

MIKE WALLER
Yacht design.

WE SPECIALIZE IN BOAT PLANS FOR AMATEUR BUILDERS
We provide stock boat plans for both monohull and multihull sailing vessels, including sailing skiffs and sharpies. Our designs mainly feature timber construction, in plywood or cedar strip plank composite construction, using the W.E.S.T. system (wood epoxy saturation technique). Our designs are intended mainly as cruising boats, although several have done well in racing. All designs are suitable for amateur boat builders.

MONOHULLS
multihulls , photos from our builders.

Photo galleries are provided on each design page where available
[email protected]
Category: Our Catamaran Build Kits
Recommended equipment.
Quality suppliers & manufacturers
The schionning team have a lot of contact with equipment suppliers and manufacturers, and hear feedback on certain brands or systems from our many customers. there are many schionnings cruising the world and testing products longevity and the customer service offered by the manufacturer., on this page we will list products and companies that we know to provide above average quality and service. it is always growing, and if your company provides equipment used on our designs and you would like to be included - please contact us., engines & drive systems.

Visit: https://oceanvolt.com
Batteries, Power Management

LITHIUM POWER (VIC)
Back in 2013 I knew that my boat batteries were reaching the end of their lives, I had been researching LiFePO4 cells for a few years and decided that I should install them. Unfortunatly I was unable to find a local supplier. So Lithium Power was established.
Technical Information
The technical information page is a collection of documents (mostly in pdf format) on the materials and systems used in schionning catamarans. including data sheets, engineering information, strength comparisons of each core material and informative articles from jeff outling the design of certain system such as engine choices and main sheet systems., detailed engineering data for your research, we understand that getting your head around the process of building your own boat, or having one built, can take a little while. to gain a greater understanding of the materials used in our designs, the below data sheets have been supplied by atl composites, and contain all of the technical data you could need regarding the composites we use. in addition are articles or documents written by jeff about certain systems used on our designs and why., all technical information and data sheets on west system/duflex/durakore provided courtesy of atl composites. for more information please see the atl composites website here., documents library.
Information Sheet – CE CERTIFICATION PROCESS
- Mainsheet Systems for Catamarans
- Motor Choices for Schionning Designs
- Weight and Weight Distribution Schionning Designs
- Schionning Designs Sailing Performance and Tips
- Hull Shapes and Performance – Power Designs
- Outboard Engines VS Diesels – Written by Ross McCombe
- An Outboard Installation That Works – Ross McCombe Follow up
- Data Sheet – DUFLEX BALSA for Catamaran Kit Builds
- Data Sheet – DUFLEX FOAM
- Data Sheet – FEATHERLIGHT Paper Honeycomb
- Data Sheet – WEST SYSTEM R105
- Data Sheet – PUMP SYSTEMS
- Data Sheet – MICROFIBRE BLEND 403
- Data Sheet – MICROLIGHT 410
- Data Sheet – MICROSPHERES 411
- Information Sheet – USING FILLERS
- Data Sheet – KINETIX RESIN Thixotropic
- Information Sheet – DURAKORE PLANKS 413
- Data Sheet – DURAKORE PLANKING 414
Kit Materials Contents
Kit materials' contents, so if you order a schionning kit, what exactly is going to arrive see an overview of the materials you will receive, and what each is used for during the build process. fibreglass cloth or tapes microspheres, microballoons or microfibers take a closer look and you can answer these questions., our schionning kits are a no nonsense, common-sense approach to building a boat. we offer great service, fast delivery and access to anything you could need for your boat straight from the supplier to your door. our construction plans and kits are sold with 100% professional boatbuilder support via phone and email, any time you're unsure or just need a second opinion, we're here..

Our kits contain all of your basic materials to build your boat to a faired shell stage, ready for painting and fit-out. We have sail-away costing estimates available for all of our standard designs, and this will give you an accurate idea of the overall cost of your project. This costing varies depending on your level of finish, as you can imagine different options vary greatly in price.
Below is a quick glance at what your Schionning Kit will include and what each item is primarily used for, we hope this is helpful and if you should require more detailed information please don’t hesitate to contact our office.
What do I actually receive?

DUFLEX PRE-LAMINATED PANELS
DuFlex pre-laminated panels are the main and most important material used in our kits, predominantly in the flat panel designs, however they are used in Strip-planked designs also, though to a lesser extent. These panels are 2400mm x 1200mm and are CNC routed to speed up build time on our Wildernes X Series, as well as some of our power designs. For internal furniture, a paper honeycomb core is used instead of the end-grain balsa wood core that is used for main structural areas. The use of this is purely to save weight in the shell and therefore produce a faster, more responsive catamaran.

KINETIX LAMINATING RESIN & HARDENER

WEST SYSTEM EPOXY RESINS

FIBREGLASS TAPES (DOUBLE BIAS)

CARBON FIBRE CLOTH

FIBREGLASS CLOTH
The kit process, building your own boat can be a daunting prospect, however to demonstrate each step in the kit assembly process, we've created this guide for you to study. as you can see our kits are the ultimate in building efficiency and have been streamlined over 30+ years to ensure that you're on the water faster and with less effort., how does it all go together.

The first step to building your dream catamaran begins with a strongback – this is a square frame used to position the temporary frames that will be used to form the hull shape. This frame will be set up and must be square and accurate, a string or laser level can be used to achieve this.

The forebeam is now installed along with the striker attachment fitting, as shown above. The bridgedeck is installed shortly after and taped onto the bulkheads with webs installed, this now completes what is a quite stiff and strong platform to work on.

Now that the bridgedeck is in place, the forward webs and dash will be fitted. At this stage, all furniture and internal work begins, with the main panels left off for ease of access when working.

Material Choices
Schionning material choices, solutions that work best for catamarans & why, our designs are based on cored composite construction techniques using west system epoxy resin and knitted fabrics. but given the range of today's composite technologies, which solution works best for catamarans and why written by jeff schionning, selecting the correct materials, resin choices.

It also fully protects the boat against water absorption and it can not develop the dreaded Osmosis.
We choose ATL Composite’s resin systems for their superior quality, reliability and value for money.
Having worked closely with the ATL Composites team and their products for many years, we know we can stand by their material solutions, and rely on great service should something unexpected happen.

This may not seem important but when working with a material for an extended period of time, the small things make all the difference.
CORES Which One to Use?

- End-Grain Balsa – 150kg per cubic metre
- Superlight Balsa – 94kg per cubic metre
- Western Red Cedar – 360-380kg per cubic metre
- Foam – 80kg per cubic metre
BALSA END GRAIN (150 kg/cubic metre)
Balsa has very good values and we can produce a shell using a very light laminate. It will be very stiff and very resilient to fatigue.
It has exceptional qualities including very high compression strength, extremely good sheer capabilities and fantastic sheer stiffness.
Compressive strength is the resistance to collapsing when pressure is applied perpendicular to the surface as when pushing directly onto the material with the point of your finger. Balsa is far stronger than Foam (80kg/cubic metre) in compression.
Balsa is also very strong in shear. This is when the core sample is held flat between your hands, one hand slid one way and the other slid the opposite way, when the core tears through the middle the core has failed in sheer. The amount of stretch you feel before the core shears is shear stiffness. To compensate for sheer weakness the core is made thicker. So 13mm Balsa may be equal in sheer to 19mm Foam.
(80 to 200 kg/m³)
There are many boats sailing that are built from foam as it’s mechanical properties are good for boat building.
- Initially one would expect this cat shell to be lighter as it is ½ the weight of Balsa. We do have to compensate for its weaknesses and will then add to the reinforcement the reinforcement on the outside to spread that compression load over more core and need a triaxial type weave to compensate for the veneer content that runs fore and aft on the Durakore.
- Secondly, we need to increase the Core thickness to compensate for the shear value, usually neutralizing the weight advantage.
- We only use structural foam core that is closed-cell and cross-linked.
The end result using foam core amounts to a very similar total boat weight. Professional builders can achieve a good result but usually use vacuum bagging and very good molds to achieve this.
Secondary Issues
Balsa can absorb water. It needs extreme neglect to rot (very unusual). Water soaks along the end grain quickly. It travels very slowly across the grain. We use balsa under the waterline especially because of it’s high compression strength for beaching etc. any core type must be sealed. Damage to all cores results in the same sort of repair. Notice a damp spot remaining when drying out to anti-foul… simply grind back the surface glass exposing the core, dry it out and re-glass – it’s that easy.
Timber cores are cheaper than Foam in most cases.
A light, high tech cat returns a far better (often 2 – 3 times) re-sale than lower tech materials. Often saving $10,000 on materials initially, loses $200,000 on re-sale – a serious reality.
Our boats can be built using Balsa, Foam or Western Red Cedar. Combine strength, stiffness, lightness and cost, with ease of use – it just makes good sense!
- Search for:
No products in the cart.
Return to shop
- 34′ x 12′ High Speed Catamaran, 36 Passengers
- 31′ x 12′ High-Speed Catamaran, 24 Passengers
- Sponge Docks Skiff 13
- Sponge Docks Skiff 16
- Sponge Docks Skiff 19
- F1430 Sit-On-Top Kayak
- F1830 Sit-On-Top Tandem Kayak
- MASH 24ft family cruiser
- OzonaX Nesting Pram
- 15′ RoG Micro-cruiser
- F1430 Sit-On-Top Kayak PDF Assembly Manual
- F1830 Sit-On-Top Kayak PDF Assembly Manual
- Ozona X Nesting Pram PDF Assembly Manual
- Sponge Docks Skiff 13 PDF Assembly Manual
- Sponge Docks Skiff 19 PDF Assembly Manual
- Ozona X Nesting Pram
- Okoume Marine BS1088
- Meranti Marine BS1088
- Ozona X Sail, 70 square feet
- Ozona X Spar kit
- Epoxy Resin, Laminating, FGCI 1 Gallon
- Epoxy Activator, 2:1, FGCI 1/2 Gallon
- Epoxy Activator, 2:1, FGCI 1 Gallon
- Wood Flour 5Qt (Premium Hardwood)
- Fumed silica 5QT
- Microballoons 5QT
- E-Glass cloth 4oz/sq.yd. 50″ wide
- E-Glass cloth 6oz/sq.yd. 60″ wide
- MASH, 24ft Cruiser
- 15′ RoG Micro-Cruiser
- F1430 Sit-On-Top
- F1830 Sit-On-Top Tandem
- Tooling and CNC

The F1430 is a unique Sit-On-Top stitch and glue kayak. Combining stunning classic looks with modern wood-epoxy construction, this kayak will easily weight in at less than half of your typical roto-molded fishing yak; And once you’re on the water, you’ll catch not only fish but plenty of attention from fellow paddlers. Deceptively simple to build, it boasts plenty of stability (enough for the designer to stand up for a selfie!), lots of storage with the possibility of converting one of the two watertight cockpit compartments to a live-bait well. Innovative cedar scuppers both in the cockpit and in the storage area. Fully watertight forward hatch will allow stowage of gear and extra cloths. The design lends itself well to a conversion to pedal drive , again by converting one of the two cockpit storages.
Aircraft-style lightening holes in the structure and optimization of unsupported panel sizes, paired with strategic carbon reinforcement yields a structure so light and strong that this boat will be a breeze to paddle and to get up to speed, even loaded up.

LOA: 14′, 4.27m
Beam: 30″, 0.76m Draft: 3″, 7.5cm Displacement*: 240lb, 110kg
*275lb maximum comfortable carrying capacity.

Construction gallery

Complete kit
$ 1,249.99 – $ 1,329.99 Select options
Wood Components
$ 799.99 Add to cart
Plans (Paper)
$ 99.99 – $ 199.99 Select options
Plans (Download)
$ 59.99 – $ 159.99 Select options
Assembly manual (Download)
$ 7.99 Add to cart
Username or email address *
Password *
Captcha *
Remember me Log in
Lost your password?
TRI-STAR 24
Tri-star 25.
TRI-STAR 25 Study Plans $40.00 Add To Cart TRI-STAR 25 Plans $550.00 Add To Cart
TRI-STAR 26 MT
Tri-star 27-9, tri-star 31, tri-star 31 cm.
TRI-STAR 31CM Study Plans $40.00 Add To Cart TRI-STAR 31CM Plans $600.00 Add To Cart
TRI-STAR 32 XR
TRI-STAR 32XR Study Plans $40.00 Add To Cart TRI-STAR 32XR Plans $600.00 Add To Cart
TRI-STAR 35
TRI-STAR 35 Study Plans $ 40.00 Add To Cart TRI-STAR 35 Plans $ 650.00 Add To Cart
TRI-STAR 35 XR
TRI-STAR 35 XR Study Plans $40.00 Add To Cart TRI-STAR 35 XR Plans $700.00 Add To Cart
TRI-STAR 36
Tri-star 37 xrc.
TRI-STAR 37 XRC Study Plans $ 40.00 Add To Cart TRI-STAR 37 XRC Plans $ 800.00 Add To Cart
TRI-STAR 38 / 39
Tri-star 40 lw, tri-star 42, tri-star 43 xrc, tri-star 43 mc, tri-star 44 lw, tri-star 45, tri-star 49, tri-star 50, tri-star 51 mc, tri-star 54, tri-star 60 / 63, tri-star 65, tri-star 80, tri-star 104.
Email us for availability and prices
STRIP PLANKING GUIDE
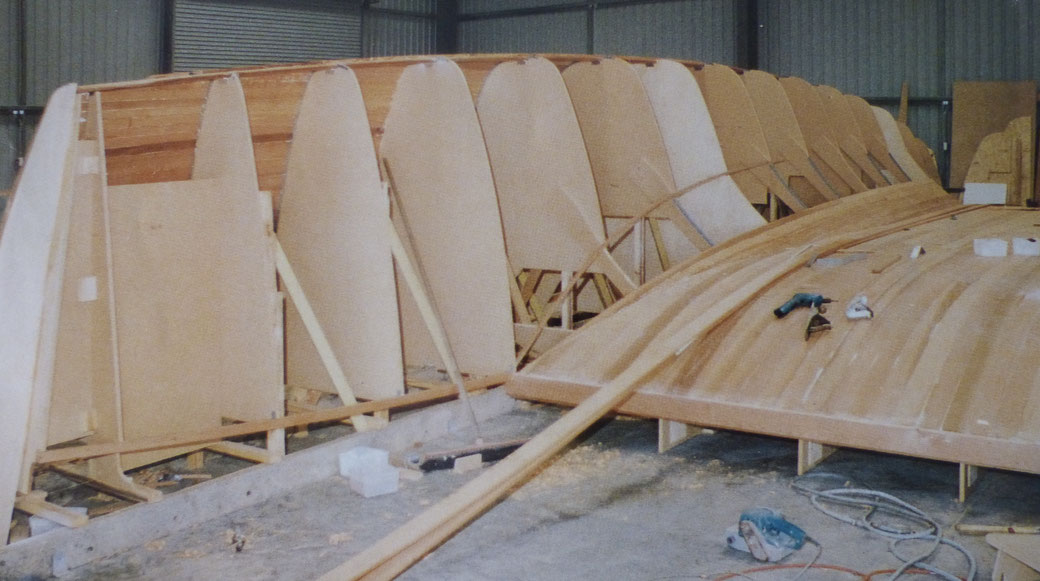
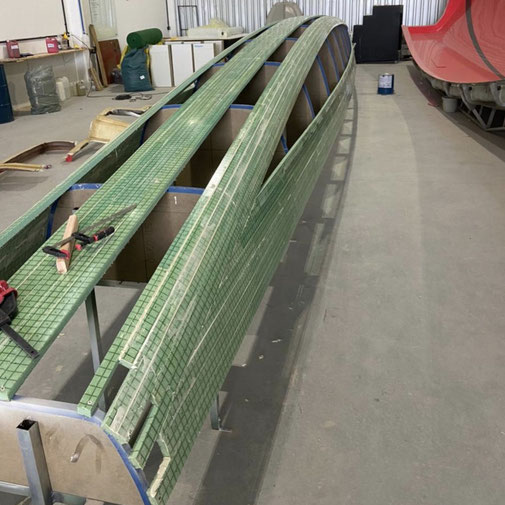
Above: The plug for the Chincogan 40 catamaran, entirely planked in western red cedar, with the plug later becoming the first boat after molds had been made.
IT'S NOT THAT HARD
Strip planking a boat hull is very straight forward process that doesn't take a great deal of skill or technical capability. But there's a few basic principles to follow. The most important one is the orientation of the planks which we've covered under "Planning the Planking".
PLANKING PROFILE
If you follow the techniques of the strip plank canoe and kayak builders (Pinterest is one good source) you'll notice a lot of them machine the strips to a concave/convex profile so they fit really snuggly on the mould frames and a minim of glue is used.
I've seen this done on offshore sailing catamarans as well but unless you're fanatical about detail it's probably overkill for larger boats. There is more cost for the machining and more wastage in the lost timber. Rectangular planks work fine.
PLANKING WIDTHS
The wider the strips the less glue joins you have to make. However wider planks create wider flats and higher ridges on the joins creating more work to fair the hull. A good compromise is wider planks on the keel plank and on the flatter hull sides, and narrower planks on the bilge curve.
For a hull bottom in the 40' to 50' size range I suggest a plank width of about 45mm for about two thirds of the area, and scale down to about 30mm for the bilge curve.
If you're going all the way up to the gunnel with the planks you could increase the planking widths to 70mm, 90mm or more if the topsides are flat enough.
GLUING TECHNIQUE
One method I've seen used is dry planking - whereby all of the planks are simply laid up dry and then the glue is screeded into the gaps when the planking is all done. This method relies on getting the consistency of the glue just right. If it's too thin its going to run through the cracks onto the shop floor below. If it's too thick it's not going to fill all the voids. Keep in mind that the width of the gaps between the plans will vary as the curvature changes so no consistency is going to be absolutely perfect for every part of the hull.
My advice is not to use this technique unless you "know what you're doing".
Another way of speeding up the gluing process is to clamp several planks side by side and run a squeegee or a cartridge gun down the line covering them all at once. Be careful not to apply glue to more planks than you can carefully lay before the epoxy begins to set.
The strip planking work can proceed very quickly with an efficient team of two or three workers. If I remember correctly we were able to plank the hull side of a 40' catamaran in two days with three workers. But don't be tempted to rush the job. Keep the planking neat and tidy. Clean up as you go, especially on the inside as much as you can. A bit of extra clean up work can save a lot of sanding later.
SELECTING MATERIALS FOR THE STRIPS
Western Red Cedar is forgiving and easy to work with. The main downside is that it's more expensive than it used to be in the 1980's and 90's when strip planking was probably the most popular method for building one off sailing boats.
Another relatively light timber that appears to be rot resistant is Pawlownia which is readily available in South East Asia and possibly in some western countries as well.
Strip planking with foam/glass strips has become a very popular method of creating round bilge hulls while retaining the light weight and durability of the PVC foam/fibreglass combination.
Typically full size foam sheets (1.2m x 2.4m) are joined up to the full length of the hull (the foam can be simply but joined with an epoxy glue) and laid up with unidirectional glass in the x axis (along the hull) both sides of the core. . The panels are then ripped into strips of the required width.
A possible compromise between the solid timber and the foam glass strips is to us ATL's Durakore with a PVC foam core and Hoop Pine veneers on each face. This is probably slightly more expensive but the panles dont need a glass laminate prior to planking and the timber faces are easier to fair than glass/epoxy.
PLANNING THE PLANKING
This is pretty basic, but it's important to a tidy job and if you don't get it right you can create a lot of hard work for yourself. Quite simply; Don't cross the bilge curve. Plan your planking operation so that your planks will run parallel with the tightest curve in the hull. Crossing the bilge curve at an angle will force the planks to twist and this can cause a lot of extra fairing work.
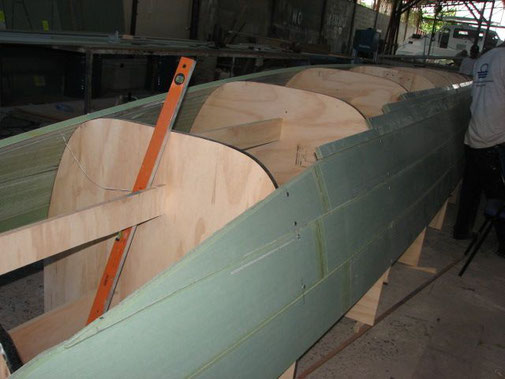
A great shot of the hull shoe planking on Raku 48 Mint. There are different ways you can approach the planking operation and I don't know exactly how it was approached on this hull; but here is one way it could have been done:
1. A marking plank was laid along the bilge curve, not glued in placed but used to mark the lay of the bilge planks.
2. A second marking plank was laid parallel I guess about 300mm further down the hull side. This determined where the lower planks (on the mould) would be trimmed off.
3. A plank is then rebated into the mould frames on this line and covered in plastic to provide a solid backing for the saw when it comes time to trim these planks.
The same can be done on the keel line to assist with trimming the keel planks.
4. The bottom planking is completed and then trimmed off as planned. Note that it would have been reasonably easy to clean up excess glue on the inside face while this was being done. Not quite so easy for the upper planks when doing the second side.
The narrower planking on the bilge and hull bottom can now begin and proceed up to the keel where once again it is trimmed along the keel line.
It is recommend to partially plank each side concurrently to avoid putting a lot of twisting load on the mould frames and strongback.
5. When closing in the final planks on the second side it will be necessary to fit some of the planks by spiling the ends to meet the keel line.
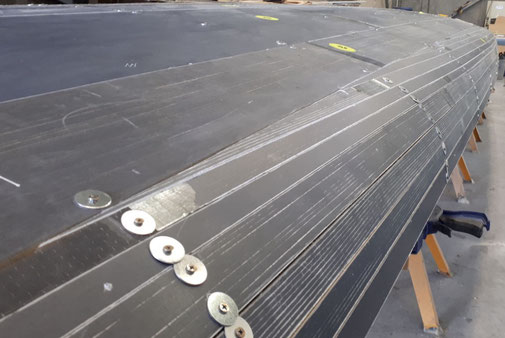
Bottom planks on a Barefoot 40 hull, ready to be trimmed off where they meet the marking plank. No backing plank has been provided for the trimming operation in this example.
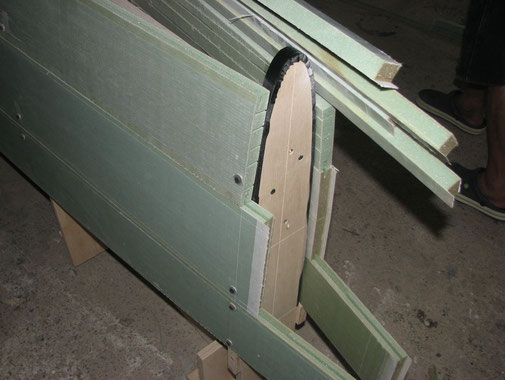
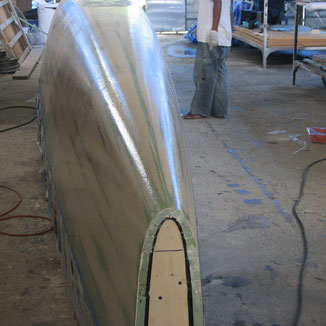
Barefoot 40 detail and the stem. The planking is 20mm thick and the final planks at the keel line have been cut down to about 25mm wide.
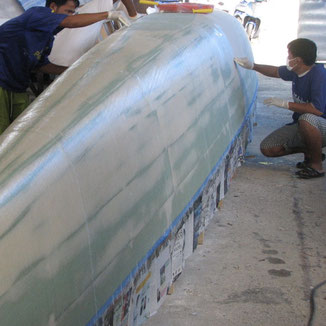
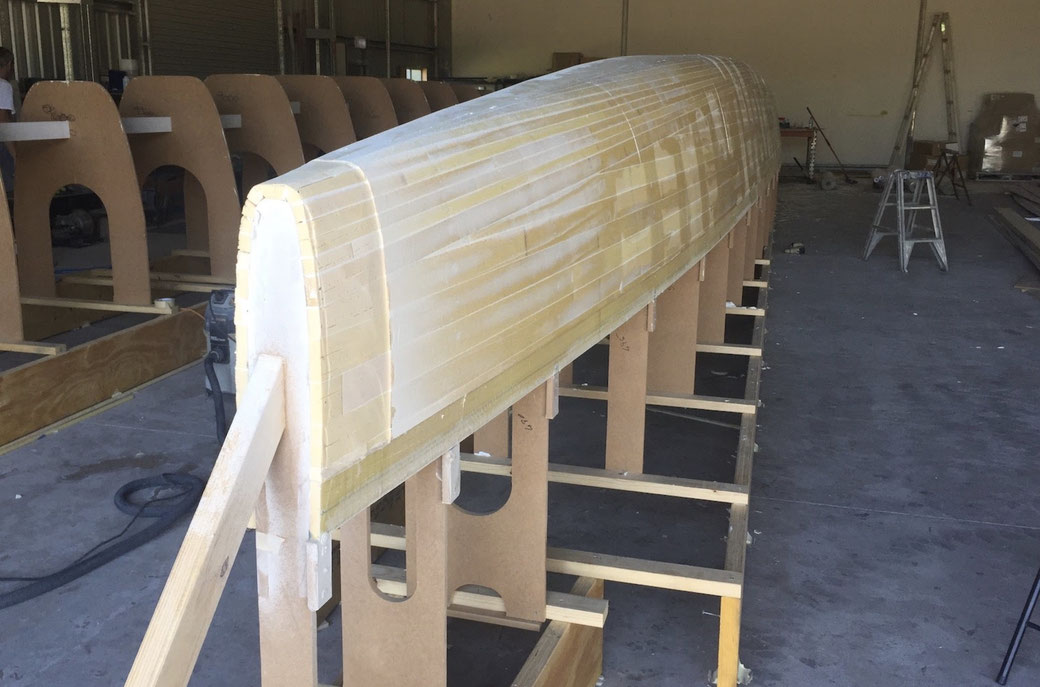
Biaxial Glass at ±45˚ has been laid across the hull over the finished planking. The joins in the glass do not need to be overlapped. The laminators are pulling excess resin from the laminate with squeegees.
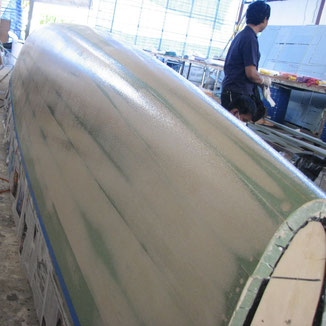
Laminating of the external hull surface completed.
Two extra coats of epoxy have been applied to ensure the hull is well sealed.
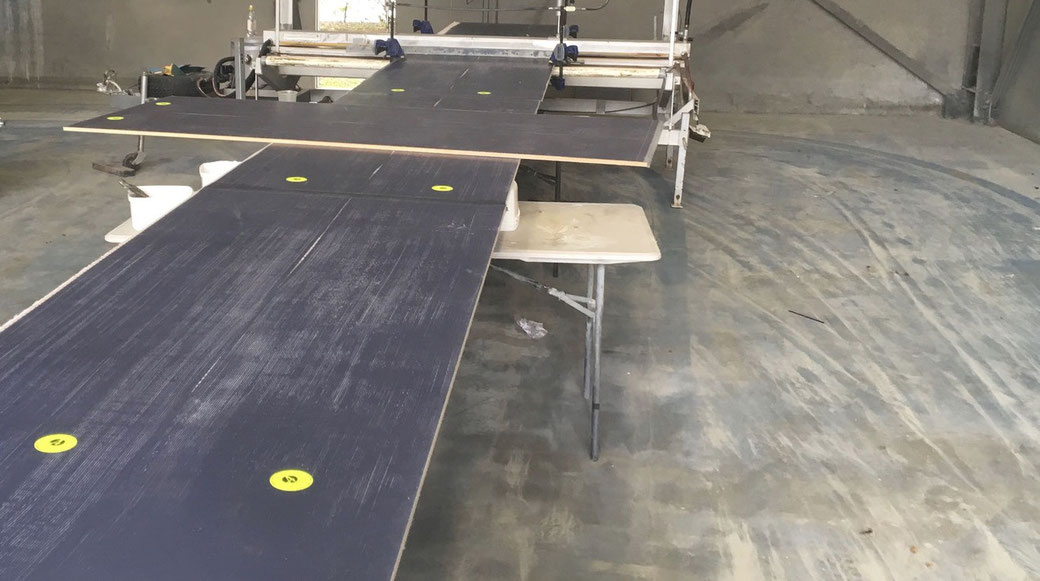
Construction of R42 Trimaran Venom. Panels of PVC foam with unidirectional carbon skins are being joined up to the length of the boat using a heat press supplied by ATL Composites. The heat press greatly speeds up the joining operation but if you don't have access to the heat press you can also join the panels using screws and clamping boards. (see this link)
Strip planking the outriggers for R42 trimaran Venom.
Two shots of the first hull for the Raku 44 trimaran under construction in Brazil. You watch progress of the construction for this boat on this link.
Join the Newsletter

- Scroll to top
This page is currently unavailable
Sawfish, the Unsinkable, Lightweight, Foam Kayak, Free DIY Kayak Plans, Anyone Can Build

Introduction: Sawfish, the Unsinkable, Lightweight, Foam Kayak, Free DIY Kayak Plans, Anyone Can Build

Do you really want a kayak? Want one so bad you can taste it, but can't afford one, or think you don't have the skills to build one? Then I have a few questions for you.
Can you cut a crusty bagel with a knife, stack blocks, stick a sandwich together with mayo, skewer meat and veggies for kabobs, grate cheese, cut thin fabric with scissors, stretch wrinkles out of bed sheets, and roll paint onto a wall? Then you can build this boat!
Unlike most boat plans that require you to do a whole bunch of reading and learning, require you to buy or own lots of tools and learn what seems like a whole new language devoted to boat building. I designed this boat, and wrote this I'ble, to be as simple as possible. You don't need any boat building books, or much in the way of tools. You can find everything you need to build this boat at hardware stores, the internet, and discount stores. When you are done, you will be a real boat builder, and have an excellent boat to show for it.
While I have built many plywood kayaks, from a simple free design called a mouseboat, to a fast capable tandem kayak called a Larsboat , they all have a few problems. They are made of plywood, and since I am cheap, and don't buy the expensive marine plywood, the cheap plywood must be taken care of or it fails after a few years. I designed this boat to use as little wood as possible, and to be nearly indestructable, It won't rot, and even if you punch a hole in it, it won't sink.
I am on FB pages dedicated to kayaking like " kayak DIY projects and tutorials ", " cheap boat yakkers, no snobs allowed ", " church of the double bladed paddle ", " Duckworks ", " kayak building ", and love to see the pictures of people on the water, I believe this boat could get more people out on the water for less than any other plan out there.
On top of how easy this boat will be for the first time builder, it is also lighter than just about any other type of boat out there. If you struggle to get a kayak onto roof racks, or hate to carry your boat any distance because of how much it weights, Sawfish is what you want. Weighing under 30 lbs, it is easy to carry any distance and to lift onto a roof rack. I designed it for my parents who are both retired, and found themselves unwilling or unable to deal with the weight of their current SOT (sit on top) kayaks. I've found it easy to carry my sawfish kayak down some fisherman trails to awesome launching points I wouldn't try with a heavier plastic boat.
In spite of the simple build, and low tech materials, Sawfish is not slow, I normally cruise at 4 MPH on my GPS, and can sprint to just over 5 MPH. I can also stand up in Sawfish, though I don't recommend this, unless you have excellent balance, and don't mind getting wet.
Thanks to the unusual building materials, Sawfish will not cost very much compared to just about any kayak you can buy or build. I have built six Sawfish so far, my best estimate on cost of materials comes to $125 to $150 US. One builder (floater and Sawgundo) said he built both kayaks for $175. Depending on what you can scrounge or have lying around, you might do even better.
there are now over 100 Sawfish kayaks that I know of, and probably some more I don't know about, I hope you send me a picture of your boat in the water, post it on youtube, instagram or whatever, the more you share, the more like it is that people will also build their own and be out enjoying their own kayak instead of just wishing.
for a little more motivation to start building your own kayak today, here's a playlist of some DIY foam kayaks.
If you want to just watch a playlist of how to build a sawfish click here
Step 1: None of This Comes From an Expen$ive Boat Builder$ $upply $hop or Catalog!

this boat is built with stuff I found only in Home Depot, Walmart, and Harbor Freight here in the US, it can all be found in a Lowe's and most likely a Menard's. I'm not sure what you have to shop at in other countries, but if you have a hardware store nearby, most of this can be found there, though probably not at the costs I can get it for here. (except for the people's republic of California, foam, like everything else, is "known to cause cancer in the state of California". pretty much anything but weed comes with that warning there)
first you need foam, I build these boats out of XPS foam (extruded polystyrene), while the beaded white foam is cheaper and sometimes easier to get, it is not as strong, and will soak up water. XPS is a closed cell foam, even if cut or gouged, it will absorb no water. You can ask your store about ordering some 2" XPS for you, however most people seem to find the store will expect you to buy the whole pallet, at $33 a sheet, times 24 or so sheets, you would be looking at close to $1,000! That would be enough for 12 Sawfish kayaks!!! {Asking around full time insulation installers has gotten some people luck, others have found asking around construction sites. turns out many times most of a panel is tossed just because they used one corner of the sheet} Any place that installs foundations probably knows where to get it, or might have some, XPS foam is used to protect and insulate the outside of the concrete in new foundations.
To build a sawfish you will need:
-two sheets of 4x8 foot 2" thick foam. (1.21 x 2.43 m 50.8 mm)
-the largest bottle of gorilla glue you can get, I find an 18oz bottle will be more than enough for one boat. If you are building a few boats, get a second bottle. I order gorilla glue from Amazon. Be aware that the glue will thicken and cure in the bottle from humidity, so don't buy too much, only what you can use in a few months.
-old bed sheets, fabric remnants, or canvas drop cloth. (the more synthetic in the fabric the harder to get glue to bond to it, and the harder to get paint into the fibers) asking around at hospitals, nursing homes, or hotel laundries may get you some free, torn or stained sheets. I buy mine at charity thrift stores, look for queen or king size, flat (not the fitted one with elastic edges) and thicker and less stretchy. Some people use muslin or even linen, just remember the thicker it is the heavier your kayak will be.
- bamboo skewers , the grocery store or walmart
-gallon jug of titebond II
-1 gallon exterior house paint, check the oops paint rack in the paint department every time you visit, they might have the color you want for a much cheaper price.
-two gama seal bucket lids the paint department of Home depot stocks them in black around here. I found them in white at a lowes, Amazon has 6 colors
-plastic packing tape 2" or wider. duct tape, masking tape, etc will also work
- plastic cutting board ,
-a tube or two of PLpremium construction adhesive, the 3x is best and cheaper (you can skip this to save money by using gorilla glue instead)
- strips of 1/4" plywood, cheap wooden yard sticks , etc. you need almost 15 feet of them though. (every time you visit the paint department ask for a 5 gallon paint bucket stirring stick or two, in a few visits you will have enough to make the anti-dent rails)
-a few feet of nylon webbing 3/4" to 1" wide, for making handles (cheap cargo straps from Harbor freight work nicely and can do a few boats)
-about a foot of PEX plastic plumbing, or PVC tubing, for making the handles much more comfortable
-safety glasses
- warner 250 wallpaper removal tool
- hand drywall saw
- shureform
-f lush cut pliers
-bricks, paint cans, old free weights, or a bunch of 5 pound rocks, ( I call them gravity clamps)
-paint roller handle, tray and rollers
- power hand plane while you can build a Sawfish without this, just using the shureform, it will be much harder to make a smooth hull, and take much longer.
- jig saw you can do all your cutting with the drywall saw, but not as easily or quickly, with less mess.
- tape measure
-10 foot long 3/4" pvc pipe
- carpenters pencil , sharpie marker, ink pen
- measuring stick
- chalk line
-aluminum ice cream scoop (for carving those inside corners, a large metal spoon would also work)
- caulking gun
-r azor knif e
- 1/2" spade or drill bit
-power drill
-phillips and regular screwdriver set
Step 2: Butterfly Scarph Joint

In plywood boat building you always run into one fact, plywood comes in 8' lengths, boats that short are slow. To make plywood long enough to have a fast shape you must join two or three panels together.
While there are many ways to do this, the best is called a scarph joint, I "invented" my own joint for making longer foam panels. In reality it is a "butt" joint, but I like to call it a scarph joint, (butt joints do not flex the same as the rest of the plywood panel, so they must be put in the middle of the boat where the least curve is happening, a scarph joint will flex just like the rest of the panel and can be put anywhere. since the butterfly joint can flex the same as the rest of the panel, I call it a scarph joint)
Start by using the wallpaper scoring tool to perforate the faces to be glued, this gives you the best glue joint possible. Rub the perforated ends with your hand to remove any little chunks of foam torn loose.
Lay the sections to be joined together along the join line as tightly as possible.
Run a strip of tape along the length of the joint and you want the tape to extend past both ends of the joint by a few inches.
Now fold one section of foam back on top of the other using the tape as a hinge.
Apply gorilla glue in a zig zag pattern from the top of one panel to the bottom of the other and back, this will get glue into as much area as possible.
Fold the top panel down again.
Flip both panels over so the tape hinge is on the bottom of the joint.
Lay the joined foam panel on a flat surface and apply weights along the joint to force the joint shut.
Fold the ends of the tape up to trap the glue that would run out of the ends of the joint.
Once the gorilla glue is cured, remove the tape, sand off the beard (glue that ran out of the joint and cured)
look for these blue hyperlinks throughout the instructable to find youtube links I made for those who learn better from watching than reading, this is the one for the butterfly scarph joint
you can cut the second panel to the correct length before gluing to make it easier to move them around. For a 12 foot boat, cut the second panel at four feet, for a 14 foot cut the second to 6 feet, etc.
Step 3: Getting Your Ducks in a Row

>this is easier to do on the floor than on a table, the foam is softer to kneel on than most floors.
I give dimensions for a good all around paddling boat in this instructable, if you are building a fishing type boat or copying the dimensions of another kayak you can watch this and apply your own measurements.
here is the video of a 14 foot tandem kayak layout for paddling.
>from the long side of the foam panel, mark each end 14 inches (35.56 cm) from the same side.
>mark a centerline onto the foam panel between these two marks at the ends, using the chalk line or a straight edge. this is the centerline of the boat
centerline video
>Using the tape measure, mark each foot (304.8 mm) along the centerline.
>lay out the hull dimensions from the centerline.
stations and dimensions video
at the bow measure and mark 1 inch (25.4 mm) to either side of the centerline
at the 6 foot (182.88 cm) station measure and mark 14" (35.56 cm) from the centerline to each side
at the stern measure and mark 2" (5.08 cm) to each side of the centerline
>Now take your PVC pipe (batten) and use the bricks (ducks) to line up the pipe along the points you just marked. Make sure you stage the ducks (bricks) at the same place when drawing each side, this keeps both sides with the same curve (fair), stack up bricks as needed to keep them from being moved by the resistance of the PVC pipe to bending. hold the pencil vertically as you trace the batten onto the foam.
tracing video
Since the hull is 12 (3.6576 m) feet long and the PVC pipe is only 10 feet, I find it best to start with the stern end, with one end of the pipe on station twelve, bricks holding it at the midpoint to the 14 inch mark, and then bringing the other end in to 12" (30.48 cm) from the centerline. Trace the outside of the batten, so that the marks for the midpoint, bow or stern are all outside of the batten. Do the other side of the boats stern, then move on to the bow. Start with one end of the batten on the zero station mark 1" from the centerline, once again have the batten run around the midpoint mark, and then bring the other end of the batten in to line up with the line you already traced.
>Using the tape measure, measure 18" (45.72 cm) from the edge of the hull pattern you just drew onto the foam at the bow and stern. Mark each 3" (7.62 cm) from the pattern edge to 18" (45.72 cm). Do this at the bow and stern.
Step 4: Now Cut It Out

>Now take the wallpaper removal tool and score up the faces of each foam panel, each of the holes left by the spikes on the tool will allow glue to penetrate into the foam deeper. I prefer to think of the holes as becoming thousands of tiny nails that pin the glued joints together. Peeling of the fabric later on for modifications to the boats has proven this to be true.
BEFORE YOU CUT ANYTHING, DO A SYMMETRY CHECK OF YOUR HULL SHAPE TO AVOID ANY MISTAKES. MEASURE TWICE, CUT ONCE!!!
symmetry check video
>Using the drywall saw or jig saw, cut out the bottom blank , the section with the center line marked on it.
Step 5: Ribs

>take the bottom blank and match it up with the 3" marks you made at each end of the panel.
> trace the edge of the bottom blank. (I show 2" wide ribs in the video, but you REALLY want 3" ribs)
>Repeat for all six side ribs.
>now cut out each of the ribs , always cutting so that you are removing each rib from the larger section of remaining foam, it's easier to hold onto that way.
>be careful when handling the ribs, they can snap easily if grabbed from one end. Hold them in the middle when moving them, and they will not be so prone to breaking.
>take all six ribs and match them up. If you are like me, some will be a bit thicker in the middle, and others will be a little narrower. Try to put them in three matched pairs.
>The thickest set will be the bottom, and the thinnest set will be the top, the remaining two will be the middle.
Step 6: Stacking

>copy the ends of the centerline on the bottom blank over to the other side of the foam.
>snap a centerline to the other side of the foam using the chalk line.
> take the two thickest ribs and lay them on top of the bottom blank so that one goes up each side of the bottom blank.
>align the stern ends of the bottom blank and side ribs to be flush.
>using the fist digit of your first finger as a measuring tool, set the overlap of the first rib at a consistent depth at the stern.
>pin the stern end of the rib in place with a bamboo skewer
>set the overlap of the side rib at three quarters of the hull from the bow to the same depth, using the same finger tip.
>pin the rib in place at the 3/4 length
>repeat this for the middle, at the 1/4 length from the bow location and the bow. Using the same finger tip dimension
>with the opposite rib aft end lined up with the stern, and set to a fingertip overlap outward, you may find the inner tips overlap, trim the opposite rib to match the inner side of the first rib.
>pin the aft end in place, then pin at 3/4 of the boats length with the fingertip dimension, and again at 1/4 of the boats length
> you will probably find that the finger tip dimension causes the two inner ends of the ribs to overlap at the bow.
>cut the opposite rib to match the inner side of the first rib
>save the sections you cut off, they will be used later.
>go along the top of the first layer ribs and snip off the skewers so that they are flush with the foam. Save the ends as you will use them for the next layers. Use the flush cut pliers to snip away at the ends of the skewers at an angle to make new points on them. you should be able to reuse each skewer a few times.
Second and third layer ribs.
>continue to line up the ends of the ribs so that they are all flush with the stern end of the bottom blank. This gives you a flat stern for mounting a rudder or motor mount on, or just gives extra volume for carrying a load of gear in the stern of the boat for camping trips, etc.
>to give the hull extra volume in the ends, use your fingertip to set the same overlap dimension at the stern and pin it in place with a skewer
>at the middle of the boat and line up the outside of the rib so that it is even with the first layer.
>go to the bow and set the overlap with your fingertip dimension again.
>don't worry about how much the foam overlaps at the front of the bottom blank and first rib, this is done on purpose.
>trim the second rib at the bow so that it is cut opposite the first layer cut, this will add a little strength to the bow.
>repeat this for the other side of the second layer, and again on the third layer.
>on the second and third layers you may find that the two rib ends don't touch in the middle at the stern, use little chunks of foam to fill these gaps, label them so you know how they go in.
>the hull should have steps leaning further and further out at the bow and stern, but have less flare in the middle. This makes it easy to paddle, but gives it extra volume in the ends to help it rise over waves and wakes.
BEFORE YOU GO ANY FURTHER! USE A PENCIL, PEN, MARKER, OR THE TIP OF THE DRYWALL SAW TO TRACE THE INSIDE OF EACH RIB ONTO THE LAYER BELOW IT. THIS WILL ALLOW YOU TO PUT IT ALL BACK THE WAY YOU WANT IT QUICKLY WHILE THE GLUE IS RUNNING EVERYWHERE.
Step 7: And Then It Gets Messy

carefully label each layer of foam and stack them in an order that you understand.
with everything laid out so you can understand it prepare yourself for doing a lot of glueing
you may want to put a sheet of plastic under the area you are gluing since gorilla glue does not come loose once cured
you will want a bunch of some sort of gloves to keep your hands clean
you will also want old clothes that you don't care about ruining
before I glue anything, I add a 2" or so tall block under the very point of the bow and stern to lift the ends out of the water, you don't have to do this, but I think it makes the boat easier to turn.
gluing it all together
take your large bottle of glue and drizzle a thin looping line of glue outside of the lines you traced onto the bottom blank,
place the first rib on the bottom blank, line it up with the marks you made and pin it in place in the same locations you pinned the hull together in earlier,
apply the glue to the other side of the bottom blank,
place the second rib from the first layer on the bottom blank and pin it in place.
continue doing this for each layer, pinning each layer in place at the same locations and trimming off any excess bamboo skewers that stick up above the layer.
Step 8: Bringing It to a Point

if your bow is not pointy and you want it to be, the nice thing about foam is that you can glue on bits and pieces to make it the shape you want.
here I demonstrate how to do this.
Step 9: Cargo Compartments

If you are building a kayak the way I show, you will want a forward bulkhead to support the end of the front deck, and and aft bulkhead to support the front of the rear deck. Decks give you dry places to store things, and a good way to keep stuff from being lost if the kayak flips, or from everything being soaked in rain, spray or waves. The bulkheads also make the kayak much stronger and not so flexible.
my earlier boats had a shorter cockpit and a longer area covered over behind the cockpit, however my thinking has changed. I now build with a short forward deck with a gama seal hatch and a short rear deck with a gama seal hatch. The rest of the boat is open for the most flexibility.
this allows you to bring a child or dog along, without being cramped. If you like to fish, it is easy to add a crate with rod holders and other gear attached, and remove it just as easily.
It is much easier to teach a child to paddle if they are sitting forward or aft of you, and when they get tired, just take the paddle they are using and stow it away, rather than tow another child sized kayak. Since short boats are slower, towing a short kayak will be like dragging an anchor behind you.
the bulkheads, forward and aft decks and final cockpit rail layer will all come from the remaining half of the second 4x8 foam panel if you lay them out correctly, be sure to think ahead so you don't have to buy another foam panel.
to find the location of your forward and aft bulkheads ,
>get a standard plastic 5 gallon bucket, place it on the bottom of the inside of the boat. Slide the bucket all the way forward until the bottom ribs pinch the bucket in place.
>trace as much of the bucket bottom as you can onto the foam.
>add two inches from the furthest aft point of the circle, this will be where the forward bulkhead is.
>measure the length of the forward deck, from the mark you just made, to the tip of the bow
>measure and mark this distance from the stern. This mark is where the front of the stern bulkhead will be.
The stern compartment should end up being wider due to the shape of the hull
Making the bulkheads
>find a piece of waste foam that is as wide as the inside of the top ribs, at the point you marked behind the bucket ring.
there are two ways to make the bulkheads, one is rather complicated , the other is much easier
glue them in place and secure them with skewers
>secure the bulkhead in place with skewers.
Step 10: Bow and Stern Decks

this is the step you will need the remaining part of the panel you didn't use in the main hull
if you already used it for something else don't panic, you can make a deck panel out of multiple sections of waste foam
whatever you use, fit these foam sections over the bow and stern and trace the outside shape of the hull onto them.
now glue the deck in place and add skewers to pin the deck in place, and use gravity clamps to press the hull/deck joint together
Step 11: A Little Taller

my original Sawfish design had 3 layers of foam in the hull on top of the bottom blank. while this was usually good enough. I had a few times that waves washed in over the rails, I really needed another two inches of rail to keep things dry.
don't panic if this happens, I swamped my 16 foot tandem Sawfish once by accident, and discovered that even full of water, the boat floated upright and I was able to paddle through the rapids and over to the shore.
bailing it out was even easier, all I did was tip the hull until one rail was under and the boat popped out of the water on its own. If you add scuppers like a sit on top kayak, you will never need to bail out any water, the hull just wants to float
However I live up north were the water is cold, and most of the year getting wet could end very badly from hypothermia.
cockpit rails are the answer
slightly taller side rails take care of most of this problem, and are easy to add from waste foam still remaining from cutting out the hull ribs.
use long sections of waste to lay another layer of foam on top of the cockpit rails, you can section in short sections as well, you are bringing the cockpit rails up to the same height as the bow and stern decks.
you want these new sections to sit right on top of the current rails, the same width as the hull ribs they sit on.
glue and pin them in place with skewers, and use gravity clamps for a tight bond between them and the hull.
Step 12: Carving It Out

yes there is a boat inside all that foam! just like an ancient canoe builder could look at a tree and see the dugout canoe locked inside it, there is a functional foam boat inside all that rough ugly looking foam layer cake. start by taking the edges of the steps in the hull off, tapering the hull up from the bottom layer to the top layer of the side ribs. (easier to do and see if the hull is upside down)
the sureform or harbor freight knock off can do this ok, but not as quickly or easily as the power plane.
step back often and sight along the hull to see where the high spots are and avoid making a low spot.
do a second symmetry check on the hull to ensure it isn't lopsided
on the bow make the taper go all the way to the top of the deck from the bottom. I also did this at the stern to help the stern lift over any following waves. Don't make the tip of the bow very sharp, since foam isn't very strong, in thin sections and sharp edges it tends to crush easily. Instead give the bow a blunt round shape. It will spend 99% of it's life out of the water anyway.
make a nice radius from the flat bottom to the sides, and the sides to the top deck, this will make the transitions easier to lay fabric over and the hull go through the water easier.
smooth off the inside edges of the cockpit and bulkheads ,
I found the ice cream scoop best for carving out the very inside corners. if you make a divot or have a crack you want to fill, use the light weight spackle to fill them, then sand it off smooth.
Step 13: Gama Seal Deck Hatches

Since you do not want to waste all that space in the ends (where else are you gonna put your car keys, wallet, camera, lunch, nice cold drink, dry towel, etc.) you will want to add some gama seal boat hatches to the boat. Follow the instructions found here to make water tight hatches for your boat that cost much less than any boat hatch you will find in a marine supply catalog or store.
Gama seal lids are designed to snap onto the standard five gallon plastic bucket, making it into a resealable water and air tight storage container. I get them at my local Home Depot in black for $8, I have also found them at some Lowe's in white for about the same amount. You can also find them on Amazon.com, and plastic container web sites in 7 colors.
>>>The Gama Seal bucket lids allow you to do one more trick for expedition paddling, in the last picture at the top notice the 5 gallon pails in the deck holes. Pack the cargo tanks, then drop the buckets in. We use the buckets instead of expensive dry bags, though dry bags would also work in the holes. (like the 5 gallon water jug in the mouseboat ring) With the gama seal rings in Sawfish the buckets are held securely, unless the hull turned upside down they will not fall out, and even then the buckets would float.
cutting out the hatch holes
- find the correct dimension from the bulkhead to install the hatch as close to the cockpit as possible using the tape measure, also use the tape measure to mark the center of the deck panel, take the rim of the gama seal lid and find where it will be centered on the deck panel and clear of the bulkhead. Now take the gama seal ring, and use it to trace hole for the deck hatch. trace as tightly as possible around the smaller end of the ring. cut along the line with the drywall saw. trim away areas as needed to make a nice fit on the gama seal rim, small gaps will help with getting the glue in between the ring and the foam deck. DO NOT GLUE THE RIM INTO THE DECK YET! Set the completed hatches aside, they will go on after the fabric skin is on
Step 14: Some Positive Reinforcement

before you add cockpit rails, it's a good idea to do a top side symmetry check , just to be sure your boat isn't too lopsided.
Foam will get small dents in narrow areas like the cockpit rails if the kayak is strapped down to roof top carrier bars with the force on the narrow areas. to avoid these dents I added strips of 1/4" plywood to the insde edge of the cockpit rails. The boat does flex when pounding into waves, the wood rails in the cockpit rim are needed to keep the hull from bowing out or splitting. On the original sawfish (red, blue and white version) I made my rails from scraps of plywood, there is a break in each rail about a foot from the front of the cockpit. The force of the hull flexing caused the fabric skin to tear and the foam to crack right at each break in the rails. Since then I've replaced these rails with ones that run the full length of the cockpit with no breaks, and no cracks or tears have showed up in the cockpit sides. If you go with sectioned cockpit rails (stir sticks, etc), you need to have another layer of wood bridging each break in the rails. Another section of plywood, stir stick, etc that is 6 inches long (three inches on each side of the break) will take care of any stresses.
If you are going to use the seats that clip into the cockpit rails, plywood rails, at least 1.5" inches wide need to be used. >cut small pockets into the forward and aft decks, use GG applied in a looping line to glue the rails to the foam. 5 gallon bucket stir sticks from home improvement store paint counters can be had for free, just ask for one every time you visit (I had one worker give one to each of my kids to use as mock swords) those cheap wood yard sticks would also work, but they aren't free. (I noticed that Home Depot now sells wood stir sticks near the paint counter, I wonder if all of you asking made them suspicious)
You want to make sure the wood is flush with the upper edge of the rail so it will protect it, I install my strips a bit high and then sand them smooth with the rail for perfect match.
>pin each end of the rail and the middle with drywall screws screwed into the foam, so the rails won't slide while clamped.
I use some 4 inch PVC pipe cut into 1.5 inch slices with my sawzall as clamps.
>place some more paint stir sticks on the outside of the hull where the clamps will land to keep from denting the foam.
Step 15: Its a Wrap!

Now on to the step that makes all those foam layers into one solid boat. lay out your fabric sections out to get the best coverage of the hull, you want the bottom section to wrap up each side above the water line. I chose bed sheets to cover the hull as they make a lighter layer as the fabric is thinner. The bed sheets are not as strong and from time to time rocks punch tears in the fabric and dent the foam. You can just live with the dents, as they don't hurt anything, or use some lightweight spackle to fill the dent, sand the spackle smooth when dry, and sand a few inches around the spackle, then use more exterior paint to glue a patch over the dent. Or use heavier fabric. Using canvas like the canvas drop cloths from Home Depot will make a tougher skin, it will also end up using more paint and weighing more. once you have your layout figured, use a pen or marker to mark the way the fabric should be. this will come in very handy as you are trying to smooth the fabric into the glue.
Step 16: Poor Man's Fiberglass

take some time to read the whole Poor man's Fiberglass instructable , we will be using the TBII method, as we are working with foam.
I use queen or king sized sheets from the thrift store as they cover the most area. I look for the sheets that are mostly cotton, don't stretch as much, and are thicker. You can use fitted sheets (elastic in the corners) but flat sheets are the best. I cut away any seams or edges that are thick, as these leave lumps in the boat hull.
dump a generous amount of TBII into the paint roller tray, using an economy paint roller, roll a coat of TBII onto the foam, start with the bottom of the hull near the stern, as it is flat and easiest to learn on it.
If you leave a flat stern on your boats the way I do, start by covering the stern , wrapping fabric around each side of the boat from the stern, and slicing the wrinkles and overlapping the edges to get it all to lay smooth. I try to use a scrap from a previous job for this, if you don't have any, use an old pillow case, or cut a corner of the big sheet off. You want a piece big enough to completely cover the stern panel and overlap a few inches around each side beyond.
put marks on the fabric to help you remember how you want it to sit when you glue it.
roll glue onto the stern, you have the right amount of glue rolled on when you can see that every pore in the foam the werner 250 made has a dot of glue in
lay the fabric into the glue using your alignment marks, then use your gloved hands to press and pull the fabric smooth, working any bubbles or wrinkles out from the middle to the edges. Roll glue onto the panels around the stern, far enough to glue the extra fabric down.
Wrinkles will show at the corners, slice the top of each wrinkle with the razor blade, and glue the upper edge (boat upper) over the lower edge. some corners will require multiple slits to get it all flat, don't give up until it is all down.
work all the way around the stern, then give the TBII some time to tack up well before moving on to the next panel. 10 min should be plenty.
Now drape the large sheet over the bottom of the hull , diagonal with a queen or king size sheet will cover the whole bottom of the boat for a 12 footer.
fold back the last three feet of fabric from the stern of the boat and roll on a coat of TBII on the bottom flat panel only, save the sides for later.
fold the fabric back over the glue and working from the point of the stern, smooth any wrinkles out of the fabric with your gloved hands, pressing the fabric firmly into the glue.
Once you have the fabric all smooth, pick up the unglued fabric from the bow end and fold it back over the glued fabric on the stern.
Pull back the last inch or two laying in the glue and roll on another two to three feet of glue, lay the fabric into the glue and work from the anchored end of the fabric already in the glue, up the middle of the fabric and out to the edges. where the fabric goes over the edge of the bottom you can leave it hanging and glue it afterwards.
If your fabric was to short to cover the whole panel , overlap the next section by two or three inches and start the next section.
Once the bottom is on, start on one side . Due to the curves of the hull the fabric will end up with wrinkles after it is pulled and pressed into the glue. use a sharp razor knife to cut the center or one side of the wrinkle, then use a small brush to glue one edge of the cut over the other so that the wrinkle is now flat.
roll glue onto the fabric where it will overlap another section, do this by folding back the overlap and rolling glue onto the folded back section.
Avoid having glue seep through the fabric as much as possible, as this will keep the paint from sticking to and filling the weave of the fabric.
trim off the over hanging fabric where needed with a pair of scissors.
The one place I used heavy canvas drop cloth on this kayak was the cockpit floor, I wanted the most strength and protection for the floor, and an anti skid treatment as well.
I cut the floor canvas an inch or two wider than the cockpit so it would overlap the bed sheets used to cover the sides of the cockpit. this overlap is how different sections of fabric become one skin when glued together.
once the floor fabric is bedded in with glue on the bottom, give the glue time to cure enough to lock the bottom fabric in place. (about a half hour depending on temp and humidity) glue the ends of the cockpit canvas in place.
cut the corners at an angle from the center of the three way joint between sides, ends and bottom, wrapping the fabric from the ends onto the sides.
Once the end fabric is in place, glue the sides. in place.
I trim the cockpit canvas just at the bottom of the cockpit rails, then use long strips of cotton bed sheets to cover the rails and overlap the canvas on the inside and the edges of the bottom sheet on the outside.
once the top deck fabric glue cured I used a razor knife to cut the fabric out of the deck holes, then fit the gama seal deck hatches in place. I cut slits into the deck to lock the tabs on the rims into the deck.
Using PLp glue the rings into the deck, lay a bead of PLp around the rim near the top, then press the rim into the deck aligning the locking tab in the deck slots. screw the deck hatch into the rim to maintain shape as the PLp cures, and lay bricks on top for a good seal.
Step 17: Add Some Color to Your Cheeks

unlike the thick canvas I used on the teardrop in the PMF I'ble to cover plywood, thin bed sheet cotton will not hold much paint, at most you will only need two layers of paint, paint it with the color you want from the start.
use a paint roller and tray and roll on the color paint you want.
Once you paint the thin fabric, you can change colors, but it won't ever stick as well as the first coat does.
I originally had a red, white and blue hull, now it is yellow and blue, my favorite combination.
Step 18: Keep It Straight!

I found Sawfish tended to wander from side to side just a bit when paddling, I needed a way for the kayak to go in a straight line, so I came up with a plastic skeg . This skeg was a bit undersized, while I could make the kayak go where I needed with a bit of extra muscle, It is just to small for safety. (My wife was caught in a strong wind in Sawfish recently and ended up on the downwind shore, she just couldn't get the bow to turn into the wind, no matter how hard she paddled) At the same time some friends of ours were also out on the same pond and were able to make it back thanks in part to the long strake I added to their Sawfish kayaks.
In their case this strake runs all the way from under the forward bulkhead, to almost the end of the stern. This seems to be a good length, without causing problems with getting in and out of the boat with the bow just resting on the beach. However their foam strake caused another problem, the stern of the kayak was out of the water because the extra foam pushed it up. This causes the bow to be down in the water, making them slower.
I tried a strake made of foam on sawfish, but found it made the boat slower. You may have noticed the foam strakes on the outer edge that some people have added to replicate the designs found on plastic kayaks. It turns out that those extra edges molded into plastic hulls are not for stability or tracking, but instead to keep the thin plastic hull from deforming in the water.
The foam strakes make the boat slower, which makes sense, because they cause drag.
Look at the way fish are designed, they have smooth bodies and thin fins to reduce drag. Plastic fins recreate this better than any other way.
>>>>>>>>>>>>>>>>>>>>>
You need a plastic cutting board the longer the better. The set from Harbor freight is perfect for me, it costs roughly $9 for the set.
>>> on my sons boat I had to find another source for cutting boards, as my local harbor freight hadn't restocked the cutting boards in a while. I found smaller cutting boards at the dollar store. I was able to make three fins from each cutting board, making them cheaper than the harbor freight fins. For a 12 foot sawfish I only needed three of the $1 cutting boards.<<<
Start by measuring 2" from the long edge of the cutting board, this will be your total fin height.
draw another line 1" from the long edge of the cutting board.
measure 3" from each end of the cutting board and draw a line that goes between the 2" and 1" lines.
Measure 3" from that line and mark another line between the two long lines. Repeat for the opposite end.
Use a 1/2" wood boring bit to make a hole on the center of each of the 3 inch lines, also bore holes into the ends of the panels (see pictures above) firmly pressing the plastic onto a piece of wood you don't care about will allow you to make these holes in the ends.
Now cut along the 2" line and the lines that run through the holes you just bored. Remove the plastic between these holes so that you create "legs" for the fin. These legs will set the correct depth for the fin in the hull.
Make as many fins as you can from the set of cutting boards.
Bore holes every inch or so in the legs, (see pictures) these will be the only real way that the fin will be anchored in the hull. the plastic that cutting boards are made from is nearly impossible to glue to.
trim the ends of the cutting board fins so that they will slide over rocks and sticks easier.
Snap a chalk line onto the center of the hull.
Lay out the fins along the center line, you want the stern most one to end where the stern of the boat is two inches across on the bottom.
Set the next fin 2 inches, minimum, forward of the aft most fin, (I like to have them 4 inches apart, all the way up the center line) you don't want them to be too close together, as the fabric glued to the foam in between each fin keeps the hull strong. Use longer fins toward the back of the boat, and shorter fins (from the shorter cutting board) toward the front.
You want to have a fin under the bow, with the forward end just where the foam is two inches across the bottom. This fin will be what hits the ground when you beach your boat, and will help you slide off the beach when launching.
I find this design for the fins works best under every condition.
Set the legs of the fin on the hull and trace around them skeg video .
Using the razor knife cut along the lines, bury the blade all the way into the foam. You want each leg pocket to be 1" deep into the foam.
Use a straight bladed screw driver to dig the foam out of the pockets.
>>I used a scrap of the thinner cutting boards to dig out the foam on my sons boat, my screw driver blade is too wide, his boat is the orange one<<
Test that the fin sits flush with the hull, with the legs fully inserted into the hull. Dig out any foam that blocks them.
Lay the fin on its side next to the pockets, and mark where each hole through the legs is.
Dig small pockets off to the side that taper away from the skin, in line with each hole mark. Do this off to both sides. (see pictures)
Using the tip of the adhesive tube, pump PLpremium adhesive into each pocket.
Fill each pocket about half way with more PLpremium adhesive.
Fill each hole in the cutting board fin with PLpremium ahesive.
Press the cutting board legs all the way into the pockets, use a bondo spatula to remove the excess glue around the edges.
As the adhesive cures it swells, this will lock the fin into the hull, and will try to push the fin back out of the holes unless you hold it in until cured. Lay bricks on each end of the fin to keep it fully inserted
Excess glue will push out around the fins, I use a flush cut saw to cut the glue and then rip it off.
The row of fins reminds me of the plates on the back of a dinosaur, or the "saw blade" nose of a real saw fish.
Step 19: Get a Handle on It!

Handles are an important part of securing and carrying your boat around, since the boat is made of foam, the only way to attach anything securely to it is to embed it in the foam with a good glue, just like the skegs in the last step were.
these are stronger than you might imagine, my parents sawfish are stored by hanging them by the handles from their garage ceiling, they also store the roof racks and other stuff in their sawfish!
here is a video to show you how easy it is to install them. I do the same thing for rope anchors for the bow and right behind the cockpit for towing or gear lashing.
lay your hand, palm down on the hull and draw two marks on either side of your hand spaced a little bit away from the edge. make sure the marks are lined up with the centerline of the hull.
I like to use the bit holder on my screw gun to make the strap mounting holes it is about 3/8" diameter and 2.5 inches long. Drill vertically into the foam until the bit holder is buried, repeat for the second mark. You might be able to use the phillips screw driver for this also.
push the tip of the PLp tube into the hole and pump adhesive into the hole, allow the tip of the nozzle to push back out as the hole fills.
take one end of the nylon webbing strap and lay it across the top of the hole, have the end go a half inch beyond the hole.
put the tip of the flat head screw driver onto the hole and push in until the screw driver hits bottom.
pull the screw driver out, hold the strap to make sure it stays in the hole.
hold a section of plastic pipe in you hand, with the thumb and fingers wrapped around the pipe. make sure some pipe extends beyond each end of your hand. squeeze the pipe loosely.
using the tubing cutter cut the pipe to length, ensure that this leaves a little beyond your hand.
thread the the pipe onto the strap
wrap your hand around the pipe handle again, lay the back of your hand on the top of the hull and lift it off slightly
take the remaining end of the strap and figure how long it needs to be to reach the hull deck again at the remaining hole.
add 3 inches of webbing to that dimension, cut the end of the webbing,
pack the remaining hole with PLp
lay the end of the strap over the hole like you did the first time
push the end of the strap into the hole
Then make sure the strap has enough free length to not trap your knuckes against the hull. you can still pull a little bit back out at this point
use the tip of the nozzle to pump glue into any voids in the strap holes. smooth off the excess glue, and keep checking as more will ooze out until cured.
repeat the same process for a stern handle.
I use the same idea to make small loops right behind the cockpit to use as tow points for ropes to other boats, and as gear leash anchors for fishing rods, etc. I also like to add one to the bow for the bow line for securing to the car.
just make sure the strap is well bedded into the foam with adhesive, you might even try using gorilla glue instead of PLp, I haven't tried that yet on Sawfish, but it works well on Seafoam,
Step 20: Hatches

Now that the paint is dry, you still need to add the hatch covers.
Use a razor knife to cut away the fabric over the holes you made for hatches earlier.
test the hatch rings for a slip fit in the hole. You want them to be easy to slide in, with just a little friction. Sand or cut away any fabric or foam that interferes.
Use the thin edge of the straight blade screw driver to cut a small groove all the way around the hole, about a quarter of an inch from the top skin.
fill this groove with PLpremium construction adhesive, then lay a bead of PLpremium around the lower lip of the hatch ring.
insert the hatch ring into the hole in the deck, wipe up any excess adhesive.
place weights on the hatches to ensure they sit all the way in the hole while the adhesive cures.
if your hatch holes are loose, use Great stuff low expansion foam crack sealer to glue the hatch rings in. Be sure to have the hatch covers in while the foam is curing.
Step 21: OUCH!

It won't take you long on a kayaking blog or page to find out that most paddlers, find their kayak seats to be uncomfortable. I agree.
I started with just sitting on a square throwable boat cushion, after a while this feels like concrete...
I've tried the seats out of motorboats, for $40 you would think they would be comfortable... but no. My rear end gets numb and painfull before too long.
I have a folding stadium that has a thin hard foam seat and a fabric back. I guess it beats a hard cement, steel, wood, or aluminum bench, but not by much...
I bought foam to make what many claim is the nicest foam seat for kayaking ever, however I haven't had time to make the seats yet.
Finally, I tried out what I think is the cheap, easy answer, a stadium seat that actually doesn't hurt my rear. Searching around on the web I discovered it seems to be usually sold under the name " Oniva seat ", I was getting them at a local discount chain, but they no longer carry them. Now I see that some Wallmarts have them
The seat most often recomended on paddling sites is the GCI sitbacker
The Oniva seat folds flat and has a carry strap, I can also see it being used as a camping seat, and even a cushion for a quick nap in the sun.
In my tandem sawfish, Tango, we use beach chairs , which are folding lawn chairs, with really short legs, intended to allow you to sit at the beach with your body out of the sand, but not high enough to be unstable on the sand. I've found them at Walmart for about $15.
The ones with four feet are much more stable than the ones with two bars on the ground!
The sand chairs aren't perfect, they have a seat back angle that is slightly too reclined for putting extra power into the paddling, however for an easy paddle or for fishing they should work just fine.
If you look at the tubes and joints of the seat, it is easy to see that some minor modifications could make the seat have a more vertical back to it. I'll get around to it someday, but until then, I just sit forward a little and paddle, it works for a few hours without any strain.
Just be sure that you can fit a sand chair into your cockpit, I can fit the sand chairs just fine in Tango, but the cockpit in Sawfish is too narrow for a sand chair.
XXXXXXXXXXXXXXXXXXXXXXXXXXXXXXXXXXXXXXXXXXXXXXXXXXX
My most recent seating experiment isn't finalized yet, but I like it the best. a standard high back kayak seat with a soft cushion on the bottom. I like it because the seat is clipped to the hull, and the high back gives me the ability to control the tilt of the kayak hull from my hips (called edging in kayak lingo, a technique used for steering)
I added small loops to the cockpit rails to attach the seat clips.
I cooking up some big changes to the cockpit design for this concept to work, stay tuned.
Step 22: Fishing Kayaks

Fishing from a kayak has become a very popular activity in the past few years. Just about any kayak can be outfitted for fishing, at a cost that is much less than that of a motorboat and trailer. Not to mention how much healthier it is to paddle in and out.
AF_Caveman has taken this design idea and created a great fishing kayak. By widening the hull to 36" in the middle he made his boat wide enough to stand up in. He also added foot pedal steering connected to a trolling motor. you can see his battleyak build album here. For about $400 he has a fishing kayak similar to those 3-5 thousand dollar ones. He also made a nice video showing the details of his kayak, and a full build video that explains how he put it all together.
NiteWolfFishing has another great video of his Wolfeyak
Rick INSC has built a couple motorized foam fishing kayaks. Rickskiff
Mandrews has also been making a good series of youtube videos of his Sawfish build . I share the link of his test under motor power.
Matt fletcher built a short one as well
I haven't gone fishing since high school, so don't ask me for tips on how to rig your boat, I would recommend that you head on over to Kayak diy projects and tutorials and do some research on the mods most kayak fishermen find useful. From what I see, anchor travelers, power poles, and fish finder mounts are the most popular, and the guys there love the foam kayak idea, so don't be afraid to post up what you are building.
I had a friend ask me for two Sawfish kayaks so he could take his wife fishing. He liked the idea of build in rod holders, and his wife asked me to make the sides a little higher. I started with the basic Sawfish design, but made the aft bulkhead wider to allow rod holders to be embedded in the foam.
I've since gone away from adding the extra thick thick bulkhead with rod holders and instead recommend a crate set up for fishing, with some straps or bungee cord to hold it in place.
Many of these fishing modded sawfish end up getting a battery and motor, be aware that this means you must register your boat in every place I know of, save your receipts for all of the materials used! many places will try to charge you tax on a boat, but the materials will already have been taxed, don't get taxed twice!
Some other ideas for a modifying your kayak:
-the flat stern was done on purpose, to allow a rudder to be added, anchor some dowels into the foam by boring holes slightly larger than the dowel into the hull, glueing them in with PLp to attach the rudder to.
- or attach a motor bracket to the dowels, then you can add an electric trolling motor , like this idea. AF_Caveman used this idea to make attachments for his motor mount. I was at the Old Town factory store recently and noticed that the latest design they have, has the motor fixed in place, and the steering is done with a rudder. This could be done with the motor mounted anywhere, even off to one side.
- you may need to add a larger hatch to the bow for the battery. I have an idea for a larger hatch you could use here
-if you add a battery, how about some lights (If you haven't already, check out the pictures of Ryan Swift's awesome kayak. He might get reported as a UFO from a distance, but no one will be able to miss him on the water!)
-If you don't have a built in battery, save your empty gorilla glue bottles, they fit perfectly over those cheap aluminum 9 LED flashlights . Use a little five minute epoxy to glue the bottle over the lens end of the flashlight, fabricate a PVC pipe to hold the flashlight higher than your head behind the seat, and you have an excellent light for after dark.
**************************************************************************************************************************
Just be aware , if you add a motor to your kayak the regulations for lighting get much tougher. Any light you have on a motor boat has to be visible for two miles in the dark, there are only a few lights with this rating.
If you don't have a motor, a flashlight you can wave is good enough (your cell phone probably has one you could use in an emergency) I prefer those cheap Energizer LED headlamps, if a boat approaches I stare at them and shake my head, making the light appear to flash.
Step 23: Rod Holders

(I don't do this anymore, but here's how if you want to)
I tried a few different things to bore the holes for the rod holders, and ultimately created a new tool to do the job. Since the cockpit floor is 7.5" from the lip of the rail, I cut off a section of PVC 12" long. Using a saw, I cut teeth into one end of the pipe.
Then I used a 1/2" boring bit to make two holes, one on either side of the pipe, near the top. finally I marked the depth I wanted to cut the foam to all the way around the cutting pipe I had created.
By inserting two screwdrivers into the holes in the top, I could lean on them and turn, boring a perfect hole into the foam. When I hit the depth I wanted, I gave it a few turns then pulled the tool out. The plug came out in the cutting pipe, leaving a perfect hole.
I asked for which sizes to use on the best kayak fishing facebook page and was told that 1.5" and 1.25" inch were both good sizes to use based on the brand of rod used. I made a tool in both sizes, and put two of each size in each kayak, bored into the aft bulkhead. I angled the outboard pipes so that they would hold a rod at a good angle for trolling, and put the center two vertically for out of the way storage. I could have probably added five or six holders, but four seemed the standard number seen on most DIY kayak mods.
To keep the end of the PVC pipes from tearing up the rod handles, I flared the ends of the pipes with heat, using an incandescent light bulb as the heat source, then holding the pipes under the faucet while flared by a glass bottle until they took the new shape.
After the whole hull was wrapped in fabric, I sanded the outside of the PVC pipe with 60 grit, then glued the pipes in with gorilla glue.
I also added loops of nylon strap with the ends glued into the foam with PLp, to anchor rod leashes too, with one anchor between each set of rod holders.
Even if you don't ever plan on fishing from your kayak, adding the rod holders will make it that much more useful for you, the rod holders are handy spots to install an umbrella for sun protection, or anchor a light in for night time paddling. It will also make it that much easier to sell, and for more money if you can call it a fishing kayak.
The gear anchor loops are also a great place to tie off another kayak when you end up towing another boat.
Step 24: Repairs

your boat will be damaged from time to time, some of this will go away on it's own as the foam will swell back into place with a little time and heat from the sun, but some of the damage will need more attention.
The steam Iron trick,
lay a thin towel you don't care about over the damaged area, apply the steaming iron to the towel and work it back and forth slowly, the foam will shape itself back to the original if it can, and the TBII will stick to the foam and fabric again.
If this doesn't work, go to the next two repairs.
For damage to the foam, use the razor to cut around the damage, don't go deeper than an inch. use the screw driver to dig out the damaged foam. cut a plug of foam that fits tightly into the hole. glue the plug in with GG. sand or plane smooth , then patch the fabric
for tears and holes in the fabric ,
cut away the damaged area, repair the foam as needed.
then cut a patch that overlaps the cut away section all the way around.
sand the edges of the fabric around the removed section.
apply titebond II glue to the bare foam and glue the patch to the foam.
Use paint to glue the edges of the patch to the fabric that overlaps around the foam, then paint the new fabric patch to match the rest of the hull.
if you break a plastic fin
carefully cut away the fabric around the foam,
use pliers to break the fin out of the foam
cut the torn out sections of foam into squared off openings
glue in replacement sections of foam
sand the area smooth
add fabric repairs to each foam repair section
cut new pockets and glue in cutting board fins just like you did before
Step 25: Getting There

Most of us are not fortunate enough to live on the water, even if I did, I would want variety. New waters mean new scenery, and places to explore and discover. One lake I paddled recently, has almost no undeveloped shore line. I spotted ducks, cormarants, and Canada geese, then was amazed to get a fly by from a Bald Eagle! a bit later I spotted a pair of loons. More bird types on this very urban pond than I've found on remote Adirondack ponds, or secluded spots in the river.
Getting your boat to these spots couldn't be easier. Unlike plastic or wood kayaks, Sawfish is super light, easy enough for almost anyone to toss up on roof racks. Thanks to being light weight Sawfish can be carried a good distance without becoming a strain. While exploring the Adirondacks I carried Sawfish nearly a quarter mile from one pond to another. This was a marked canoe carry with a smooth enough path through the woods. Unlike most people who carry the boat across, then return and carry their gear, I simply put Sawfish over one shoulder, hung the seat strap over the other and carried the paddle with my free hand. It took me longer to answer questions about the boat, than the portage took!
Thanks to the light weight, I've also been able to park and walk a distance to the water, much further than most kayakers or canoers would want to deal with. Another way to carry Sawfish is resting on the top of my head like a hat, thanks to the softness of the foam, it doesn't hurt like a plywood boat does.
A simpler, cheaper option than a roof rack, would be canoe blocks, foam blocks with a groove cut into them to lock over the rails of the boat. Either way, you need a good way to secure the boat to the car.
In the above pictures you will notice the bow rope is tied to a strap coming up next to the hood. I've added these anchor points to every car I've owned. there is no lying on the ground to reach tie off points, and no chafed paint from vibrating tie down straps or ropes.
To make it easier to carry my paddles around I carry them in a bag , this way they are protected, and aren't all trying to slide out and fall when I carry them.
Step 26: Gearing Up

As soon as you start planning to build a boat, you also need to keep an eye out for the gear to use it safely. three things are an absolute must:
-a life jacket , while there are many cheap ones, a life jacket meant for paddling is worth the money. the arm holes will be bigger to avoid chafing, it should have pockets for your whistle, and there should be more areas open for ventilation, as paddling is work that warms you up. Try some on at a walmart or boating store, if the prices scare you off, or they don't have paddling ones, Amazon and Ebay, even Craigslist are good options.
I have three I use depending on the season. An Onyx movement probably the most budget friendly with quality features and comfort, I wear this for cool weather paddling. An NRS Ninja for the ocean, rough water, warm weather paddling. For hot weather, flat water paddling I wear an inflatable belt pack PFD it won't save my life if I am unconscious in the water, or panic and don't get it on correctly, but it gives me a fighting chance of surviving in most conditions. Any PFD you wear is 100 times better than one left in the boat...
Remember: the kayak is unsinkable, YOU are not!
-a paddle , you can make your own, here are a few different ideas, an inexpensive one , a greenland style , or an eskimo style, there are plenty of DIY paddle plans for free on the web also. I have a variety of paddles, mostly from discount stores, my favorites have a graphite shaft so they weigh very little. the difference in weight isn't really noticeable at first, but over a few hours you notice that your arms don't feel as tired.
I prefer blades that are brightly colored, as they tend to flash in the sun, increasing your safety on the water through better visibility.
I keep our family set of paddles in one paddle quiver bag to protect them and keep them organized. (this way I don't show up at the river with missing paddle halves)
-a seat . the Oniva seat is the easiest option, but I now prefer the clip in high back paddling seats , I will be modifying mine to allow it to breathe better in hot weather. You will have to sculpt a foam base under the seat for comfort, or buy one of the very expensive ones with a thicker cushion under the seat. (still working this part out)
a large car wash sponge works best to remove water in the boat. look for a sponge with a cloth cover as this keeps the sponge from being filled with dirt and sand.
I always carry my phone in the boat for safety. I also use the here app for data free, off line, GPS positioning and maps. I keep the phone in a phone dry bag that allows me to hear music, and take pictures through it. it will float if dropped into the water.
get a good paddling hat, bring sun glasses, sun screen, bug repellent, bandages (great for blisters), and a waterproof camera on a floating strap.
never forget a water bottle!
Step 27: Conclusion

Sawfish was the first boat I designed, my 10th or so boat build. It is light weight, fast (relative term), inexpensive, unsinkable, and stable. best of all it can be built without one expensive "marine" component. The foam in the hull will keep a 200+ lb adult afloat with no problems (like a Boston Whaler) yet it weighs only 25lbs.
my total cost comes to just over $100 dollars US, compare to the cheap, tipy, 8 or 10 foot kayaks sold at discount stores for $150 to $250 and up!
the hull is cut out and assembled in very little time. I really only had time to build this boat starting in April of 2015, and even then only spent one or two hours two or three days a week to not only complete this hull, but cut out the parts for three more, and partially assemble another. I cannot put a time to build with the boat because of this, but it won't really take that much longer than a plywood boat.
It will never rot, it will never sink, it is stable enough to trust your kids in, can be built for cheap money, with stuff found at home stores and discount retailers. most people sitting on the shore will be amazed that you built it yourself, even more amazed when you tell them what it is made of, and show off how strong you are/how light it is.
Even real snobbish kayakers will not know you have a home built boat until they take a close look at it.
-If you damage the fabric, just use some more paint to glue a patch over the damage.
-If the foam gets gouged, use some GS or light weight spackle to fill the gouge, then sand smooth and glue a patch over it with paint.
-If the foam gets "pin striped" by a rock or log and it bothers you, get a thin towel you don't care about and a steam iron, apply the steaming hot iron to the towel over the crease or dent in the foam, heat will activate the foam and TBII and the dent should pop right out.
-Leaving the hull out in the hot sun will also heat the dents and creases out of the hull.
Step 28: Registration

Before you launch your kayak, be sure to write your phone number and name inside a cargo compartment. that way the coast guard, police, harbor master or local rescue service has a way to find out if they need to launch a search and rescue or not, if they find your boat floating or on a beach somewhere.
I live in a state where human and sail powered craft do not need any registration, however there are states and countries that require a registration, and that requires a hull number. I'm using the same idea Gavin Atkin uses for the mouseboats, and shorty pen uses for the Puddle duck racer. When you get your hull to the 3D stage (glued together into a boat shape, doesn't have to be sculpted yet even) send me a message here on instructables, I'll give you a hull number and will keep a list on the next page. click the "I built this" tab on the page also, and include a picture of your first launch, this is the best way to get more people to want to build one themselves. >WHEN you build a Sawfish, PLEASE! post a picture on my Rowerwet facebook page, Duckworks facebook page , Kayak DIY projects and tutorials facebook page! I ask that the picture be with the boat in the water, it looks nicer. This is the only payment I ask for answering your questions and sharing my plans and ideas for free. does that sound like a deal? thank you, Josh, ( Rowerwet on Facebook, and everywhere else)
Step 29: Hull Number List

this is the list of hulls as far as I know. If you want to see which numbers go with which hull, follow this link and scroll through. there are at least three incomplete sawfish that I know of right now, and a few more boats that were built along the sawfish lines in the album link
1. Sawfish (the original boat), MA (pantherworks) 2. ?, Pantherworks (my mom's boat) MA 3. ?, Pantherworks (my dad's boat) MA 4. ?,Pantherworks (my aunt's boat)
5. battleyak, AF_Caveman, hull widened to 36", foot pedal steering trolling motor (the blue one) VA
6. Tydra, ffernandez indiano, the Czech Republic
7. ?, Pantherworks (built for my friend sam)
8. ?, Pantherworks (sam's wife's boat)
9. floater, jim bayes, MI
10. Talon, FernandoA89, NM
11. Saw-gundo, jim bayes, MI.
12. Bountiful harvest, bionic randy, he has the build record at 10 days!
13. ?, kkid
14. Myanos, Jim Wright, RI
15. Golden Sawfish, EddieR33, PA
16. ?, John Henson, the Azores
17. ?, Mikael Larson, Denmark
18. ?, Don Kirkley
19. ?, Gary Schepers, GA
20. ?, Gennady Kedrovsky, Ukraine, First person to make sawfish 12 into a double.
21. ?, James brown, TN, currently being created (a really bright guy who figured out the new cut pattern for Sawfish on his own at about the same time I figured it out. He also figured out the better way to do the decks on Sawfish) He wrote about his build experience in Duckworks Magazine
22. ?, Ryan Swift, widened for fishing, with some awesome LED lights built in. you can search for his build on the Kayak DIY and tutorial facebook page
23. ?, Stephen Conrad, The bright green one
24. ?, Terry Garrett, CA, No pictures yet
25. Brickfish, BrianM351, first Sawfish 11, shortened to fit in and out of the builders apartment. (the one with the interesting rails)
26. Beta-Yak, Bruce Glassford, He tells me he is creating youtube videos of his build, I can't wait!
27. Redwall, the first Sawfish 14, in TX
28. Sunburn , sawfish 12, built by my 12 year old son, possibly the last using the old cut pattern
29. Tango, the first sawfish 16, a tandem sawfish with room for expedition paddling.
30. ?, Mark Fisher, a sawfish type build of a West Mersea duck punt , the first sawfish to sail!
32.? fishing kayak
33. ? David Thompson
34. ? Matt and Yevonne
35. ? Less Van Den Top
36. ? Kip Kathy Anderson
38. ? Gary Sheppers
39.? Dan Thompson
40. ? Michael Deckard fishing kayak
41. ? Mark Barbera fishing kayak
42. Wolfeyak , Mark Alexander
43 Dakyak , Mark Alexander
44. procrastination project, Jonathan Joy
45.? Katie Hawkins, first woman builder!
46. ? Stephanie Pawlowski
47.?. Ryan Swift
48. ? Victor Smith
49. ? Loganbraho
50. I know there are more out there, post your pictures in the comments here, or Rowerwet
Step 30: Frequently Asked Questions

be sure to share your builds and ask questions on the Rowerwet facebook page! !
I can't find/afford XPS foam.
A) this is the most common question I get, yes you can use EPS, the beaded foam panels, just be aware that they will absorb water unless carefully sealed. You might want to consider coating the whole bottom of the hull with marine epoxy, or some other tough, waterproof membrane. Stored dry, especially someplace hot, with any tears or holes carefully repaired after each paddle, you will probably be fine.
I can't find/get two inch thick foam
A) you can make two inch foam by laminating one inch foam sheets together, I've done it with gorilla glue, just keep the loops to an overlapping pattern of three inch circles. You could do this with other thicknesses, just be sure that the bottom of the kayak is one and a half inches thick minimum, two inches is best for strength.
I can't find the glues you recommend, or they are very expensive in my country.
A) This is more of an issue than I ever imagined, my best answer is to find any boat building blogs in your country, and see if there is a local equivalent. More than one builder has found something locally made and sold that was close enough. When you do find it, and are happy with the results, please share that info here or on my facebook page, it will help others in the same situation. The more this design is built around the world, the better the support will be for those who want to build outside of North America.
Have you or anyone ever tried some other coating than the ones mentioned in the Instructable?
A) If it hasn't been mentioned, then most likely no. I have a system that works, and I'm all about low cost and simple, If you do try it, please post back here or on my facebook page in a year or two and let us know what the long term results are, you might have the next great idea.
Can I make it longer/ shorter/ wider?
A) Yes! just be aware that anything over 36 inches wide is too wide to paddle, and oars work best at 48" up to 60" wide.
Can I add a motor to it?
A) Yes, but aware that a motor makes it so that you have to register the boat, save all of your receipts for what you buy to prove you paid taxes on the materials. You also may have stricter regulations about required gear and lighting.
If you want to add a gasoline motor, be aware that gasoline eats foam, use plywood encased in fiberglass with bilges that do not drain toward the motor or tank storage. Finding a motor small enough to be safe may also be an issue, let us know what you discover.
Do you have any videos explaining how to build a sawfish?
A) I finally added a few videos for the steps people seem to have the hardest time understanding. Click on the blue links throughout the text to see the videos and links.
How tough is this?
Very, one year on our vacation, my family took a fleet of sawfish kayaks down down the Saco River in North Conway, NH. I was in my Seafoam mouseboat, which is only made of 1" foam instead of 2". The Saco is known for mild whitewater . It has plenty of rocks, and gravel , and our boats all bumped and thumped over them.
With the foam strake, Sawfish got hung up a bunch , and I had to get out and push my wife over the shallow spots. The two 8 foot sawfish have only plastic fins, they bumped and thumped over the rocks. with their plastic fins, they almost never got hung up.
After the trip I inspected each foam hull, they had grooves in the foam and fabric, but no holes or tears. I left the boats upside down in the sun for a few hours, and the grooves disappeared due to the self healing nature of foam.
I've also taken Sawfish out in the surf in York, Maine. Each wave was actually dropping me from crest to trough, with a splash, and the hull didn't show any stress at all.
Is it really unsinkable?
yes! check out this video of me swamping my 16 foot sawfish in a rapid, even full of water I was able to paddle through the rapid, then turn and paddle to shore. Once I
Step 31: Sawfish 8 (clownfish)

not long after I created the Sawfish design, I made two 8 foot Sawfish for my kids. I gave them the name clownfish , but after a while I realized that the boats were really just a short sawfish.
the short length is slower on the water, and I ended up towing them on longer trips, Towing a short boat is like running with a parachute on.
I plan on giving them away after all of my kids move on to bigger kayaks they built themselves.
the only advantage the 8 foot design offers is that it is easy to store, and can be built out of one sheet of foam instead of two.
I made the stern too wide on these, and it causes drag, if you build one, make the stern at the water line small and pointy for better speed.
I took the Sawfish 8 for a paddle, it handled my 180 lbs just fine.
Step 32: Sawfish 16

It is easy to create any length kayak you want with the sawfish design, I decided to make a tandem kayak for my wife and I to paddle. My wife prefers to be in the same boat when we paddle. I prefer her to be as well, because then I don't have to wait for her. I took the standard length Sawfish 12 and added 4 feet to the middle, at the six foot station. I really think a two foot stretch would have been plenty, but the 16 foot boat works just fine for the two of us, and as a solo boat when I go alone.
video with both boats side by side
She can stop to fiddle with her hair, or take a drink, even read a book or take a nap, while I continue to paddle along. we have a plywood tandem kayak that I built called Duet. Duet is my 16' Larsboat , the Larsboat is a Jim Michelak design, that is a simple stretch of his most popular design, the Toto double paddle canoe. The Toto is 13' long, adding three feet to the hull makes it into a fast tandem. My Larsboat is actually about a half a foot longer than the plans. when I was drawing the boat on the plywood I realized that there was plywood left beyond the stern location as drawn, so I stretched it to use the whole length possible. 5 inches longer means a little more bouyancy.
For comparison I have a picture of Sawfish next to Duet at the top, while Duet is a fast seaworthy boat, she is also rather heavy, weighing 65 lbs, not much fun to move on and off of the van, or pick up after a long days paddle.
Here is a video of our new tandem sawfish in action, Tango , is actually a little longer than she needs to be, she could easily handle three paddlers without too much modification. This is just as well, as you can see our youngest rides in Tango with us.
build album
Most couples do not get along so well in a tandem, be sure to try one out before building a tandem and then finding out why tandems have the nickname "divorce boat"
interesting idea for paddling with your feet that could be adapted to a Sawfish 16 easily, allowing an able paddler to take a challenged paddler along.
Step 33: Sawfish Gets a Makeover

Since I first launched Sawfish, I have been using her hard, and testing different ideas on her. I tried two handle anchoring ideas before I was happy.
Then we had the day my wife got blown away in Sawfish and ended up on a beach far from the car, because she couldn't control the boat in a strong wind.
I added a foam strake to the bottom of the boat to see if it would help with control. This strake made the boat slower, and got hung up on many rocks when we did a family trip on some mild whitewater in North Conway, NH. I hacked the foam strake back off the bottom of the boat, but that left a bare section of foam right down the middle.
The wood cockpit rails had a break in them, and this caused the foam to crack right at the break, and tore the fabric there. The damage was only in the top layer, and it didn't weaken the boat when it was floating, so I just lived with the damage.
The cockpit location was about a foot too far aft, and this made sawfish slow, and hard to handle in a cross wind, moving the seat up as far as possible helped, but didn't fix all of the problem.
Finally I took sawfish on an exploring mission, ending up in thick reeds and shallow water. I split my kayak paddle in half and used each half like ski poles to push through the reeds, until our way was finally blocked by a stone wall. There were rocks and logs in the water, and Sawfish was being bent and beaten harder than any time before.
The flexing caused the score line running right down the middle of the foam used in the hull to split, and sawfish began to leak into the cockpit.
After we got back to the shore and were carrying her to the next pond, we found a stick embedded in the foam of the hull. it hadn't gone all the way through, and even with the split seam, sawfish wouldn't have sunk, instead she let in some water, but that was it.
It's been a few years of hard use and no repairs on purpose, to see if the boat would be safe over long term. The design passed and met all of my expectations, but now it was time to make sawfish over into a boat that would look as great as the sawfish I'm building now.
First I removed the fabric, this was easy, I cut it all the way around with a razor knife, then peeled the fabric off.
Then I used the power plane to reshape some of her bottom curves and bow shape to be less square, and flow through the water easier.
I removed the cockpit rails, decks, bulkheads and top rails.
I used the ice cream scoop to remove all that extra foam from her bow and stern, and created more useful space for bow and stern cargo tanks. .
I added a new aft bulkhead a foot forward of where her old one was, a new forward bulkhead, added new decks, and higher cockpit rails with no inward curve to them. (they didn't keep waves out the way they should have)
I also added a third bulkhead in the stern, this will enclose a small cargo tank in the very stern, but leave an open area behind the cockpit for fishing gear or a small child to ride.
There were a few deeply damaged areas in the foam on the bottom of the hull, I cut them out and glued in new sections of foam to give the hull a smooth surface again.
I used the power plane to remove the plastic cutting board skeg, as it would get in the way of putting on new fabric. Since I wanted a skeg in the stern again, and couldn't get the old one out easily, I cut away the bottom layer of foam in the stern and replaced it with a new piece. after the glue cured, I sanded it to match the stern of the hull.
I raised the cockpit sides, installed new decks, recovered the hull with new fabric and paint.
my first test paddle was on Mirror lake in Lake Placid, NY, watching the start of the 2018 Ironman race. Sawfish had no strakes on her bottom, and I found it hard to paddle in a straight line, the boat went sideways almost as fast as it went forward.
Since I was over an hour from the nearest Harbor freight, I bought some cutting boards at family dollar and added them to the Sawfish.
I even bought some stencils that say sawfish, and a little sawfish shape stencil, they really dress the boat up, and help identify her. Anybody seeing her on the car or in the water knows what kind of kayak she is!
The second cockpit/cargo area works great for teaching a kid to paddle tandem .
Step 34: DON'T TRY THIS AT HOME!

I'v gotten a few questions about the strength of the boat, will it handle rocks and moving water, etc. To prove it to myself and the rest of you I took it to the most extreme conditions I know of, the surf zone on my favorite beach.
I tried it out in the surf on two different days, one was very windy with good surf conditions, I'm not sure what the wave heights were, but I know the waves were covered with surfers and they got plenty of rides. I punched out through the surf, the boat went through just fine, though many waves came over the bow and filled the cockpit. With a cockpit full of water the boat got harder to handle, but still made good progress and rode over most of the wave.
Once I got past the break I rolled out of the kayak and then rolled it up on one side to dump out the water. Thanks to the foam it floated high on its side, so all of the water came out. I was able to climb back in with some effort, without filling it up again. This will only work for stronger more agile people as it takes some strong swimming with your legs to get up enough to straddle the hull with your body, then swing your legs around into the hull. I did all of this in water too deep to touch bottom. (NOTE- if you fall out of this boat with any wind, it will sail away quickly, faster than you can swim, keep a rope tied to it to give you something to grab)
I tried to surf the waves back in , but the hull is too long, the skeg too far back, the bow too pointy, and the stern to narrow, for this hull to be able to surf in the big stuff. The bow dug in, the stern came around and I got dumped!
Part of the problem was the lack of a good way to brace my feet in the cockpit, mostly the hull shape is wrong. I do plenty of surfing in a Yakboard, so I know how to surf, but I also know a normal kayak will be swamped, rolled, and handle like a pig in the surf. I see people try to surf in regular kayaks all the time, it is entertaining for me, but not fun for them. Even white water "squirt boats" do not last long, they fill up fast even with a skirt.
Since the boat was no match for the surf, and I really wanted to surf, I launched back through the surf, then paddled over a mile down the beach to get as close to my parents beach cottage as I could, so I could swap Sawfish for a surf kayak. The seas were very rough thanks to the wind, and most of the rollers (this is the north atlantic ocean, gulf of Maine) were over my head as they approached, then I would be launched off the top, to smack down on the other side. if the hull was going to fail it would have then.
It made the trip just fine. To make it out without another trip through the washing machine surf, I hopped out of the kayak where I could just touch bottom, then holding onto the bow handle and the paddle in the other hand, I bobbed and walked out of the surf.
Two days later the surf was much lower, the waves were perfect for kids on boogie boards, so I tried the surf in Sawfish again. This is the day I have pictures for, the surf is small, and the surfers were only getting a few good waves.
Before I launched I made a scupper in the cockpit. I used the shaft of the double paddle to punch a hole through the cockpit floor fabric, the foam bottom, and the bottom fabric. SInce the hull is foam, it floats even with a 1" hole in the cockpit floor. however I discoverd the hole was too small, I had to wait a few min. for the water to run out, sitting out beyond the break. I am currently working on a foam surf kayak, check out my Rowerwet facebook page Sandshark album
I was able to surf a few small waves this way, but the boat is not for surfing! I just did this to prove how strong it is, if it will handle being smashed around in the surf, a hole drilled through the bottom, and a couple good wipeouts in the surf, you do not need to worry about how strong it is. It tood a lot of force on the kayak paddle, and a twisting motion like a drill to make the hole through the fabric skin, you will probably not punch a hole in your kayak unless you drop it from a height or run white water/surf with it. stick to rivers, lakes, and streams, anywhere you would take a regular canoe on and you will be fine.
some videos of Sawfish , and some other foam kayaks running rocky rapids on the Saco River in North Conway, NH. And a plastic kayak not going so easily because it is heavier

Second Prize in the Summer Fun Contest

Fourth Prize in the Outside Contest
Recommendations

Fix It Contest

Making Time Contest

Big and Small Contest

- Fishing Kayaks
- Paddle Boards
- Life Jackets (PFDs)
- Boat Storage
- Paddling Clothing
- Paddling Accessories
- Cool New Gear
- Submit a Review
- Paddling Near Me
- Paddling Locations Map
- Download the Go Paddling app
- Paddling Trips
- Kayaking Trips
- Canoeing Trips
- Share Your Knowledge
- Add a Paddling Location
- Add Your Trip
- All Articles
- Getting Started
- Boats & Gear
- Techniques & Safety
- Camping & Survival
- Join Newsletter
- Create Account
- Message Boards
- Classifieds
- Photo of the Week
- Free Weekly Newsletter
- Gear & Reviews
- Kit & Plans
Kayak Kits & Plans
Ready to DIY and build your own kayak? Find kayak kits and kayak plans from brands Chesapeake Light Craft . If you want to build your own, choose a kayak kit. If you want to source your own materials, choose kayak plans. There's nothing more rewarding than paddling your own handiwork!
Gear Category
- Recreational
- Kit & Plans
Building Your Own Kayak
Nothing compares to the pride you get from building and then paddling your own wooden kayak. Kayak kits and kayak plans are simple and straightforward to follow. Those characteristics make them the perfect winter or off-season project . But if you run stuck, there are plenty of helpful resources and happy folks to lend advice when needed. You'll learn the stitch and glue fundamentals of bringing these wooden dreams to life.
Wooden Kayak Kit Reviews
We've collected wooden kayak kit reviews for over twenty years. When you read them through, it is evident that very few ever regret the decision to get one. Not only are they one of the most beautiful kayaks to display, they track well. And since you built it, you understand every component to that kayak.
When you're done, first take a step back and admire your handiwork. Second, go paddle it! Finally, be sure to submit a review and share your kayak kit experience with the next curious paddler!
Featured Manufacturers
Log in or Sign up
You are using an out of date browser. It may not display this or other websites correctly. You should upgrade or use an alternative browser .
Kayak Catamaran?
Discussion in ' Wooden Boat Building and Restoration ' started by lvabd , Dec 6, 2022 .
lvabd Junior Member
Does anyone know what this is or if there are plans for it? It looks like someone just strapped two kayaks together. I don't have a shop right now and want something minimalist, for coastal cruising and camping. This looks like it might fit my requirements, without being overly complex. This came from a 2014 post, on this site; but, the ebay link is dead. Can I just show the picture to a boat-builder and have him reproduce it?
Milehog Clever Quip
Welcome to the forum! It's an attractive craft but I am skeptical of its utility. I'm gonna be a little salty here but understand, I've been in your shoes, not knowing anything about sail boats and being attracted to a bad design. How is it propelled when not sailing? Will it go to weather? Is it even capable of a broad reach? How do you board and exit on anything but a shallow beach? That bridge will slap and sneeze on anything but flat water. The motion, I suspect, will be abrupt and sluggish. The canvas, as it is, will be useful only for camping, otherwise present too much windage and destroy visibility. Suggest you find something proven like a production beach cat rather than try to revive something defective that didn't reproduce.
You nailed it sir! It's a bad design; but, I do want the camping bit. I really am looking for a sail powered wall-tent. Of course, that would be the Kon Tiki, which couldn't make Galeon speed. I'm thinking this beast can be redeemed, by lowering the shelter under sail. With it up, I think Thor Heyerdahl will embarass me at the regatta. Also, there's no used boat market where I live. A beach cat won't help with camping and will set me back five large. I'm lookin' to go five small. In this image, there are all the bits I need, just perhaps, they shouldn't all be active at the same time. It's more icon than boat, I suppose; but, maybe not that far off. It's gonna take some re-arranging, I think and maybe ad some zippers and snaps on the canvas, to allow parallel parking. Thanks for the enthusiastic welcome!
DCockey Senior Member
The boat in the photo appears to be "skin on frame" construction, probably designed to be taken apart for transport. lvabd said: ↑ Can I just show the picture to a boat-builder and have him reproduce it? Click to expand...
That is a lot. Do you have any recommendations or compromises I can consider, to keep the price down?
Ivabd, you still haven't answered my questions. Humor me. Let's expand on DC's post. Pay 10k for materials, 6k for labor and end up with an unsail-able/unsale-able/unseaworthy POS. Yours is not an unusual position. You don't know what you don't know while we can plainly see that which you can't. You can buy a good beach cat and have it transported for much less than having that POS built. Ask yourself why there is only one, likely extinct, version of that craft. If it was a good idea, you'd see more. The world is always looking for a better mousetrap and you have not found one. Think of yourself as a dehydrated horse. We have led you to water, the rest is up to you.
I was posting while you were. I'd search for nearby sailing clubs, scour the web and, if you have a thick hide, go to sailing anarchy which is everything from vulgar and hateful to a great source of ideas. A good used cat from a popular design or one-design fleet, will have the best sale and resale value. P.S. Thanks for asking before jumping in after that Darwin Special.
gonzo Senior Member
People use beach cats, like Hobies for camping. A regular tent set on the trampoline is all you need.
Skyak Senior Member
lvabd said: ↑ Does anyone know what this is or if there are plans for it? It looks like someone just strapped two kayaks together. I don't have a shop right now and want something minimalist, for coastal cruising and camping. This looks like it might fit my requirements, without being overly complex. This came from a 2014 post, on this site; but, the ebay link is dead. Can I just show the picture to a boat-builder and have him reproduce it? Click to expand...
- Advertisement:
Robert Biegler Senior Member
lvabd said: ↑ Does anyone know what this is or if there are plans for it? It looks like someone just strapped two kayaks together. Click to expand...
Strongback design for a barrel back kayak
Compact 13' Kayak for Cedar Strip Construction
kayak plans
kayak hull design.
Building a 10' Wood Duck Kayak... Help needed with wood choice
11' Kayak "Loggerhead"
15' lapstrake kayak..
Canvas covered kayak restoration
Catamaran crossbeam repair
Catamaran Wheel House and Hardtop
- No, create an account now.
- Yes, my password is:
- Forgot your password?


- Basic Kayaking Knowledge , Learn
15 Free Boat Plans You Can Build This Week (with PDFs)
Boatbuilding is one of the most ancient forms of craftsmanship still alive today. As long as our ancestors have had a curiosity about exploring open waters, they have been practicing and honing their boatbuilding skills.
To be honest, however, building a boat is no small task. It will require a lot of work and patience to ultimately create a finished product that you are happy with and that is actually seaworthy.
Of course, we have also included a few free boat plans. You can keep in your back pocket for the next time you are asked to build a cardboard boat as part of a contest or lakefront teambuilding adventure.
We hope that these resources help you in your journey to build your own boat!

Photo by SeventyFour via Shutterstock
Free Boat Plans
Why build your own boat, 1. the wanigan, 2. the mouse, 3. the slipper, 4. the handy andy, 5. the junior, 6. the jolly roger, 7. the cork, 8. the hobby kat, 9. the tern, 10. the falcon, 11. the white duck, 12. the sea midge, 13. the zephyr, 14. the gypsy, 15. the crazy cardboard boat, 15 free boat plans you can build this week (with pdfs) – final thoughts, share on pinterest.
- The Wanigan
- The Slipper
The Handy Andy
- The Jolly Roger
- The Hobby Kat
The White Duck
- The Sea Midge
The Crazy Cardboard Boat

Photo by Halsey via Shutterstock
There are a lot of reasons why you should explore building your own boat versus buying a pre-made model. Here is a quick breakdown of the most obvious benefits:
- You will know the ins and outs of your finished boat better than anyone
- It can be a great project to work on with your teenage or even adult children
- You will gain valuable skills molding and shaping wood and other materials
- You can design your boat for your specific needs
- You don’t have to trust the sometimes-questionable manufacturing of mass-produced boats
- You can create a boat that functions as your second home on the water
- You can save money if you source materials mindfully
Of course, most first-time boatbuilders still experience some level of trial-and-error. With patience and perseverance, however, you can craft a one-of-a-kind vessel that has no equal anywhere in the world.
Free Boat Plans You Can Build This Week (with PDFs)
PC Duckworks Boat Builders Supply
The Wanigan boat began as a garvey design, which is one of the older boat plans known to the Americas. Traditionally, these boats were built as work scows and were very popular among American summer camps.
The design itself is very simple, but these boats can carry heavy loads. It can also handle a trolling motor being mounted to the stern so you can cover more ground if you want to use it as a fishing boat.
The creator of this boat plan became aware of some of the downsides of the garvey design, such as the heavier weight that made it less efficient than some other designs. So he combined elements of dory and wanigan designs to create a hybrid.
The main changes include an enlarged beam, tilted lathes to provide a stiffer hull, and knocking off the top strakes to reduce the boat’s overall weight.
The Wanigan text
These additional The Wanigan drawings  may also prove useful for your build process!

The Mouse is one of the most compact and nimble boat plans we have found for this list. It is an easy build and also a great boat for two kids or a single teenage paddler.
The original builder began with a one-sheet boat design in an effort to create the lightest and most affordable boat possible. This means it is only suited for calm waters and should not be used in high winds or wavy conditions.
That said, it was built in roughly 12 to 24 hours of work time and doesn’t require a full workshop to construct. The main material that is required for building this boat is quarter-inch plywood. But the builder recommends using one-inch by half-inch pine or something a little sturdier.
The plywood and pine components are held together using a method called ”˜stitch and glue’. This method requires choosing one of the best glues for kayak outfitting , which are typically made of epoxy and glass tape rather than something cheaper like polyurethane.
The Mouse Instructions
Also, here are a few extra useful The Mouse Notes for builders

The Slipper is the first of many sailboat plans on our list and it is faster, easier, and cheaper to build than most. It also features a deeper cockpit than many other sailboat designs, which makes it safer for intermediate sailors.
This sailboat plan features dual steering stations so that you can sail from inside or outside of the helm. It also includes a centerboard trunk that hardly intrudes into the cabin at all. So that, it is easier to work around while you are in the cockpit.
The exterior hull and cabin of this sailboat feature a modified dory design using two sheets of plywood ripped to three feet wide before being joined together. The resulting hull is a modified V-shape that reduces drag.
The centerboard of this boat can also be winched up to the level of the top of the cabin or lowered down to alter the draft. This allows you to customize the boat design for a stiffer and more weather-worthy vessel if you need it.
The Slipper was also intentionally designed with an aft cabin that naturally helps to keep the bow pointed into the wind whether you are underway or the boat is anchored in the port.
The Building Slipper

PC DIY Wood Boat
The Handy Andy is a great little 10-foot portable rowboat for hunting, camping, fishing, and other recreational uses. It is actually the only folding boat design on our list, which makes it best for folks that need the most portable boat plan possible.
This boat features a 42-inch beam and a depth of about 15 inches at the mid-section. It also weighs roughly 80 pounds when assembled and can handle up to three average-sized human passengers.
The design boasts a flat bottom with canvas-bound edges and the primary material used for construction is ⅜-inch marine-grade plywood. Despite its lightweight nature, this rowboat can handle trolling motors or even outboard motors with a maximum of five horsepower.
Once finished, the hull can be folded or unfolded in less than a minute’s time.
This design makes it one of the only boats on this list that can be stored in a truck bed or easily carried by two people to be launched at more remote locations.

If you are looking for an all-purpose dinghy that can handle almost any use you might imagine, look no further than The Junior free boat plan. It can carry three or four average-sized adults and is much easier to row than a traditional dinghy.
It is also durable enough to be equipped with a small outboard motor. You could even set it up with sailing equipment if you want to use it as a sailing vessel. As we said, this is truly an all-around boat design!
This boat plan requires constructing three frames that will provide the majority of the load-bearing support. The builder recommends using ¾-inch framing with ⅜-inch plywood as the exterior material for this boat build.
Resin glue and flathead screws are also required to hold this boat together. But there is a full list of materials included in the plans we have linked to below. Sticking to that plan should also give you enough leftover materials to construct two six-foot oars for rowing this boat until you install a trolling motor or outboard motor down the line!

Channel your inner Captain Morgan when you are following these plans to build your very own Jolly Roger boat. This flat bottom boat design is designed for pond fishing . It can also be a useful yacht dinghy for getting from your dock to a larger vessel anchored offshore.
The plan follows conventional dinghy construction methods but also includes a few modifications that will save you time and energy. The wide design is super stable for boaters of all ages.
The keel, frame, chines, and risers are all cut from ¾-inch oak, ash, or any other trusted hardwood you can get your hands on. For the smaller components, the builder recommends using cedar, cypress, fir, or white or yellow pine.
Because this boat plan is also sturdy enough to handle a small motor, it includes important points for protecting the wooden hull from spark plug damage.
Be careful to follow these guidelines to build the safest boat possible if you imagine installing a motor down the line.
The Jollyroger

The Cork is another simple rowboat design. This one trends away from the flat bottom plans that we have included thus far. Instead, it features a deeper, V-shaped hull that makes it better suited to more efficient rowing and easier maneuverability.
It can be rowed easily from either seating position and is durable enough to handle up to three average-sized adult passengers. The ends of the boat are identical, which allows for multi-directional rowing.
The list of materials required for this boat plan should cost you between $30 and $50, depending on your location and hardware costs there. The resulting build is lightweight enough for two people to be carried and also to be transported on top of a vehicle .
Inside the boat, the builders use aluminum tubing to secure the struts that hold the seats. This material choice keeps the overall weight of the boat down while still adding the necessary rigidity across the beam of the boat.

The Hobie Cat is one of the most iconic and recognizable small sailing vessels ever made. This Hobby Kat plan is your answer to building your own iconic sailboat without spending thousands of dollars.
Your finished boat will be able to handle speeds of up to 20 miles per hour. It will be a super fun vessel for windy days on the lake or bay. The builder was able to construct the hulls, decking, and rudder for this boat while spending little more than $200.
From there, they purchased and installed the mast, boom, sail, and rigging, which brought the total amount spent to roughly $650 (still much less than a name-brand Hobie!). Without the mast and sail, this boat weighs roughly 165 pounds and is constructed using primarily 3/16-inch marine plywood.
You can also elect to build your own mast, boom, and sail if you have the time and skills to do so.
Those elements are not included in this boat plan, but they do offer some recommendations for where to buy these components!
The HobbyKat

Named after the common seabird found around the world, the Tern is a lightweight and nimble sailboat with a 72 square foot base design. She is made for inland sailing and planes very well in moderate breezes.
The hull design also provides minimal water resistance and the small floor plan makes this boat easier for intermediate sailors to handle. Even though it offers a small footprint, this boat is sturdy enough to handle up to four adult passengers.
One of the best things about this boat plan is that it can be built almost entirely by using only common hand tools.
Of course, you can speed things up if you have power tools and you are skilled enough to use them correctly.
The Tern boat plan includes a 20-foot mast, but you can shorten that length if you desire. The plan includes a complete list of materials and step-by-step instructions on how to plane and assemble each element.

As you might expect from its name alone, the Falcon is an incredibly speedy sailboat for its size. It boasts a 14-foot centerboard and can handle two to four passengers, depending on its size and weight.
In tests of the original build, the creators claim that this boat out-distanced many Snipe and Comet sailing vessels as well as pacing evenly alongside longer 18-foot sailboats. When finished, your boat will have a six-foot beam and a total weight of roughly 475 pounds.
For the main framing components, they recommend using white oak and plywood will be the main material used in the hull construction. The hull features a V-shaped that was inspired by larger schooners.
The Falcon is best suited to sailing on bays, lakes, and wide rivers. It is also a boat plan with just under 120 square feet of deck space and it is a great build for amateur craftsmen and sailors.

The White Duck is a flat-bottomed rowboat with a total length of 13’6” and a four-foot beam. The cockpit is approximately 15 inches deep all the way around and this boat can handle up to five passengers while maintaining buoyancy and stability.
When fully constructed, it will weigh roughly 200 pounds, but the final weight will depend on the type of lumber you choose for your build. This boat plan features plywood planking over solid wooden frames.
The White Duck is built with a pointed bow that cuts nicely through the water. The flat stern of this boat design will make it easy to attach a small outboard motor with a maximum of six horsepower.
As you might expect from its name, this rowboat is a great option for duck hunting trips. That being said, it is a highly versatile craft that can also be used for pond fishing or casual rowing on your nearby lake.

The Sea Midge is one of the smallest rowboats on our list and it is ideally suited for one average-sized rower or two small paddlers. It is only about 8 feet in length and offers a 52-inch beam at its widest point.
The Midge’s small dimensions make her ideal for navigating narrower creeks and streams. With an approximate weight of 62 pounds, she is easy to maneuver on the water and can also be much more easily transported than some of the larger boat plans on our list
The Seamidge

The Zephyr is a compact and speedy dinghy sailboat that measures roughly 14 feet long and approximately five feet across. This boat style was originally developed for safely crossing the English Channel. This means it can stand up well in rough waters.
When finished, it is also light enough to be transported on a small trailer or on top of a larger vehicle.
The boat plan calls for using hemlock or fir for the framing and oak or Douglas fir for the keel and chines.

The Gypsy is a small cruising sailboat that is meant to be equipped with an outboard motor for powered locomotion. The original design resulted in an incredibly seaworthy vessel that logged more than 6,000 nautical miles in her lifetime.
It includes a comfortable cabin that makes it well-suited for multi-day sailing adventures. This boat plan includes improvements on the original design that will help you build an extremely durable and long-lasting sailboat.
The Gypsy boat design will help you construct a vessel that can handle a motor up to 25 horsepower so that you can enjoy cruising speeds of up to nine miles per hour.
While it may require a bit more of an investment in time and money, it will also help you produce one of the best boats you can build with a free boat plan!

PC Saint Dominic Catholic School
Finally, let’s talk about a crazy cardboard boat plan that you can build in less than a day. This is a great boat plan to bookmark for your next teambuilding project so that you can earn bragging rights with your coworkers.
The plan calls for using 1.5 sheets of cardboard. But you can use the remaining half sheet to build your own boat paddle if you want to get creative.
Triple-thick cardboard is best for this boat plan. But you can always double up thinner sheets if that is all you can find.
These plans include an easy-to-follow diagram for marking, cutting, and folding the cardboard sheets to create the hull of your boat. From there, it calls for using contact cement and construction adhesive to seal the edges and corners.
If you are looking to save a little money on this build you could also use duct tape and then wrap the entire design in plastic sheeting to provide waterproof qualities.
Overall, this build is one of the cheapest and easiest on our list. It is also a great project for hot summer camp days on the lake or river!

Photo by Alexandra Soloviova via Shutterstock
We hope that you now have a couple of free boat plans to inspire you to begin your own construction project.
Don’t hesitate to check out YouTube for some useful boat-building videos when you are getting into the nitty-gritty of these build processes!
Enjoyed 15 Free Boat Plans You Can Build This Week (with PDFs)? Share it with your friends so they too can follow the Kayakhelp journey.

Peter Salisbury
Pete is the Owner of KayakHelp.com. Born and raised in Cleveland, Ohio, he grew up kayaking, fishing, sailing, and partaking in outdoor adventures around the Great Lakes. When he’s not out on the water, you can find him skiing in the mountains, reading his favorite books, and spending time with his family.

COMMENTS
4 - 2″ stainless steel U bolts with lock nuts and washers. 4 - 5″ stainless steel eye bolts with lock nuts and washers. 1 - 8′ 2×4 (or a couple of 8″ scraps) 2 - 8″ 5/8×16 bolts with lock nuts and washers. 4 - Ratcheting straps. I also needed a rubber mallet, wrenches, a drill, a set of drill bits, and a table saw.
Kayaks; Other Paddle Boats; Stand up Paddleboards; Powerboats . All Powerboats; Cabin Powerboats; ... Catamarans; Sailing Yachts . All Sailing Yachts; Yachts 20' to 24' Yachts 24' to 35' Yachts 35' + ... To download plans click HERE The idea for the 1 Wedge1 Sheet Wedge came from my desire for a simple, low cost, yet useful small portable hull ...
We provide stock boat plans for both monohull and multihull sailing vessels, including sailing skiffs and sharpies. Our designs mainly feature timber construction, in plywood or cedar strip plank composite construction, using the W.E.S.T. system (wood epoxy saturation technique). Our designs are intended mainly as cruising boats, although ...
The SS pipe catamaran frame is al... This Part2/2 features the custom designed SS fixture for the shorter Pelican kayak to address the kayak height differences.
Catamaran Stock Plans. ... Plans are leased to build ONE boat, NO time limit. Tri-Star designs are proven designs, sailing the seven seas since 1964. Free consultation is provided to the original non-professional builder till he or she is sailing the seven seas. All boats may be built with flared hulls, with the exception of the TRI 25, TRI ...
Our construction plans and kits are sold with 100% professional boatbuilder support via phone and email, any time you're unsure or just need a second opinion, we're here. ... The first step to building your dream catamaran begins with a strongback - this is a square frame used to position the temporary frames that will be used to form the ...
Order the Latest Design Portfolio today to see over 85 multihull plans in stock.Besides illustrating my stock designs, for which I sell study plans and full construction plans, it also contains my design philosophy of multihulls; an article on the rapid Cylinder Mold(pdf) or Cylinder-molding (in html) multihull construction; examples of drawing sets; photographs; fact sheets with dimensions ...
Affordable. Building your own boat with Wharram Designs is the easiest and most cost effective way to fulfil your sailing dreams. Wharram Self-build boat plans start from only £120. Wharram designs are based on years of practical, hands-on experience of building and ocean sailing catamarans. They are renowned for their seaworthiness, stability ...
DUO 900 Plans For study plans click HERE The DUO 900 is a quick-to-build, open-bridge catamaran with asymmetrical hulls. The boat was designed for a French fighter pilot who lived in Argentina. His goal was to sail from Buenos Aires to Marseille. Looking...
Sit On Top Stitch and Glue Kayak Design available in Kit, Paper Plan and PDF Plan for Download. 14ft by 30in, beautiful classic look and easy to build ... Plans (Paper) $ 99.99 - $ 199.99 Select options ... 34′ x 12′ High Speed Catamaran, 36 Passengers; 31′ x 12′ High-Speed Catamaran, 24 Passengers; Shop Online. Paper Plans. Sponge ...
The DESIGNER'S book TRIMARAN and CATAMARAN CONSTRUCTION is part of the plans (over 21') and covers all phases of construction. Plans are leased to build ONE boat, NO time limit. Tri-Star designs are proven designs, sailing the seven seas since 1964. Free consultation is provided to the original non-professional builder till he or she is sailing ...
Chat 18 Plans Download. Click HERE to download Free Study Plans. About Woods Downloadable Plans. The Chat 18 is a safe day sailing catamaran designed for sheltered waters and is very simple and easy to sail. Even so, it is still a fun and responsive boat. Comprehensive building plans are now available.
Step 1. Kit Design. Work with us to finalise the details of the design you have chosen including any design options or additional modules to be included in the kit. We will determine the laminates, the number of panels required for each laminate, create the cutting files and prepare a quote for the kit if it is not already priced.
Pontoon hull kayak. This type of hull is often also called a "double hull kayak," "tunnel hull," "dual hull design" or "catamaran hull kayak.". This kayak hull type prioritizes stability, at the expense of speed and maneuverability. Like a pontoon boat, a pontoon hull kayak is designed to sit flat on the water and resist rocking ...
The planking is 20mm thick and the final planks at the keel line have been cut down to about 25mm wide. Biaxial Glass at ±45˚ has been laid across the hull over the finished planking. The joins in the glass do not need to be overlapped. The laminators are pulling excess resin from the laminate with squeegees.
Materials and Tools Needed for Building a Catamaran. Building a catamaran requires a variety of materials and tools. The materials you will need will depend on the design of your catamaran and the type of construction you choose. Common materials used in catamaran construction include wood, fiberglass, composites, aluminum, and PVC.
Our most popular plans these days comprise full-sized patterns for every part of the boat, and come with extensive assembly manuals. A few of the older marques, such as the Chesapeake and Mill Creek kayaks, are on 24" x 36" paper; parts that fit within those dimensions are shown full size. Other components are scaled and dimensioned.
yes there is a boat inside all that foam! just like an ancient canoe builder could look at a tree and see the dugout canoe locked inside it, there is a functional foam boat inside all that rough ugly looking foam layer cake. start by taking the edges of the steps in the hull off, tapering the hull up from the bottom layer to the top layer of ...
Kayak kits and kayak plans are simple and straightforward to follow. Those characteristics make them the perfect winter or off-season project . But if you run stuck, there are plenty of helpful resources and happy folks to lend advice when needed. You'll learn the stitch and glue fundamentals of bringing these wooden dreams to life.
The free study plan for this kayak can be downloaded using the link below, but that will just give you a PDF drawing of the kayak design. For complete building instructions, you will need to use the link above and locate additional resources. The Iggy: Igdlorssuit. 3. Siskiwit Bay SOF.
KAYAK specifications: OAL: 95 inches. Max Width: 30 inches. Height: 15 inches (12" option) Weight: 40 pounds. Max load = 250 pounds. Draw: 4", with average weight operator. Well, I have completed yet another boat design/build. This took me exactly 3 weeks to build and get in the water.
catamaran; kayak; plans; Joined: Dec 2022 Posts: 20 Likes: 1, Points: 3 Location: Canada lvabd Junior ... take them to a boat builder, and that will likely be cheaper than a catamaran built from folding kayaks. Or as recommended already, get a beach cat, ideally with large volume hulls, some good drybags, and make yourself a tent. ...
Free Boat Plans You Can Build This Week (with PDFs) 1. The Wanigan. PC Duckworks Boat Builders Supply. The Wanigan boat began as a garvey design, which is one of the older boat plans known to the Americas. Traditionally, these boats were built as work scows and were very popular among American summer camps.