

Login to my account
Enter your e-mail and password:
New customer? Create your account
Lost password? Recover password
Recover password
Enter your email:
Remembered your password? Back to login
Your cart is empty

Pond Yachts: How to Build & Sail Them
Description.
This is beautifully illustrated in watercolors, and shows you a bunch of neat detail items to make your model building all the easier and more pleasurable.
Table of Contents:
- Introduction
- Getting a Perspective
- The Rule and why have a Rule
- Designing to fit the Rule: ideas for shape, aesthetics, of hull design, displacement ,and other practical matters.
- Materials needed
- Carving the hull
- Making and fixing the keel
- Making a rudder
- Paint and Finishes for hull, keel, rudder, mast, etc.
- Boat stands
- Going for a sail
- Living with a pond model
- Other boats to build
- Appendices: Glossary, Materials, Miscellaneous Helps
by M. de Lesseps
86 pp., hidden wire-o-binding, softcover
Customer Reviews
This a helpful book very informative and clear language about the principals of design and construction.
very handy for my project
I was expecting the information to be a little more technical
Recently viewed
Our Store is in Brooklin, Maine
at 84 Great Cove Drive. We're open Mon-Fri 8am to 4:30 pm Call 1.800.273.7447. WE'RE RIGHT HERE .
Timely Shipping
We are 99-3/4% sure... that we will ship your order within 24 hours Granted, that does not include weekends and holidays.
Secure payments
Rest assured... not only is our site secure, we do not hold your credit card/payment info.
- Opens in a new window.
POPULAR SEARCHES:
- Raspberry Pi
- Woodworking
- 3D Printing
- Maker Faire

- All Stories
- Magazine Projects
- Board Guide
- Magazine Issues
Projects from Make: Magazine
Wooden mini yacht.
Build a Wooden Mini Yacht this weekend.

- Time Required!: A weekend
- Print this Project

By Thomas Martin
Thomas martin.

When my son was 3 years old, I made a small bathtub boat with him, using scrap wood and a piece of dowel. It lasted much longer and got more of his attention than any dollar-store bath toy, and about six years later we decided to try building a larger boat for the pool and local ponds we fished.
Here’s the result of our experimentation: a simple and worthy pond sailer that’s rigged and scaled like a real yacht. You can build it in a weekend using readily available materials and tools.
Project Steps
Prepare the sailcloth..
It’s hard to find waterproof fabric that’s easy to cut and won’t fray. You can make your own by stretching ripstop nylon loosely over a frame or 2 hangers, and spraying it lightly (in a well-ventilated area) with polyurethane.
First spray up and down, and then back and forth, until the fabric is well coated but not saturated.
Let dry overnight.
Mark and cut the parts.
Download the project plan and print it at full size. Following the plan, measure and mark the mast, jib boom, and mainsail boom lengths on the ¼” dowel. Trace the hull from the printed pattern onto the top and 2 ends of the cedar block; cut templates or use carbon paper. Draw the keel and masthead crane patterns on the brass strips, and draw the bowser (rigging clip) pattern 8 times on the thin plastic.
Cut and drill all the parts. Any fine-tooth saw will cut the dowel, or you can roll it under an X-Acto blade and snap the score. Heavy-duty shears or a hacksaw will cut the brass; be sure to file away the sharp edges afterward. You can saw or file down the hull’s shape, then use a hobby knife or thin chisel to excavate the slot for the keel. Drill all holes, plus pilot holes for the screw eyes (in the hull, just poke pilot holes in by hand with a thumbtack).
Finally, file, sand, and smooth all parts. The more time you spend here, the better — especially if you plan to use a clear finish over the wood.
Mount the keel.
On the underside of the hull, mask both sides of the keel’s slot with tape. Wearing gloves, and in a well ventilated location, mix and spread some 5-minute epoxy into the slot using a scrap stick or wooden match.
Slide the keel into position and hold it there while the epoxy cures. You can square it up using a business card on each side.
Use a gloved finger to smooth the epoxy along the joint line, and fill any voids with more epoxy.
Finish the wood.
Finish the hull uniformly, or for a big-boat look, paint the outside of the hull and stain the deck.
Sand the hull with 100-grit paper over a sanding block, and again with 150-grit. Apply a first coat of paint or varnish, and re-sand with 180-grit before each subsequent coat.
For a stained deck, first paint the hull upside down, then re-sand the top perimeter to remove any overspray. Rub stain into the deck and edge, let dry, and coat with varnish or polyurethane.
For the mast and boom pieces, bevel the cut edges for a more finished look, then sand with fine grit to remove any fuzz. Stain if desired, and cover with at least 2 coats of varnish or polyurethane sealer, sanding lightly between coats.
Assemble the mast and booms.
Cut a slot in the top of the mast and glue in the masthead crane. Once that’s secure, follow the plan to install all screw eyes: 4 to the mast, 1 on the fore end of each boom, 1 more on the mainsail boom (for the boom vang), and 4 to the deck. Screw these in until the shank of the screw is completely into the wood.
Insert the brass brad down through the hole in the jib boom and bend it into a clew hook.
Use needle nose pliers to open the mainsail boom eye, hook it onto the eye on the mast, and close it. This forms the gooseneck, the joint that lets the boom swing from side to side (far left in the photo). Press the mast down into the hole in the deck with the masthead crane centered afterward, and tap it gently down into its hole with a hammer.
Add the sails.
After the sail material is dry, trace and cut it to the plan patterns. Lay the boat on its side on a hard surface with the masts and booms in place and fit the sails to the areas for rigging. For the grommets, cut a small X at each sail corner, insert a grommet up through the hole, press the cloth down around it, and tap the grommet flat with the eyelet tool until it firmly grips the cloth.
NOTE: It’s a good idea to practice setting grommets first with a couple of sailcloth scraps and extra grommets. It’s time for rigging. Knot and cut a short length of dacron line, thread it through a bowser, and string the boom vang. For these and all other knots, add a tiny drop of cyanoacrylate glue immediately after tying; the line is slippery and won’t hold knots otherwise.
Use 5″ lengths of line to tie each sail grommet to its corresponding screw eyelet or drilled hole with a square knot. You’ll need about 10″ for the top of the jib sail, which threads through 2 eyelets before tying off to the uphaul bowser.
Referring to the plans, tie the 4 lower connections on the booms first, and then add the upper lines for tension, so there are no wrinkles in the sails along the booms. Thread a bowser onto the jib uphaul as indicated: for their final tensions, you’ll adjust the jib using the uphaul at the top, and the mainsail using the boom vang.
For the backstay, tie in a long length of line at the masthead crane and install a bowser, routing the line through the eyelet at the stern.
Tighten the backstay and the sails so that they’re fairly tight but the mast is not bowed forward or aft. Finally, add the 2 lines called sheets. For these, cut two 15″ lines. Tie each one through the hole in the aft end of a boom, thread it through the sheet eyelet on the deck just underneath, then through 2 holes in a bowser, through the other sheet’s eyelet, and finally through the last hole in the bowser, doubleknotting the line.
NOTE: It’s important to tie the bowsers exactly as shown on the plan to make them work. The sheets let you adjust the angle (trim) of the sails — slack for downwind sailing or tight for crosswind — letting you cross a pond or pool in any direction that isn’t too close to directly upwind.
This project first appeared in MAKE Volume 20 , page 56.
From the Shed: New Arrivals

DIY Arcade Joystick Kit

Make: Arduino Electronics Starter Pack

Maker's Notebook - Hardcover 3rd Edition

Transistor Cat Kit

Our websites use cookies to improve your browsing experience. Some of these are essential for the basic functionalities of our websites. In addition, we use third-party cookies to help us analyze and understand usage. These will be stored in your browser only with your consent and you have the option to opt-out. Your choice here will be recorded for all Make.co Websites.

- Basic Kayaking Knowledge , Learn
15 Free Boat Plans You Can Build This Week (with PDFs)
Boatbuilding is one of the most ancient forms of craftsmanship still alive today. As long as our ancestors have had a curiosity about exploring open waters, they have been practicing and honing their boatbuilding skills.
To be honest, however, building a boat is no small task. It will require a lot of work and patience to ultimately create a finished product that you are happy with and that is actually seaworthy.
Of course, we have also included a few free boat plans. You can keep in your back pocket for the next time you are asked to build a cardboard boat as part of a contest or lakefront teambuilding adventure.
We hope that these resources help you in your journey to build your own boat!

Photo by SeventyFour via Shutterstock
Free Boat Plans
- The Wanigan
- The Slipper
The Handy Andy
- The Jolly Roger
- The Hobby Kat
The White Duck
- The Sea Midge
The Crazy Cardboard Boat
Why Build Your Own Boat?

Photo by Halsey via Shutterstock
There are a lot of reasons why you should explore building your own boat versus buying a pre-made model. Here is a quick breakdown of the most obvious benefits:
- You will know the ins and outs of your finished boat better than anyone
- It can be a great project to work on with your teenage or even adult children
- You will gain valuable skills molding and shaping wood and other materials
- You can design your boat for your specific needs
- You don’t have to trust the sometimes-questionable manufacturing of mass-produced boats
- You can create a boat that functions as your second home on the water
- You can save money if you source materials mindfully
Of course, most first-time boatbuilders still experience some level of trial-and-error. With patience and perseverance, however, you can craft a one-of-a-kind vessel that has no equal anywhere in the world.
Free Boat Plans You Can Build This Week (with PDFs)
1. the wanigan.
PC Duckworks Boat Builders Supply
The Wanigan boat began as a garvey design, which is one of the older boat plans known to the Americas. Traditionally, these boats were built as work scows and were very popular among American summer camps.
The design itself is very simple, but these boats can carry heavy loads. It can also handle a trolling motor being mounted to the stern so you can cover more ground if you want to use it as a fishing boat.
The creator of this boat plan became aware of some of the downsides of the garvey design, such as the heavier weight that made it less efficient than some other designs. So he combined elements of dory and wanigan designs to create a hybrid.
The main changes include an enlarged beam, tilted lathes to provide a stiffer hull, and knocking off the top strakes to reduce the boat’s overall weight.
The Wanigan text
These additional The Wanigan drawings  may also prove useful for your build process!
2. The Mouse

The Mouse is one of the most compact and nimble boat plans we have found for this list. It is an easy build and also a great boat for two kids or a single teenage paddler.
The original builder began with a one-sheet boat design in an effort to create the lightest and most affordable boat possible. This means it is only suited for calm waters and should not be used in high winds or wavy conditions.
That said, it was built in roughly 12 to 24 hours of work time and doesn’t require a full workshop to construct. The main material that is required for building this boat is quarter-inch plywood. But the builder recommends using one-inch by half-inch pine or something a little sturdier.
The plywood and pine components are held together using a method called ”˜stitch and glue’. This method requires choosing one of the best glues for kayak outfitting , which are typically made of epoxy and glass tape rather than something cheaper like polyurethane.
The Mouse Instructions
Also, here are a few extra useful The Mouse Notes for builders
3. The Slipper

The Slipper is the first of many sailboat plans on our list and it is faster, easier, and cheaper to build than most. It also features a deeper cockpit than many other sailboat designs, which makes it safer for intermediate sailors.
This sailboat plan features dual steering stations so that you can sail from inside or outside of the helm. It also includes a centerboard trunk that hardly intrudes into the cabin at all. So that, it is easier to work around while you are in the cockpit.
The exterior hull and cabin of this sailboat feature a modified dory design using two sheets of plywood ripped to three feet wide before being joined together. The resulting hull is a modified V-shape that reduces drag.
The centerboard of this boat can also be winched up to the level of the top of the cabin or lowered down to alter the draft. This allows you to customize the boat design for a stiffer and more weather-worthy vessel if you need it.
The Slipper was also intentionally designed with an aft cabin that naturally helps to keep the bow pointed into the wind whether you are underway or the boat is anchored in the port.
The Building Slipper
4. The Handy Andy

PC DIY Wood Boat
The Handy Andy is a great little 10-foot portable rowboat for hunting, camping, fishing, and other recreational uses. It is actually the only folding boat design on our list, which makes it best for folks that need the most portable boat plan possible.
This boat features a 42-inch beam and a depth of about 15 inches at the mid-section. It also weighs roughly 80 pounds when assembled and can handle up to three average-sized human passengers.
The design boasts a flat bottom with canvas-bound edges and the primary material used for construction is ⅜-inch marine-grade plywood. Despite its lightweight nature, this rowboat can handle trolling motors or even outboard motors with a maximum of five horsepower.
Once finished, the hull can be folded or unfolded in less than a minute’s time.
This design makes it one of the only boats on this list that can be stored in a truck bed or easily carried by two people to be launched at more remote locations.
5. The Junior

If you are looking for an all-purpose dinghy that can handle almost any use you might imagine, look no further than The Junior free boat plan. It can carry three or four average-sized adults and is much easier to row than a traditional dinghy.
It is also durable enough to be equipped with a small outboard motor. You could even set it up with sailing equipment if you want to use it as a sailing vessel. As we said, this is truly an all-around boat design!
This boat plan requires constructing three frames that will provide the majority of the load-bearing support. The builder recommends using ¾-inch framing with ⅜-inch plywood as the exterior material for this boat build.
Resin glue and flathead screws are also required to hold this boat together. But there is a full list of materials included in the plans we have linked to below. Sticking to that plan should also give you enough leftover materials to construct two six-foot oars for rowing this boat until you install a trolling motor or outboard motor down the line!
6. The Jolly Roger

Channel your inner Captain Morgan when you are following these plans to build your very own Jolly Roger boat. This flat bottom boat design is designed for pond fishing . It can also be a useful yacht dinghy for getting from your dock to a larger vessel anchored offshore.
The plan follows conventional dinghy construction methods but also includes a few modifications that will save you time and energy. The wide design is super stable for boaters of all ages.
The keel, frame, chines, and risers are all cut from ¾-inch oak, ash, or any other trusted hardwood you can get your hands on. For the smaller components, the builder recommends using cedar, cypress, fir, or white or yellow pine.
Because this boat plan is also sturdy enough to handle a small motor, it includes important points for protecting the wooden hull from spark plug damage.
Be careful to follow these guidelines to build the safest boat possible if you imagine installing a motor down the line.
The Jollyroger
7. The Cork

The Cork is another simple rowboat design. This one trends away from the flat bottom plans that we have included thus far. Instead, it features a deeper, V-shaped hull that makes it better suited to more efficient rowing and easier maneuverability.
It can be rowed easily from either seating position and is durable enough to handle up to three average-sized adult passengers. The ends of the boat are identical, which allows for multi-directional rowing.
The list of materials required for this boat plan should cost you between $30 and $50, depending on your location and hardware costs there. The resulting build is lightweight enough for two people to be carried and also to be transported on top of a vehicle .
Inside the boat, the builders use aluminum tubing to secure the struts that hold the seats. This material choice keeps the overall weight of the boat down while still adding the necessary rigidity across the beam of the boat.
8. The Hobby Kat

The Hobie Cat is one of the most iconic and recognizable small sailing vessels ever made. This Hobby Kat plan is your answer to building your own iconic sailboat without spending thousands of dollars.
Your finished boat will be able to handle speeds of up to 20 miles per hour. It will be a super fun vessel for windy days on the lake or bay. The builder was able to construct the hulls, decking, and rudder for this boat while spending little more than $200.
From there, they purchased and installed the mast, boom, sail, and rigging, which brought the total amount spent to roughly $650 (still much less than a name-brand Hobie!). Without the mast and sail, this boat weighs roughly 165 pounds and is constructed using primarily 3/16-inch marine plywood.
You can also elect to build your own mast, boom, and sail if you have the time and skills to do so.
Those elements are not included in this boat plan, but they do offer some recommendations for where to buy these components!
The HobbyKat
9. The Tern

Named after the common seabird found around the world, the Tern is a lightweight and nimble sailboat with a 72 square foot base design. She is made for inland sailing and planes very well in moderate breezes.
The hull design also provides minimal water resistance and the small floor plan makes this boat easier for intermediate sailors to handle. Even though it offers a small footprint, this boat is sturdy enough to handle up to four adult passengers.
One of the best things about this boat plan is that it can be built almost entirely by using only common hand tools.
Of course, you can speed things up if you have power tools and you are skilled enough to use them correctly.
The Tern boat plan includes a 20-foot mast, but you can shorten that length if you desire. The plan includes a complete list of materials and step-by-step instructions on how to plane and assemble each element.
10. The Falcon

As you might expect from its name alone, the Falcon is an incredibly speedy sailboat for its size. It boasts a 14-foot centerboard and can handle two to four passengers, depending on its size and weight.
In tests of the original build, the creators claim that this boat out-distanced many Snipe and Comet sailing vessels as well as pacing evenly alongside longer 18-foot sailboats. When finished, your boat will have a six-foot beam and a total weight of roughly 475 pounds.
For the main framing components, they recommend using white oak and plywood will be the main material used in the hull construction. The hull features a V-shaped that was inspired by larger schooners.
The Falcon is best suited to sailing on bays, lakes, and wide rivers. It is also a boat plan with just under 120 square feet of deck space and it is a great build for amateur craftsmen and sailors.
11. The White Duck

The White Duck is a flat-bottomed rowboat with a total length of 13’6” and a four-foot beam. The cockpit is approximately 15 inches deep all the way around and this boat can handle up to five passengers while maintaining buoyancy and stability.
When fully constructed, it will weigh roughly 200 pounds, but the final weight will depend on the type of lumber you choose for your build. This boat plan features plywood planking over solid wooden frames.
The White Duck is built with a pointed bow that cuts nicely through the water. The flat stern of this boat design will make it easy to attach a small outboard motor with a maximum of six horsepower.
As you might expect from its name, this rowboat is a great option for duck hunting trips. That being said, it is a highly versatile craft that can also be used for pond fishing or casual rowing on your nearby lake.
12. The Sea Midge

The Sea Midge is one of the smallest rowboats on our list and it is ideally suited for one average-sized rower or two small paddlers. It is only about 8 feet in length and offers a 52-inch beam at its widest point.
The Midge’s small dimensions make her ideal for navigating narrower creeks and streams. With an approximate weight of 62 pounds, she is easy to maneuver on the water and can also be much more easily transported than some of the larger boat plans on our list
The Seamidge
13. The Zephyr

The Zephyr is a compact and speedy dinghy sailboat that measures roughly 14 feet long and approximately five feet across. This boat style was originally developed for safely crossing the English Channel. This means it can stand up well in rough waters.
When finished, it is also light enough to be transported on a small trailer or on top of a larger vehicle.
The boat plan calls for using hemlock or fir for the framing and oak or Douglas fir for the keel and chines.
14. The Gypsy

The Gypsy is a small cruising sailboat that is meant to be equipped with an outboard motor for powered locomotion. The original design resulted in an incredibly seaworthy vessel that logged more than 6,000 nautical miles in her lifetime.
It includes a comfortable cabin that makes it well-suited for multi-day sailing adventures. This boat plan includes improvements on the original design that will help you build an extremely durable and long-lasting sailboat.
The Gypsy boat design will help you construct a vessel that can handle a motor up to 25 horsepower so that you can enjoy cruising speeds of up to nine miles per hour.
While it may require a bit more of an investment in time and money, it will also help you produce one of the best boats you can build with a free boat plan!
15. The Crazy Cardboard Boat

PC Saint Dominic Catholic School
Finally, let’s talk about a crazy cardboard boat plan that you can build in less than a day. This is a great boat plan to bookmark for your next teambuilding project so that you can earn bragging rights with your coworkers.
The plan calls for using 1.5 sheets of cardboard. But you can use the remaining half sheet to build your own boat paddle if you want to get creative.
Triple-thick cardboard is best for this boat plan. But you can always double up thinner sheets if that is all you can find.
These plans include an easy-to-follow diagram for marking, cutting, and folding the cardboard sheets to create the hull of your boat. From there, it calls for using contact cement and construction adhesive to seal the edges and corners.
If you are looking to save a little money on this build you could also use duct tape and then wrap the entire design in plastic sheeting to provide waterproof qualities.
Overall, this build is one of the cheapest and easiest on our list. It is also a great project for hot summer camp days on the lake or river!
15 Free Boat Plans You Can Build This Week (with PDFs) – Final Thoughts

Photo by Alexandra Soloviova via Shutterstock
We hope that you now have a couple of free boat plans to inspire you to begin your own construction project.
Don’t hesitate to check out YouTube for some useful boat-building videos when you are getting into the nitty-gritty of these build processes!
Enjoyed 15 Free Boat Plans You Can Build This Week (with PDFs)? Share it with your friends so they too can follow the Kayakhelp journey.
Share on pinterest.

Peter Salisbury
Pete is the Owner of KayakHelp.com. Born and raised in Cleveland, Ohio, he grew up kayaking, fishing, sailing, and partaking in outdoor adventures around the Great Lakes. When he’s not out on the water, you can find him skiing in the mountains, reading his favorite books, and spending time with his family.

Important Registration Information - 2024 Registration
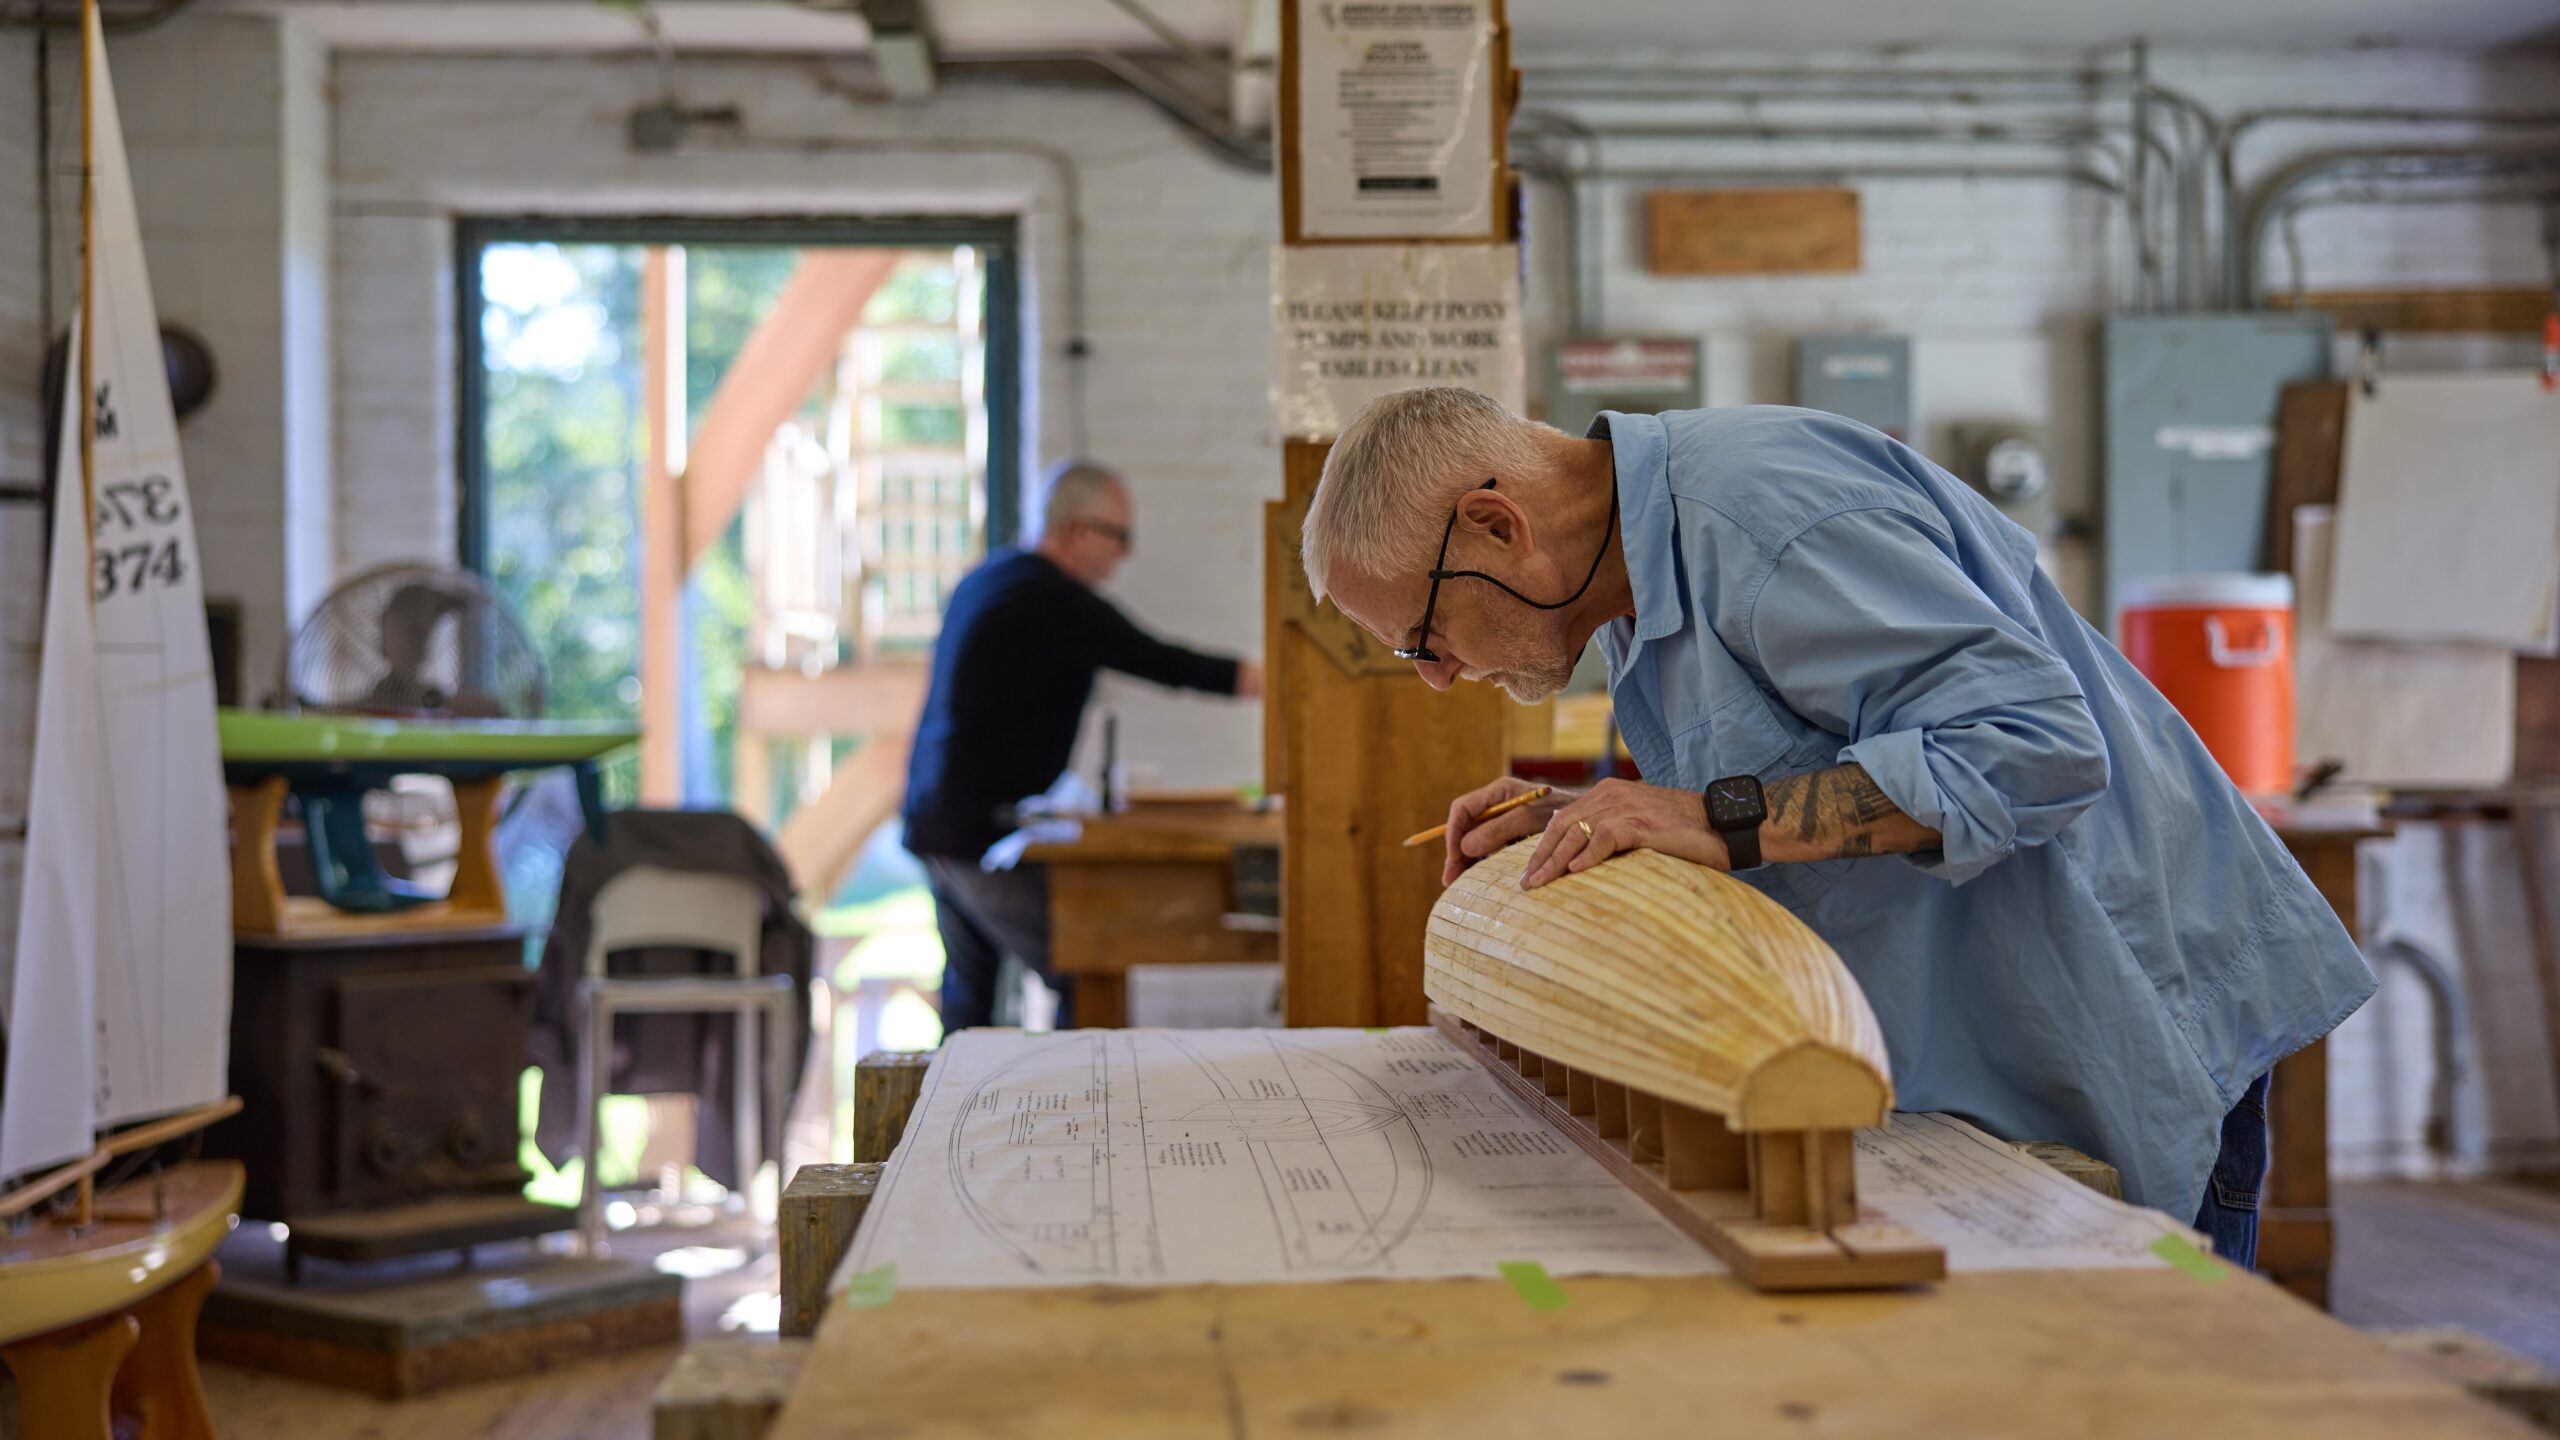
Build Your Own Plank Constructed Pond Yacht
A vintage marblehead-class pond yacht designed for radio control..
While growing up in western Pennsylvania, Bruce Richter spent countless hours in his dad’s workshop learning the ropes, building models, and making sawdust before getting sidetracked with garage bands, sports, and college. The urge to build returned around the time he and his wife Jan moved to New York City, although he quickly realized apartment living wasn’t exactly conducive to woodworking. The planets aligned when he discovered WoodenBoat School and Kerbs Boathouse in Central Park, home to over one hundred radio-control sailboats. Since then, Bruce took WoodenBoat School’s pond yacht construction course six times and served as former instructor Thom McLaughlin’s assistant before taking over as lead instructor a few years ago. Bruce has earned several national craftsmanship awards for the Vintage Marblehead RC sailboats he built at WBS. He is former Commodore of the 100-plus-year-old Central Park Model Yacht Club, has served as Class Coordinator of the US VMYG Vintage Marblehead fleet, is designer/art director of the vintage group’s publication The Model Yacht, and occasionally builds guitars. Following a career as a writer/creative director in major New York City advertising agencies and as president/executive creative director of his own marketing services firm, Bruce and wife Jan are beginning their next chapter in life as Blue Hill, Maine transplants.
This course is appropriate for students with some knowledge and experience. Basic knowledge and use of hand tools is required for most shop courses. Basic knowledge and ability to sail is required for most waterfront courses.
This course involves a low level of activity throughout the week including: occasional standing and working, seating is usually available, working on your own project at your own pace is common.
This is a six-day course ending Saturday
Other Sessions: September 1-7
Pond Yacht I: $385 (Includes CNC cut molds, strongback, keelson, planking, fin, and rudder.) Pond Yacht II: $169 (Includes materials to finish the boat other than sails, fittings and electronics.) Pond Yacht III: $35 (Shop supplies to help you continue your project.)
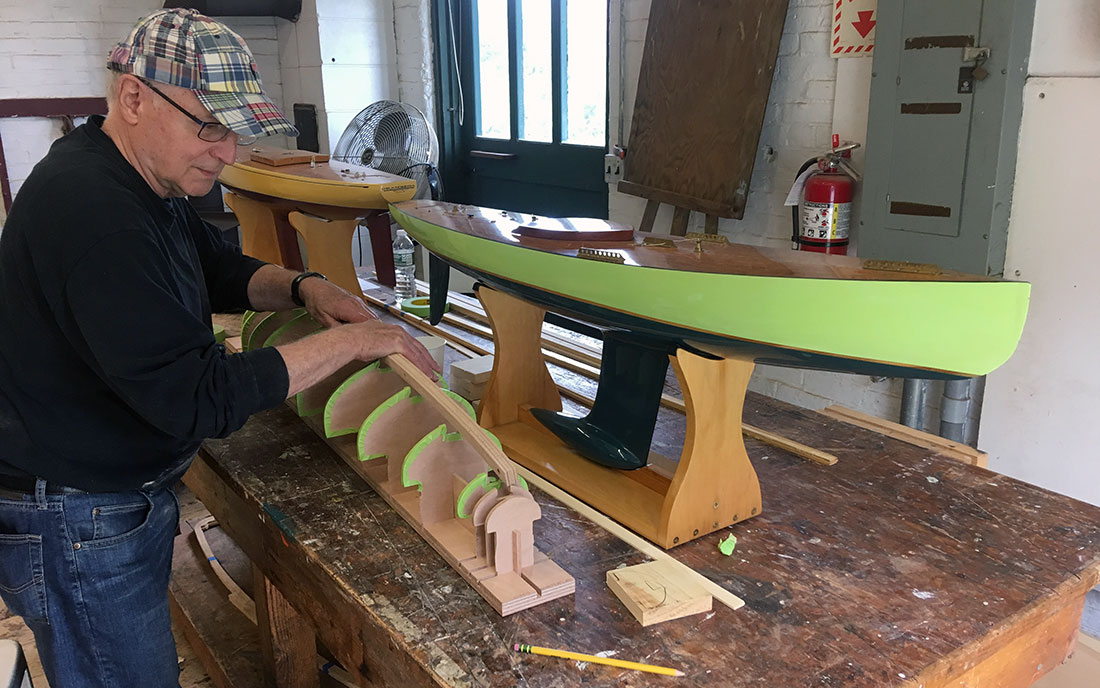
In this course each student will begin the construction of his/her own pond sailboat using the plank on frame process. This practice is similar to those used in building full-sized boats and allows for a flowing hull form that is beautiful on display and swift on the water. The course boat NORUMBEGA was designed by former instructor Thom McLaughlin. The class of this boat is known as Vintage Marblehead (VM) and is still actively sailed today under the guidance of the U.S. Vintage Model Yacht Group. The Marblehead class of small boat originated in 1932 using minimal design requirements of 50″ LOA and 800 square inches of sail. When fully rigged the boat is over 7′ tall, which makes it quite impressive from shore. The boat can be easily dismantled for transport. Construction of this pond yacht will pleasantly challenge and inform the builder. While group and one-on-one instruction will take place daily, students will also make decisions based on blueprints and developing an eye for form. During this week, the boat will be planked, faired, and the fin and rudder will be fabricated. Bruce will also discuss the steps that follow to complete the boat—decking, rigging, electronic installation, and painting.
Students who have started construction of their VM model in previous years at WoodenBoat School are also welcome to participate in this course to finish their boat. This week will be an excellent opportunity for further guidance. It will also provide inspiration to those individuals just beginning their boat and to view firsthand the final steps in construction.
This course is appropriate for students with some knowledge and experience. Basic knowledge and use of hand tools is required for most shop courses.
“Bruce Richter was an excellent instructor. He taught the pond yacht course in a knowledgeable, caring, and professional manner.”
T.S., Wilbraham, Massachusetts
“Bruce Richter taught a great course. I liked that he checked our work each evening and made note of our mistakes to correct the next day. He pulled together regular meetings to discuss theory. I especially enjoyed the pond yacht history lesson! Great teaching skills. Great personality and a sense of humor.”
J.J., Phoenix, Maryland

Register For This Course
Courses fill quickly, so don't delay if this is a course you want to take.
Related Courses
Woodcarving, carving name boards, introduction to woodworking.
|
|
|
| ||
|
|
|
|
All boats are built to order
for more information e-mail
Something different a Z scale train layout in a briefcase
11/30/2010 Long Beach CA.
Jack Malone
Today we lost a very good friend, Love you Jack "Godspeed"
Jack and his winning Newport 12 #701
A project in the shop now under construction.
15 ft. Chester Yawl boat
Contact us for more information about our boats E- MAIL Mailing Address: 5264 N. Ventura Ave. Ventura CA. 93001 Want more information about model sailing? look at our links page .
Thanks for stopping and come back soon.
copyrighted � 1998-2021 Pondboats.com all rights reserved

Creating Historic Model Ship Kits Since 1905
Pond yachts.

$ 23.50
About Pond Yachts
Pond Yachts: How to Build and Sail Them. By M. de Lesseps. An entertaining and practical guide to the nearly forgotten art of designing, building and sailing traditional wooden pond models Profusely illustrated with watercolors and sketches by the author. (86 Pages, Spiral Bound).
Join over 5,000 readers of our monthly newsletter!
Example: Yes, I would like to receive emails from . (You can unsubscribe anytime)

View Catalog
Order catalog, download catalog, hours of operation.
- Open Year Round!
- Mon - Fri: 8 am - 4 pm
- Saturdays: 9 am - 4 pm (May to Oct)
- Closed Sundays and Holidays
- Call for Appointment
Take Trip to BlueJacket Shipcrafters
- #1-(800)-448-5567
- [email protected]
- 160 E. Main Street, Searsport, ME 04974
Social Media
- Ordering Info
- Newsletter Archive
© 2024 Bluejacket Shipcrafters, Inc. All Rights Reserved. Privacy and Terms of Use Policy .
The model yacht company specializes in buying, selling and restoring vintage model pond yachts and model sailing yachts.
We offer a selection of restored, original and unrestored model yachts and steam boats.
We also sell marine art, maratime antiques, yachting photographs, and broker the sale of good quality models boats on behalf of owners.
We undertake selective restorations of model yachts for clients.
Please contact us for further information.
- DELIVERY & RETURNS
50th Anniversary Collectors Issue - September/October Issue No. 300 Preview Now
50/800 Marblehead Pond Yacht
After taking Thom McLaughlin’s class on building pond yachts at the WoodenBoat School in 2009, John Stoudt spent the rest of that year into the early winter of 2010 working on this model. It is a 50/800 Marblehead Vintage class design that John built with very thin planks, tacked to wood frames. John also planked the deck. All of the fittings are solid brass.
Design Specifications
ACCESS TO EXPERIENCE
Subscribe today.
Publishing dynamic editorial content on boat design construction, and repair for more than 40 years.
1 YEAR SUBSCRIPTION (6 ISSUES)
Print $39.95, digital $28.00, print+digital $42.95, from launching.

From the Community

Cheerio II, 1931 46' yawl, formerly owned by actor Errol Flynn.

Handmade wooden canoe
Beautiful hand built wooden canoe. Design modeled on the Wabanaki Indian canoes of Maine.

1929 Hacker Craft Runabout 18'

Jimmy Steele Peapod
Good Vintage Boat - Hull Number 66 - Completed In 1989.
The home of the worlds best R/C Model Aircraft Designers
UK Manufactured to order: Guaranteed Quality
Products search
Login FAQ
[email protected] +44 (0)1684 311682
- Unorthodox Aircraft
- X-List Plans (Aircraft)
- F/F Sport & Competition
- C/L Aerobatic
- Round The Pole
- Brian Taylor
- Dennis Bryant
- Chris Golds
- Duncan Hutson
- Chris Williams
- Dave Hurrell
- Philip Noel
- Peter Miller
- Sepp Uiberlacher
- RCM&E Magazine Designs
- All Aircraft Plans not yet categorised
- All Short Kit (Sets)
- Scale Short Kit (Sets)
- Sport Short Kit (Sets)
- Depron Short Kit (Sets)
- All Laser Cut Wood Packs
- Scale Laser Cut Wood Packs
- Sport Laser Cut Wood Packs
- All Additional Wood Packs
- Scale Additional Wood Packs
- Sport Additional Wood Packs
- Private & Trainer aircraft
- Transport Aircraft
- WW1 Aircraft
- WW2 Aircraft
- JetWorks - Semi-Scale Park Jets
- Static Aircraft Wood Kits
- All Aircraft Parts
- ABS Sets & Fairing
- Cowls & Nacelles
- Intakes & Rads
- Spats & Undercarriage
- Spinners & Prop Nuts
- Cliff Charlesworth Cowls
- All Canopies & Screens
- Cliff Charlesworth Canopies
- Jilles Smits Canopies
- Pat Teakle Canopies
- Guns, Sights & Cockpits
- All Materials
- Depron Foam
- All Covering & Tools
- DiaCov 1000 Covering
- Lightweight Tissue
- Rotary Tools
- All Perma-Grit Tools
- Sanding & Filing Tools
- Cutting Tools
- Screwdrivers
- Hex Wrenches
- Clamps & Pliers
- Marking & Measuring
- Model Aircraft Covering
- Airbrushing
- Lighting & Magnification
- RTF Aircraft
- ARTF Aircraft
- Free Flight
- Books & Specials
- DVDs & Blu-Ray
- Bargain Aircraft DVDs SAVE!
- Full Size Focus CD
- Line Drawings
- Model Aircraft Magazine Plans
- Cabin Cruisers
- Coastal Forces
- Fishing Boats
- Paddle Steamers
- Leisure Craft
- Scale Traditional Craft - British Isles
- Merchant Vessels
- Scale Traditional Craft - Non British Isles
- Passenger Ferries
- Steam Designs
- Patrol Launch
- Rescue & Lifeboats
- Working Boats & Ships
- Traditional Craft - British Isles
- Traditional Craft - Non British Isles
- Racing Sailing Boats
- Sport Sailing Boats & Yachts
- Scale Sailing Boats & Yachts
- Competition Powerboats
- Competition Powerboats - IC
- Competition Powerboats - Electric
- Easy to Build Boats
- Engineering
- Hydroplanes
- X-List Plans (Boats)
- All other Boat Plans & not yet categorised
- All Plan & Hull Sets
- Sailing Plan & Hull Sets
- Motor Boat Plan & Hull Sets
- David Alderton Plan & Hull Sets
- All Boat Short Kit (Sets)
- Sailing Short Kit (Sets)
- Motor Boat Short Kit (Sets)
- RC Boat Kits
- All Static Model Boats
- Narrow Static Boats
- Motor/Steam Static Boats
- Sailing Static Boats
- Working Static Boats
- Ready To Run Model Boats
- All Boat Laser Cut Wood Packs
- Sailing Laser Cut Wood Packs
- Motor Laser Cut Wood Packs
- Sailing Additional Wood Packs
- Motor Additional Wood Packs
- All Boat Additional Wood Packs
- Hulls (FG & ABS)
- Boat Fittings
- Electronics (Boats)
- Plastic Materials & Parts
- Airbrushing (Boats)
- Rotary Tools (Boats)
- Internal Combustion Engines
- Steam Engines & Plant
- Workshop Equipment
- Model Railway Plans
- All Engineering Plans not yet categorised
- Military Vehicles
- OO Gauge Parts & Kits
- Scale Model Buildings
- O Gauge Parts & Kits
- Scale Model Boats
- HO Scale Parts
- Maintenance Trays
- White Metal Fittings
- Airbrushing (Engineering)
- Rotary Tools (Engineering)
- Engineering DVDs & Blu-Ray
- All Model Aircraft Covering
- DiaCov 1000
- Sanding & Filing
- Aircraft Books & Specials
- Aircraft DVDs & Blu-Ray
- Bargain DVDs SAVE!
- Boat Books & Specials
- Boat DVDs & Blu-Ray
- Books & Specials
- Chargers & Leads
- Control Boards & Accessories
- Hot-end Parts/Kits
- Motors/Drivers
- Teeth, Wheels & Bearings
- VORON Parts
- Automotive Parts
- Crafts & Games
- Electric Scooters
- Medical / Health
- Shot Glass Trays

30 years Experience
Of Scratch Building & Modelling The Home of the Model Builder

Made in our Workshop
Laser Cut & Printed to Order Guaranteed Quality & Detail

Sailing Boats & Yachts
Showing 1–50 of 161 results

Varmint MM2129

Water Baby ‘A’ – Plan

Ardent – Plan + Article

Argus MM405

Ariel MM746 Static Sail Plan

BALLAST PROFILES

Banoosh MM1353 Static Sail Plan

Barge Yacht MM902 Static Sail Plan

Birkenhead Catamaran MM1121

Bluebottle MM293

Boom Safar MM1327 Static Sail Plan

BRAINE AND VANE STEERING

Breakaway MM1369

Breeze (Bristol Channel Pilot Cutter) – By Dave Alderton

Brig SY34 Static Sail Plan

Brigantine SY33 Static Sail Plan

‘Hilda 2’ (Bristol Channel Pilot Cutter) – By David Alderton

Britannia – The Kings Racing Cutter – Plan

Buoy Cat MM728

Burutu & Bajima Tug

Caribee MM403

Celia Jane MM1365

“Gypsy Queen” Yarmouth Lugger

Galway Hooker – by Mike Mayhew of Waverley Models

China Boy MM501

Nookie Bear – Radio 10 Rater – Plan

Wing Ray – Plan by Vic Smeed

Comet Catamaran Plan MM1139

Crackerbox – Plan

Cumulus (Marblehead) – Plan & Article

Cutter Rig SY29 Static Sail Plan

Cygnette MM762

Dabchick – Plan

Dinghy MM153 Static Sail Plan

Duckling RC1344

Dutch Auxiliary MM240

Dutch Yacht MM1203 Static Sail Plan

Early Sixth Rate SY24 Static Sail Plan

Enterprise Static Sail – Plan

Eowyn Of Rohan MM1181

- Patrol Launch (11)
- Scale Traditional Craft - British Isles (9)
- Scale Traditional Craft - Non British Isles (5)
- Cabin Cruisers (27)
- Coastal Forces (83)
- Fishing Boats (25)
- Leisure Craft (47)
- Rescue & Lifeboats (23)
- Merchant Vessels (51)
- Steam Designs (23)
- Passenger Ferries (12)
- Trawlers (41)
- Tug Boats (85)
- Warships (128)
- Paddle Steamers (12)
- Working Boats & Ships (148)
- Traditional Craft - British Isles (14)
- Traditional Craft - Non British Isles (7)
- Warship (4)
- Racing Sailing Boats (26)
- Scale Sailing Boats & Yachts (72)
- Sport Sailing Boats & Yachts (27)
- Easy to Build Boats (14)
- Engineering (21)
- Competition Powerboats (7)
- Competition Powerboats - Electric (7)
- Competition Powerboats - IC (9)
- Hovercraft (11)
- Hydroplanes - Electric (7)
- Hydroplanes - IC (7)
- Straight Runners (2)
- Submarines - Scale (18)
- Submarines - Sport (3)
- Unconventional Boats (16)
- X-List Plans (Boats) (20)
- All Boat Plans not yet categorised (149)
Filter by price
Average rating.
- Rated 5 out of 5 (2)
- Rated 4 out of 5 (1)
J Class Yachts For Sale (Sail)
- Upcoming Events
- AMYA J CLASS History
- Stuff for Sale
- Construction Videos
Building a J Class Model
By john hanks iii.
Now you may be wondering what is involved in building a model of a J Class yacht. I will give you an idea of what is involved in getting your J model in the water.
To begin with, let me say that you will need to do some scratch building to get your J model completed, regardless which yacht you choose to model. The scratch building will involve the deck, the rig, and probably the hardware associated with the mast, boom and rigging. With that said, you will need to decide which yacht you would like to model. In the full size J Yachts there was a definite advantage associated with which hull was in the water, but with the models, it appears that any of the J designs will make a good fast sailing model, if it is built correctly. So your decision should be driven by your personal preference for a particular boat. Once you decide which yacht you would like to model you will need to either buy a fiberglass hull or get the drawings for your chosen hull. There are hull line drawings available in the proper scale for all of the J's as well as some deck plans. You can get line drawings from several of the maritime museums, such as the Mystic Seaport Museum.
The amount of time that you will spend on building your model will vary with your building ability, whether you start with a fiberglass hull and how much detail you want to put on your model. Should you decide to scratch build the entire model with a lot of detail, you should plan on spending about 500 to 550 hours building your model. If you begin with a fiberglass hull, subtract about 150 hours, if you do not want to detail your model, deduct about another 100 hours. The cost of materials will be about $800 to $900 if you decide to completely scratch build your model.
I will begin the actual building process with a plank-on-frame hull. You can skip these steps if you start with a fiberglass hull. The process for completing the remainder of the model will be the same from that point on.
To begin the building process, you will need to get your drawings ready by extending each frame to a “waterline” that is above the deck line on the drawing. This new “waterline” will be the part of the frame that rests on the building board. The new “waterline” gives you a flat plane so that all of the frames are referenced to the building board surface, while allowing the arc of the sheer at the deck line to maintain its shape. Your modified drawing should show the hull shape, the shape of the deck beams, and the building board surface.
You will begin the building process by building a building board. The easiest way that I have found to do this is to buy an 8 foot long 4”x6” and mount it at a convenient building height on 2”x4” legs. You will need to make sure that the 4”x6” plank is straight and true and that it will stay that way through out the building process, as this will determine the trueness of your model.
Mark a centerline on your building board and then mark all of the station locations on the centerline. You will then need to draw a line perpendicular to the centerline at each of the station locations. You will next attach small blocks (approximately 1-1/2 x 1-1/2 x ¾ inch) to the building board on the centerline and aligned with the perpendicular station lines. The blocks need to be placed so that the frames that will be glued to these blocks will be centered on the perpendiculars.
The next step will be to cut out the frames that will form the hull. For this step you will need to keep in mind the difference between the line drawings for a metal hull versus a wooden hull. The drawings for a metal hull show the frames to the outside of the plating and for a wooden hull, they are to the outside of the framing, not the hull planking. This will make a difference in your model, as all of the Js were metal boats, and if you draw your frames to the lines, your model will be oversized by the thickness of your planking.
I use 1/8 inch Luan plywood for the frames. The plywood comes in a 4’x8’ sheet and I can get all 28 to 30 frames from one sheet of plywood. The frame patterns are cut from your drawing, and each frame pattern is traced on the wood. With careful placement you should have no trouble getting all of the frames traced onto the plywood. You will need to draw the cutouts for the keel, inwales and king plank in the frame tracings. The centers of the framed are also cut out so that you end up with a ring of wood that is about ¾ inch from the outside to the inside of the frame.
When I cut my frames I do not try to cut on the line that I have drawn; I am not that good with the saw. I leave a little wood, about a 1/16 inch next to the line and sand the frame to the final shape. I find that this makes it much easier to control the accuracy of the frame shape. Once all of the frames are cut and notched for the keel and inwales, they are glued to the blocks on the building board. At this point you should be able to sight down the frames and get a good idea of the shape of your hull.
With the frames glued in place, you are now ready to install the keel and the inwales. I like to use ¼ inch birch plywood for the keel and 1/4x1/4 inch square for the inwales. The inwales can be cut from the same material that you will use for the planking. The hull framing is very limber at this point but it becomes very ridged once the keel and inwales are in place.
The hull is now ready for planking. I have used pine, bass, aspen, spruce and alder for planking. All work well. The availability and price of the material is what determines which material I use. When I built my first J some 30 years ago, clear pine in 8 foot lengths was plentiful and inexpensive. Since then, it has become hard to find and very expensive. As a result I have used other woods that were available, hence the bass, aspen, spruce and alder. The planking material is cut into strips that are about 5/32 inch thick and 3/8 inch wide. This is a nice working size, as the planks are limber enough to form to the hull without the need for spiling (tapering), wetting, or steaming them. You will start the planking at the first frame and end at the last. The 2 to 3 inches of hull that remain at the ends will be filled with solid wood blocks shaped to the dimensions of the hull. Begin planking your hull at the sheer and work to the keel. Each side of the hull will require about 50 to 60 planks. Remember that you will need to alternate sides of the hull as you plank so that you keep the stresses equal on both sides of the hull, thus preventing distortion in the hull.
You will need to change direction of the planking when you get to the bilge area of the hull. The planking will take on an increased twist towards the stern that will prevent the planks from laying fair. The planks will tell you when you have reached this point, usually about 15 to 20 planks up on the hull. To overcome this you will need to lay a plank in a straight line along the hull so that it lays flat between the areas where the existing planking meets the keel. This will leave a lens shaped gap of about 4 or 5 inches between this plank and the existing planking at the middle of the hull. Fill this area by planking from the new plank that you laid down to the existing planking. Once you have completed that step, then continue to plank the rest of the hull. When you have finished your planking, you are ready to attach the bow and stern blocks, shape them, and sand the entire hull to get it ready for fiber glassing.
I like to build the rudder next and fit it to the hull. I build the rudder as I would build an airplane control surface, with a leading edge spar, three ribs, and a trailing edge. The framework is then covered with 1/32 inch plywood. The square tube that accepts the 5/32 inch brass rod rudder shaft is installed in the leading edge as well as the pivot pin at the bottom of the rudder. The hull is drilled and the rudder log is installed and the rudder is fitted in place. Once the rudder is fitted and works well, the hull is fiber glassed using a single layer of 6 ounce cloth and three to four coats of resin. Each coat of resin is sanded before the next coat is applied. When the sanding is complete you will have a smooth and fair hull that will look great when it is painted. The hull is now ready to be removed form the building board. At this time, you should also have a stand built and ready to accept the hull.
Once the hull is off of the building board, it is time to seal the inside with epoxy and install the mechanical workings in the hull as well as install any reinforcements that are needed, such as at the chain plates, mast step, and sheet exits. From this point on, the building process is the same for the fiberglass hulls once you have the deck beams in place. This is also the time to lay out the hatch openings. When laying out the hatch openings you want to keep them as small as possible and still be able to do any work inside the hull that is necessary. Nothing is more frustrating than to find out that you cannot reach some part of your equipment once the deck is in place, so be sure that you can work on and remove and replace all of the fittings, winches, ballast, etc., through the hatch(s) that you have framed in your deck.
Building the deck is the next big step in getting your J ready to sail. There are several different ways to build your deck, and your decision on how much scale detail you want on your model will drive part of that process. If you want a slick deck with no scale detail, then a simple plywood deck will do. The 1/8 inch plywood will be more than adequate for the job and can be finished so that you have a very good looking wooden deck on your model.
Another option is to build a plank deck that represents the deck on the full size yacht. If this is your preference, then you begin by cutting the deck planking to the same dimensions as the hull planking. I cut my planks to a length of 15 inches so that I have scale 20 foot planks. To simulate the deck caulking, I use black construction paper glued between the planks. Once you have the planking cut, you will need to lay the king plank down the center of the deck and the water way planks down each side of the hull. All of the Js had the planking run parallel to the edge of the hull, so you will need to begin laying your deck from the edge of the hull, and work to the center. The paper between the planks helps the glue, thin CA, flow and form a good bond at the seam. From this point on you just continue your planking until the deck is completely covered. As you build your deck you will need to cut your planking at the hatches so you will have access to the inside of the hull when you have finished your planking.
When the deck planking is complete, you will sand the whole deck and get it ready for finishing. At this point, you should have a great looking model.
Again your decision on the amount of detail that you want on your model will determine your next step. If you opt for a scale appearance, by this time you will need to make the cabins, deckhouses, winches, cleats, and anything else that goes on the deck.
The hull is now ready for finishing. I use non-water-based, clear gloss, polyurethane on the deck, cabins, and spars and automotive acrylic enamel for the color on the hull. These make very nice durable finishes which should last many years on your model. I chose to use polyurethane because it does not yellow like varnish does as it ages. This is a personal choice driven by how you would like your deck to look as it ages.
At this point you will have to ballast your model. I have found that the easiest time to do this is after the model is painted and has the scale waterline in place. Place your model in a swimming pool or other suitable tank, and place the lead in the hull until the hull sits on the waterline that is painted on the hull. You will need about 60+ pounds of lead in a manageable form, about 5 pound pigs, for this exercise. Once the lead has been placed in the hull and the proper trim established, you will need to note where the lead is in the hull and the amount at each location. You can then remove the lead from the hull and using your notes, make molds for the ballast so that it fits into the hull cavities.
The next step is building your rig. The masts for the J models will be anywhere from 8 to 91/2 feet tall, depending on which boat you are building and how you lay out the sail plan. For support, the mast will need at least two sets of spreaders with accompanying side stays, and a diamond stay. I have used both aluminum and wood to make J masts. The last mast that I built was made from spruce and was 109 inches tall, with a tear drop cross section that measured about 1-1/4 x ¾ inches. The mast was tapered in its top 3 feet and had a bolt rope slot cut in it used to attach the main sail to the mast. The mast was made from two pieces of spruce that were glued together on the centerline with the grain in each piece set so that any warps canceled each other out. The result was a stiff spar that weighed about 1-1/2 pounds ready to step on the deck Extruded aluminum masts are also available in lengths up to 10 feet, from Ludwig Manufacturing. These masts have a bolt rope slot molded in them and are both light, about 1 pound for a 10 foot piece, and stiff.
The main boom and jib club were both made from spruce. The jib club was about 33 inches long and 1x1/2 inch in cross section and tapered to 1/2 x1/2 inch at both ends. The main boom was about 45 inches long and was about 1 inch from top to bottom with a scale cross section that resembled an old wine jug. These shapes were made for a model of Rainbow.
The gooseneck attachment was made for a piece of ¼ inch thick aluminum plate and secured in a slot cut into the base of the mast. The gooseneck and boom vang pivot on a single stainless-steel rod, (welding rod) about 3 inches long. The boom can be removed from the mast by simply pulling the pivot pin; then the gooseneck and vang are released. The sail can then be slid down out of the bolt-rope slot and rolled for storage.
This is a quick overview of the building process that is needed to build a model J boat.
Below is a list of most of the materials that were used.
2 – 1”x8”x8’ pine, aspen, bass or other suitable wood that can be cut into 5/32”x3/8” strips for hull and deck planking
1 – 4’x8’x18” plywood used for hull framing, 2 if you are using one for the deck
1 – 1’x4’x1/4” five ply birch plywood for the keel
1 – 1’x2’x1/32” plywood used for the rudder sheeting
1 – 1”x4”x8’ spruce for the mast and booms (optional if you are using an aluminum mast)
4 – ¼”x12”x.030” brass strap used for chain plates, mast, and boom fittings
1 – 1/8”x3’ stainless steel welding rod used for gooseneck pivot and spreader stubs in the mast
1 – 1’x6”x1/4” aluminum plate used for the gooseneck and vang fitting (use only if you are scratch building the fittings
1 – 5/32”x12” brass round tube used for spreader bases
1 – 3/16”x12” brass rod used for the rudder shaft
1 – 7/32”x12” brass round tube used for rudder log
1 – 3/16’x12’ square brass tube used for the rudder shaft socket in the rudder
60+ pounds of lead used for ballast
4 – 8oz bottles of thin CA used for planking the hull and deck as well as general construction
1 – 2oz bottle of medium CA for general construction
32oz of 30 minute or longer set epoxy used to seal the hull interior
1 – 10’x50” 6 oz fiberglass cloth used to cover the outside of the hull
2 – Quart cans of polyester resin with catalyst used with the fiberglass cloth
6 to 8 – 2” disposable brushes used to apply polyester resin
8 – Turnbuckles used for the side stays, boom vang and diamond stay
36 – 1-72x 1” stainless steel machine screws with nuts and washers used for various attachments
90’ – 60 pound test nylon coated stainless steel fishing leader with swages used for the standing rigging
8 – Single blocks used for back stay, winch arm, up haul and rudder control
1 – Spool of 40 to 60 pound test braided Dacron line for the sheets
12 – Bowsies for various rigging adjustments
Reference Information
Reference book: Enterprise to Endeavour by Ian Dear, ISBN 1-57409-091-7
This covers most of what you would need to build your J model. I did not mention the wood or brass that I used to make the scale detail, as most of it was obtained as scrap from a cabinet shop and salvage yard. Some additional things that you will need are a radio (at least 2 channels), a quarter scale servo for the rudder, and a sail winch, either arm or drum with about 3,000 inch ounces of pulling power. You would also need to order your sails from your favorite sail maker.
I hope that this answers most of your questions about what it takes to build a model of a J Class yacht. By the way the process described above applies to scratch building any R/C model sail boat, the only difference is the scale of the project. Good luck with your building project

AMYA J CLASS
1330 North Andrew Drive, Kuna, Idaho 83634, United States
Copyright © 2022 AMYA J CLASS - All Rights Reserved.
- Our Expertise
- Our Professionals
- Our History
- Work For Us
- Environmental Analysis
- Ecological Restoration
- Landscape Architecture and Planning
- Compliance Support
- Conservation Planning
- Ecological Research
- Renewable Energy
- Water Resources
- Public Sector
- Transportation
- Private Sector
- News & Events
South Bay Salt Pond Restoration

Santa Clara, San Mateo, and Alameda Counties

As a key member of the technical consulting team, H. T. Harvey & Associates addressed all ecological issues encountered during the development of alternatives for the restoration project. We analyzed biological resources impacts for compliance with the California Environmental Quality Act and National Environmental Policy Act, led the first phase of restoration design, and guided the project in acquiring regulatory permits. Our team also monitored the pilot levee breaching conducted for the restoration effort, developed monitoring and adaptive management plans, and incorporated appropriate public access features into the project design.
This project, the largest tidal and wetland restoration effort in the United States, had its share of challenges and complexities. The greatest challenge was trying to understand and balance the ecological tradeoffs among competing natural resources and stakeholder interests. The H. T. Harvey & Associates team of ecological experts worked to overcome these challenges, helped develop conceptual models for the restoration design, and helped develop a comprehensive adaptive management plan and the associated monitoring.
Project Contact
Steve rottenborn.
Principal, Wildlife Ecology
Other Public Sector Projects

Lacey Meadows Watershed Assessment, CEQA, Wetland Delineation Tahoe Truckee Watershed, Sierra County, California

The Presidio of San Francisco Habitat Restoration The Presidio of San Francisco
Hawaii’s Wildlife and Forest Action Plans State of Hawai‘i
Sign Up For Our Newsletter
Add your email to our mailing list to receive occasional ecological news from us.

IMAGES
COMMENTS
Designs / Plans. The WoodenBoat Forum is sponsored by WoodenBoat Publications, publisher of WoodenBoat magazine. The Forum is a free service, and much like the "free" content on Public Radio, we hope you will support WoodenBoat by subscribing to this fabulous magazine. To get WoodenBoat delivered to your door or computer, mobile device of ...
Learn how to design, build, and sail your own pond yacht with this book. It includes watercolor illustrations, materials list, rigging instructions, and tips for living with a pond model.
Build a Wooden Mini Yacht this weekend. ... a simple and worthy pond sailer that's rigged and scaled like a real yacht. You can build it in a weekend using readily available materials and tools. ... trace and cut it to the plan patterns. Lay the boat on its side on a hard surface with the masts and booms in place and fit the sails to the ...
This flat bottom boat design is designed for pond fishing. It can also be a useful yacht dinghy for getting from your dock to a larger vessel anchored offshore. The plan follows conventional dinghy construction methods but also includes a few modifications that will save you time and energy. The wide design is super stable for boaters of all ages.
The Marblehead class of small boat originated in 1932 using minimal design requirements of 50″ LOA and 800 square inches of sail. When fully rigged the boat is over 7′ tall, which makes it quite impressive from shore. The boat can be easily dismantled for transport. Construction of this pond yacht will pleasantly challenge and inform the ...
Pond Boats by Midlife Models . Builders and designers of contemporary Pond Boats. Handmade one-designs for R/C Sailing. High quality materials, craftsmanship and hardware. Great sailing and beautiful for display. Hull #10, hull #17 and a Yawl sail Ventura Harbor. Our handmade radio controlled boats sail on the pond or in the harbor, and look ...
Length 31cm, Beam 9cm, Height 47cm. Price: £75 + £8 P & P. Please visit or shop to see our Dragonflys in stock. If there are no Dragonflys in stock please e mail us at [email protected] to place an order. Delivery normally takes 7-10days after confirmation of order. Overseas customers please contact us for shipping price.
John Alexander started to design and build a series of A class boats called "Heather Glen" which in 1939 won the yachting Monthly cup (the model version of the Americas cup) with his Eldest son James being the skipper. Later in 1949 the boys won the British championship with "Scamp". Not everyone could afford an A class yacht and so ...
This 10 Tonner is built to the earliest plan we could find of a model yacht built to this rule which was publicized in the 1884 Model Yachtsman and Canoeist. A step back in time, she is typical of models seen racing on the Round Pond and Serpentine in early Victorian London where model yacht racing began. We have two versions of the 10 Tonner.
Pond Yachts: How to Build and Sail Them. By M. de Lesseps. An entertaining and practical guide to the nearly forgotten art of designing, building and sailing traditional wooden pond models Profusely illustrated with watercolors and sketches by the author. (86 Pages, Spiral Bound).
The model yacht company specializes in buying, selling and restoring vintage model pond yachts and model sailing yachts. We offer a selection of restored, original and unrestored model yachts and steam boats. We also sell marine art, maratime antiques, yachting photographs, and broker the sale of good quality models boats on behalf of owners.
From the Community. After taking Thom McLaughlin's class on building pond yachts at the WoodenBoat School in 2009, John Stoudt spent the rest of that year into the early winter of 2010 working on this model. It is a 50/800 Marblehead Vintage class design that John built with very thin planks, tacked to wood frames. John also planked the deck.
Some are JPG format. Multi-sheet plans will be provided with separate download links for each sheet. Select a class from the list on the right to see all the model yacht plans available in that class. Each plan will be listed with the boat name and a short description. Click on the product thumbnail to see a larger preview of the plan.
Ardent - Plan + Article. SKU: MAR3022. Two sheet plans for a classic ply chine sail cruising yacht length 900mm and beam 260mm. Hull lines and rig... £ 20.00 £ 18.00 Add to basket.
This is a quick overview of the building process that is needed to build a model J boat. Below is a list of most of the materials that were used. WOOD. 2 - 1"x8"x8' pine, aspen, bass or other suitable wood that can be cut into 5/32"x3/8" strips for hull and deck planking.
16′ Cabin Lynx An elegant 16′ catboat suitable for great daysailing and overnighting. The 16-foot Lynx is small enough to single-hand easily, yet the cockpit seats four adults comfortably. Its…. $38,900. Learn More. Arey's custom boats Our DesignsFrom the establishment of the Arey's 14' to today's most popular design, the Open 16 ...
The US VMYG is also a close collaborator with the Vintage Model Yacht Group (United Kingdom). Our organizational goals are the preservation, building, and sailing of older model yacht designs, and the study of the history of the sport of model yachting. "Vintage" primarily means any older model sailboats no longer sailed (or never raced) in ...
I believe the r-boat pond plans work well (link I posted above) - Art Read and I saw a few of them at the pond yacht races at the Wooden Boat Festival held over the 4th of July weekend here in Seattle. Art was quite admiring of them. [ 07-07-2004, 03:42 AM: Message edited by: Meerkat ]
Aug 29, 2016 - Information about pod boat construction. See more ideas about boat plans, pond, boat.
All hunting areas are boat-access only, except for Ravenswood. Additional information is available in the Visitor Center. A special use permit for hunting is required. ... The Project launches three public Working Groups to guide Phase 1 design and construction at each pond complex. Alviso Eden Landing Ravenswood. 2006. Project managers breach ...
Edging the Dumbarton Bridge, the Refuge's Ravenswood ponds offer views of shorebirds and the Bay. South of the bridge, Pond SF2 provides shallow water bird habitat and man-made nesting islands. A Bay Trail spur for walking and bicycling, 1.4-mile round-trip, edges the pond along the Bayshore. Two platforms overlook the 260-acre pond's ...
The South Bay Salt Pond Restoration Project is the largest tidal wetland restoration project on the West Coast. When complete, the restoration will convert 15,100 acres of commercial salt ponds at the south end of San Francisco Bay to a mix of tidal marsh, mudflat and other wetland habitats. The property was purchased by the State of California ...
Santa Clara, San Mateo, and Alameda Counties The California Coastal Conservancy acquired 15,100 acres of former commercial salt ponds in South San Francisco Bay with the intent of restoring them to a mix of tidal marshes, mudflats, managed ponds, and other habitats. Additional goals for the project were to manage floodwaters and provide the public with wildlife-oriented access