- PRO Courses Guides New Tech Help Pro Expert Videos About wikiHow Pro Upgrade Sign In
- EDIT Edit this Article
- EXPLORE Tech Help Pro About Us Random Article Quizzes Request a New Article Community Dashboard This Or That Game Happiness Hub Popular Categories Arts and Entertainment Artwork Books Movies Computers and Electronics Computers Phone Skills Technology Hacks Health Men's Health Mental Health Women's Health Relationships Dating Love Relationship Issues Hobbies and Crafts Crafts Drawing Games Education & Communication Communication Skills Personal Development Studying Personal Care and Style Fashion Hair Care Personal Hygiene Youth Personal Care School Stuff Dating All Categories Arts and Entertainment Finance and Business Home and Garden Relationship Quizzes Cars & Other Vehicles Food and Entertaining Personal Care and Style Sports and Fitness Computers and Electronics Health Pets and Animals Travel Education & Communication Hobbies and Crafts Philosophy and Religion Work World Family Life Holidays and Traditions Relationships Youth
- Browse Articles
- Learn Something New
- Quizzes Hot
- Happiness Hub
- This Or That Game
- Train Your Brain
- Explore More
- Support wikiHow
- About wikiHow
- Log in / Sign up
- Cars & Other Vehicles
- Boat Building

How to Paint a Boat
Last Updated: December 22, 2023 Approved
This article was co-authored by Jeanine Hattas Wilson . Jeanine Hattas Wilson is a Professional Painter and the President of Hattas Public Murals, Inc. With nearly 20 years of experience, Jeanine specializes in creating, overseeing, designing, and painting murals. Jeanine holds a BA in Advertising from Marquette University and a Studio Painting Minor from The Milwaukee Institute of Art & Design. She has studied at The Atelier Artien in Paris, France, Los Angeles Academy of Figurative Art, and under renowned artists such as Robert Liberace, Michael Siegel, and William Cochran. To date, Hattas Public Murals has painted nearly 5,000 commissioned works of art in homes and commercial and public spaces. There are 7 references cited in this article, which can be found at the bottom of the page. wikiHow marks an article as reader-approved once it receives enough positive feedback. In this case, 92% of readers who voted found the article helpful, earning it our reader-approved status. This article has been viewed 211,798 times.
As your boat begins to crack and fade after several years in the water, you have two choices -- hire a professional boat yard to paint it again or do it yourself. Painting a boat takes a lot of time and effort, from preparing the hull to buying the paint, but anyone can do it with some simple equipment and a few open afternoons.
Prepping the Boat

- Anything you cannot remove you should cover in painter's tape to keep clean and protected.

- Generally, running your finger along the surface, top or bottom, will tell you if there is still a coating-- it feels like a candle or a freshly waxed car.
- If you are in any doubt about the coating, go over the boat again -- paint will not stick to this waxy surface, so it all needs to go.

- Make sure you fill in any holes with marine-grade epoxy, found near the marine paint in hardware and boat stores.

- If the old coat of paint is flaky or damaged you will need to strip it and sand it away entirely.
- If the old paint is a different type than the one you plan to apply (non-vinyl vs vinyl paint), then remove it entirely.
- Never use a belt sander on your boat
- Warning: wear a respirator and eye protection when sanding, as paint chips are toxic. [5] X Research source
Painting the Boat

- When available, paint your boat in a covered area.

- Two step polyurethane paint, while longer lasting, takes precise mixing and application techniques to use.
- Most gel coats, excepting expensive, high-end options, will fade in 1-2 years.

- After the first coat has dried, lightly sand the boat (300-grit sandpaper) and apply another coat. [8] X Research source

Community Q&A
- Take your time cleaning and sanding -- preparing your boat can take as much as 80% of your time, but it will lead to a better final product. Thanks Helpful 0 Not Helpful 0
- If you are uncomfortable with any part of this process, especially sanding, call a professional boatyard to get a price quote for painting. Thanks Helpful 0 Not Helpful 0

- Dust and debris while sanding can be highly toxic. Always wear protection for your eyes, nose, and mouth.
Things You'll Need
- Marine paint
- Paintbrush or roller
You Might Also Like

- ↑ http://americanboating.org/clean_boat_cleaning.asp
- ↑ http://www.yachtsurvey.com/Paint.htm
- ↑ https://www.boatus.com/magazine/2011/december/diy.asp
- ↑ https://www.boatus.com/magazine/2017/april/10-steps-to-the-perfect-topside-paint-job.asp
- ↑ http://www.boatus.com/boattech/articles/painting-tips.asp
- ↑ https://www.boats.com/how-to/how-to-paint-a-boat/
- ↑ https://uk.boats.com/how-to/boat-painting-guide/
About This Article

Before painting a boat, start by removing the boat from the water and cleaning the surface with a high-pressure hose. Then, sand the boat with 80-grit sandpaper and brush on a coat of primer to create a smooth, even surface. Afterwards, apply 1 coat of one step polyurethane paint, let it dry, then sand the surface with 300-grit sandpaper to remove any spots or paint bubbles. Finally, apply 2 to 3 more coats of paint, making sure to sand the boat after each coat has dried. To learn more, including how to choose the right paint for your boat, scroll down. Did this summary help you? Yes No
- Send fan mail to authors
Reader Success Stories
Jason Jensen
Sep 26, 2016
Did this article help you?

Austen Clark
Sep 29, 2018
Michael Irwin
Apr 5, 2017
Simon Casey
Dec 2, 2016
Jerry Jones
Aug 28, 2016

Featured Articles

Trending Articles

Watch Articles

- Terms of Use
- Privacy Policy
- Do Not Sell or Share My Info
- Not Selling Info
Don’t miss out! Sign up for
wikiHow’s newsletter
Videos » Sailboat Sunset Seascape Acrylic Painting for Beginners

Project Description:
Paint colors, paint brushes, other materials, special notes:.
Easy Sunset with sailboat painting on canvas full tutorial of this relaxing Serene Seascape. Fully guided Step by step in live and replay for the brand new art student. This is a colorful fiery simple sunset you will love to put on you wall and drift off to summer.
Full Image : goo.gl/GYpfW7
*** Special Supplies For This Painting ***
Beginners learn to paint full acrylic art lesson.
Below are a list of materials. The links go through our Amazon Affiliate program, and you support The Art Sherpa when using them. These are link to make thing easy and convenient. *** Acrylic Paint Colors ***
Cadmium Red, Medium Shade: http://amzn.to/1XqnERZ Cadmium Yellow, Medium Shade: http://amzn.to/1Xqmwhb Dioxazine Purple: http://amzn.to/1QYnSfk Mars Black: http://amzn.to/1U1eqOw Phthalo Blue (Green Shade): http://amzn.to/1RhXrjV Quinacridone Magenta: http://amzn.to/1P8CRkB
Titanium White: http://amzn.to/1XqooGI
Blending Medium OR Glazing Medium to aid in flow
*** Recommended Canvas Size *** 16x20 (41cm x 51¾cm) canvas, pre-gessoed: http://amzn.to/1oJW6LH
MY EASEL Best European Easel *OS3 http://amzn.to/1Xm9Ieu
*** Assorted Brushes for Acrylic Painting *** Medium flick resistance, synthetic or natural fiber. Short Bristles and Short handle. Acrylic handle over wood and Synthetic fiber over natural . www.thebrushguys.com Use The Code " theartsherpa" for 5% off Simply Simmons long handle (there short on this line) Bright #10 #6 #4 Filbert #10 #6 Detail round #6 - medium- #4 and fine #2 ½ angle shader I generally paint with Simply Simmons , Creative Mark, Ebony Splendor and Pro Stroke brushes. I also use some Windsor Newton and Ruby Satin Silver My favorite Brush is Goldilocks or Simply Simmons bright #10 Extra Firm Filament 255341010
*** Other Supplies *** Paper towels Water cup Chalk, a few colors Ruler Sharpie Table easel Delicious snack or beverage A smile!
Have fun Live with The Art Sherpa during this BEGINNER HOW TO PAINT art lesson in acrylic art tutorial. This is an easy, fun, social art lesson for canvas. We talk about art and other fun subjects. With help and guidance, anyone can paint. You can paint!
Want to see something? Just comment! Tell me what you'd like to paint, or what you want to know about art. This is YOUR art journey. Open your heart and access your art.
Acrylics are a fun and enjoyable painting medium. I prefer 'Creative Mark' brushes, and I use Liquitex heavy body acrylic paint, Matisse Derivan, and golden colors.
I love teaching people to paint in a supportive environment. Everyone deserves to have art in their lives and feel the joy that art can bring! Follow along and share your art journey with me! I look forward to hearing from you.
WWW.THEARTSHERPA.COM
TWITTER: @artsherpa
PINTEREST: https://www.pinterest.com/cinnamoncooney *** LOTS of pinnables!
FACEBOOK: https://www.facebook.com/hartparty
INSTAGRAM: https://instagram.com/theartsherpa
ETSY: https://www.etsy.com/shop/hARTpARTY to purchase original art by Cinnamon Cooney!
HEART MAIL: Art Sherpa 204 9490 fm 1960 RD W suite 200 Humble tx 77338 Artwork is the property of Hart Party and The Art Sherpa it is intended for the personal enjoyment of the student and not commercial use. Contact us for commercial use policies. For-profit businesses in the Painting Party industry may not use our tutorial/original painting design without a licensed or signed-use deal with Hart Party. If you’d like to share our tutorial/original painting design with a church group, skilled nursing facility or other nonprofit interest, do get in touch. We have ideas, guides and a few fun little extras to make bringing the Art Sherpa to your community one big party. Let’s collaborate! This artwork is under copyright and is intended for the viewer’s personal enjoyment. If your paintings of my original design are offered for sale in a retail setting of any kind, please attribute ‘Original design by Hart Party. www.theartsherpa.com’ Did you sell a painting of my original design via private sale? Congratulations and big art high fives! Please, create no prints or mechanical reproductions of your paintings of my original design.
The Art Sherpa Experience
Learn to paint with Acrylics Step by Step with The Art Sherpa. There are 600+ free video art lessons for beginners. You CAN paint this. Begin YOUR art Journey today by finding the perfect acrylic painting on canvas to follow along with. With the #1 beginners acrylic painting channel on YouTube, there is something you will be excited to create, and can hang on your wall today. We have Big Art Quest lessons that will take you through every beginner step and lessons to get you painting your own masterpieces. Join our art family for Live streaming video lessons on YouTube and Facebook. Take your art to go with Mobile! Why are these art lessons free? So YOU can save for more art supplies and have fun!

How to Paint a Boat: A Step-by-Step Guide for a Fresh Finish
There’s something special about a well-maintained boat gliding through the water, its sleek and vibrant appearance turning heads along the shore. Boat maintenance plays a vital role in preserving both the aesthetic appeal and the structural integrity of the vessel. Among the many aspects of boat care, painting is a key element that can truly transform its appearance and provide long-lasting protection.
Painting a boat is not just about maintaining its beauty; it’s a process that instills a sense of pride and accomplishment. The sight of a freshly painted boat, glistening under the sun, evokes a feeling of satisfaction and signals to others your commitment to preserving your vessel.
In this comprehensive guide, we will take you through the necessary steps and provide valuable tips to help you effectively paint your boat. Whether you are restoring an old boat or looking to give a new life to your current one, this article will equip you with the knowledge and techniques needed for a successful paint job. Get ready to embark on a journey that will not only enhance the appearance of your boat but also protect it for years to come.
Assessing the Boat’s Condition

Before embarking on the painting process, it is crucial to assess the condition of your boat. Here’s why it’s important:
- Identifying Damage and Corrosion: Assessing the boat’s condition allows you to identify any damage or corrosion that needs to be addressed before painting. Look for areas where the fiberglass, wood, or metal may be compromised, such as cracks, blisters, or rust. Repairing these issues ensures a solid foundation for the paint and prevents further damage.
- Surface Imperfections: Surface imperfections like dents, scratches, or peeling paint can affect the overall finish. Identifying these imperfections allows you to address them through proper surface preparation techniques such as sanding, filling, or fairing. Achieving a smooth surface is crucial for a professional-looking and long-lasting paint job.
- Proper Preparation: Adequate preparation is key to achieving a durable and flawless paint finish. This includes cleaning the boat’s surface to remove dirt, grease, or contaminants, as well as removing any loose or flaking paint. Properly preparing the surface ensures good adhesion of the paint and improves its longevity.
By assessing the boat’s condition, you can address any existing damage or imperfections and ensure proper preparation for the painting process. This sets the foundation for a smooth and durable finish that not only enhances the appearance of your boat but also protects it against the elements for years to come.
Gathering the Necessary Supplies
To paint a boat effectively, it is important to gather the necessary supplies. Here’s a list of essential items you will need:
- Marine-Grade Paint: Choose a high-quality marine-grade paint specifically designed for boats. Consider the type of material your boat is made of (fiberglass, wood, aluminum, etc.) and select a paint suitable for that material. Marine-grade paints are formulated to withstand the harsh marine environment, providing durability, UV protection, and resistance to water, salt, and weathering.
- Primer: Use a primer designed for marine applications to ensure proper adhesion and longevity of the paint. The primer creates a stable base for the paint to adhere to, enhances its durability, and improves the overall finish.
- Paint Brushes or Rollers: Select high-quality paint brushes or rollers suitable for the type of paint you are using. Brushes with synthetic bristles are often recommended for applying marine paints. Rollers are ideal for larger areas and can provide a smoother finish.
- Masking Tape: Masking tape is essential for creating clean and precise lines between different painted areas. It helps protect areas that you don’t want to paint, such as windows, hardware, or trim.
- Sandpaper and Sanding Tools: Various grits of sandpaper, ranging from coarse to fine, are needed for surface preparation. Sandpaper helps smooth out imperfections, remove old paint or varnish, and create a suitable surface for the new paint to adhere to. Sanding tools like sanding blocks or orbital sanders can aid in achieving an even and consistent surface.
- Protective Equipment: Wear appropriate protective equipment, including safety goggles, a respirator mask, gloves, and protective clothing. These items help protect you from paint fumes, dust, and chemical exposure, ensuring your safety during the painting process.
It is crucial to select high-quality marine-grade paint that is specifically designed for the material of your boat. Using the right paint ensures optimal adhesion, durability, and resistance to the marine environment. It also provides a long-lasting finish that protects your boat and maintains its appearance over time.
By gathering the necessary supplies and choosing the right marine-grade paint, you set yourself up for a successful boat painting project, achieving a beautiful and durable finish that enhances the overall aesthetics and protection of your vessel.
Preparing the Boat for Painting
Preparing the boat’s surface is a crucial step in achieving a smooth and professional paint finish.
Here’s a guide to preparing your boat for painting:
- Cleaning the Boat’s Surface: Start by thoroughly cleaning the boat’s surface to remove dirt, grime, and any contaminants. Use a mild detergent or boat-specific cleaner and scrub the surface with a soft brush or sponge. Rinse thoroughly with clean water to ensure no residue remains. Cleaning the surface allows the paint to adhere properly and ensures a clean base for the new coat.
- Removing Loose or Flaking Paint: Inspect the boat’s surface for any loose or flaking paint. Use a scraper or putty knife to gently remove the loose paint. Be careful not to damage the boat’s underlying material. Removing loose paint helps create a smooth and even surface for the new paint to adhere to.
- Sanding the Surface: Sanding is essential to create a suitable base for the new paint. Start by using coarse-grit sandpaper (around 80-120 grit) to remove any remaining old paint, smooth out imperfections, and promote adhesion. Use a sanding block or orbital sander to ensure an even and consistent sanding pattern. Gradually progress to finer-grit sandpaper (around 220-320 grit) for a smoother finish. After sanding, clean the surface again to remove any sanding dust.
- Filling and Fairing: If there are any dents, scratches, or imperfections on the boat’s surface, use a suitable filler or fairing compound to repair them. Follow the manufacturer’s instructions for the specific product you are using. Apply the filler or fairing compound with a putty knife, smoothing it out to create a level surface. Once the filler has cured, sand it lightly to ensure it blends seamlessly with the rest of the surface.
By cleaning the boat’s surface and removing loose or flaking paint, you create a clean canvas for the new paint. Sanding helps create a smooth and suitable base, promoting proper paint adhesion and ensuring a professional-looking finish. Filling and fairing any imperfections further enhance the overall appearance of the painted surface.
Remember to wear appropriate protective equipment, such as gloves and a respirator mask, during the preparation process to protect yourself from dust, chemicals, and fumes. Proper preparation sets the stage for a successful paint job, ensuring a beautiful and long-lasting finish for your boat.
Applying Primer and Paint

Applying primer and paint is a critical step in the boat painting process. Here’s a guide to help you achieve a professional finish:
The Role of Primer:
Primer plays a vital role in the painting process. It enhances paint adhesion, improves durability, and helps create a uniform surface. It also seals the underlying material, preventing moisture penetration and protecting it from potential damage. Applying primer ensures that the paint adheres properly and provides a long-lasting and high-quality finish.
Applying Primer:
- Preparation: Ensure the surface is clean, dry, and properly sanded. Follow any specific instructions provided by the primer manufacturer.
- Mixing: Thoroughly mix the primer according to the manufacturer’s instructions. Use a stir stick or paint mixer to ensure proper blending of the components.
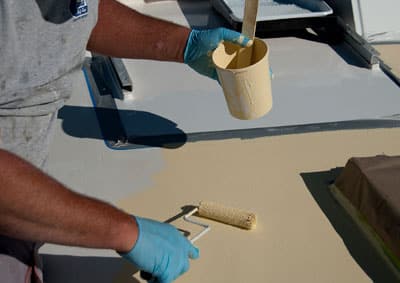
- Application: Apply the primer using a high-quality brush or roller suitable for the type of primer you are using. Start from one end and work your way across the surface in smooth, even strokes. Ensure even coverage and avoid leaving thick or thin spots. Follow the manufacturer’s recommended coverage and application thickness.
- Drying Time: Allow the primer to dry according to the manufacturer’s instructions. This usually ranges from a few hours to overnight. Avoid touching or disturbing the surface during the drying process.
Applying Paint:
- Preparation: Ensure the primer is dry and properly cured before applying paint. Stir the paint thoroughly to achieve a consistent color and texture.
- Application: Apply the paint using the same techniques as the primer, starting from one end and working your way across the surface. Use smooth, even strokes to achieve consistent coverage. Avoid applying the paint too thickly, as it can lead to drips or runs. Allow each coat to dry before applying subsequent coats, following the manufacturer’s recommended drying times.
- Multiple Coats: Apply multiple coats of paint as necessary to achieve the desired color and finish. Allow each coat to dry and lightly sand between coats to promote adhesion and ensure a smooth surface.
Maintain good ventilation during the painting process, and follow all safety precautions recommended by the primer and paint manufacturers.
Properly applying primer and paint ensures a durable and visually appealing finish. Adhere to the manufacturer’s instructions for mixing, application, and drying times to achieve the best results. Take your time, be patient, and aim for even coverage to create a beautiful and long-lasting paint job for your boat.
Painting Different Boat Surfaces
Painting different boat surfaces requires specific considerations and techniques. Here’s a guide to help you achieve optimal results on various surface types:
Fiberglass:
- Clean the fiberglass surface thoroughly to remove any dirt or contaminants.
- Use a marine-grade fiberglass primer designed specifically for fiberglass boats. Follow the manufacturer’s instructions for proper mixing and application.
- Apply multiple thin coats of marine-grade paint, allowing sufficient drying time between each coat.
- For optimal results, sand lightly between coats to promote adhesion and achieve a smooth finish.
- Follow the manufacturer’s recommended number of coats and drying times for the specific paint you are using.
- Ensure the wood surface is clean, dry, and properly prepared.
- Apply a suitable wood primer to seal the surface and promote proper paint adhesion. Follow the manufacturer’s instructions for application and drying time.
- Use marine-grade paint suitable for wood surfaces. Apply multiple thin coats, allowing each coat to dry fully before applying the next.
- Sand lightly between coats to achieve a smooth finish and promote adhesion.
- Consider using a varnish or clear coat as a final protective layer over the paint, especially for areas exposed to direct sunlight and water.
- Clean the metal surface thoroughly to remove any rust, grease, or contaminants. Use a suitable metal cleaner or solvent.
- Apply a metal primer designed to inhibit corrosion and promote adhesion. Follow the manufacturer’s instructions for proper mixing and application.
- Use marine-grade paint suitable for metal surfaces. Apply multiple thin coats, ensuring even coverage and avoiding drips or runs.
- Consider using a rust-inhibiting paint or a paint specifically designed for metal surfaces exposed to saltwater.
- Sand lightly between coats to promote adhesion and achieve a smooth finish.
Each surface type presents unique challenges and requirements. Following the manufacturer’s instructions for the specific primers and paints you choose is essential. Pay attention to the recommended number of coats, drying times between coats, and any specific instructions regarding surface preparation or sanding.
Remember, proper surface preparation, the use of high-quality primers and paints, and allowing sufficient drying time between coats are key to achieving optimal results. Take your time, follow the instructions, and enjoy the process of transforming your boat into a stunning work of art.
Finishing Touches and Cleanup

The finishing touches and cleanup are essential steps to complete your boat painting project. Here’s a guide to help you with these final tasks:
Finishing Touches:
- Remove Masking Tape: Once the paint has dried sufficiently, carefully remove the masking tape to reveal clean and crisp lines. Pull the tape at a 45-degree angle to avoid peeling off any fresh paint. Inspect the edges and make any necessary touch-ups with a small brush.
Cleaning Paint Brushes or Rollers:
- Clean Immediately: It’s important to clean your paint brushes or rollers immediately after use to prevent the paint from drying and hardening on the bristles.
- Use the Proper Solvent: Refer to the paint manufacturer’s instructions for the recommended solvent or cleaning agent to use for the specific type of paint you used. Some paints may require water-based cleaners, while others may need mineral spirits or other solvents.
- Thoroughly Clean: Rinse the brushes or rollers with the appropriate solvent, working the bristles or nap to remove all traces of paint. Repeat the process as needed until the brushes or rollers are clean. For stubborn paint, you may need to use a brush comb or wire brush to remove it.
- Dry and Store: After cleaning, allow the brushes or rollers to dry completely before storing them. Hang brushes upside down or store them flat to maintain their shape.
Proper Disposal and Cleanup:
- Disposing of Paint Cans: Dispose of empty or partially empty paint cans according to local regulations . Many areas have specific guidelines for proper disposal of paint cans, which may include recycling or hazardous waste centers. Check with your local authorities for the appropriate disposal methods to protect the environment.
- Cleanup: Clean up the work area, ensuring all paint cans, brushes, and other materials are properly stored or disposed of. Dispose of any used masking tape, drop cloths, or other debris responsibly.
Paying attention to the finishing touches, such as removing masking tape for clean lines, enhances the overall appearance of your paint job. Cleaning paint brushes or rollers promptly after use helps maintain their quality and extends their lifespan.
Proper disposal of paint cans and responsible cleanup is crucial for protecting the environment. Follow local regulations and guidelines to ensure you dispose of any materials in an environmentally friendly manner.
By giving attention to these final steps, you can proudly admire your beautifully painted boat and enjoy the satisfaction of a job well done.
Watch Fiberglass boat painting made easy: prep, paint and top coat with a roller | Video
Top 5 FAQs and answers related to How to paint a boat
How long does it take to paint a boat.
The time it takes to paint a boat can vary depending on factors such as the size of the boat, the number of coats desired, the surface condition, and weather conditions. It is recommended to allocate several days or even weeks for the entire process, including surface preparation, priming, and painting, allowing for proper drying times between coats.
Can I paint my boat myself, or should I hire a professional?
Painting a boat can be a DIY project, but it requires careful planning, proper preparation, and attention to detail. If you have experience with painting or feel confident in your abilities, you can certainly tackle it yourself. However, if you’re uncertain or have a large boat with complex surfaces, hiring a professional painter with expertise in marine applications may be a wise choice to ensure a high-quality finish.
Do I need to remove the old paint before applying a new coat?
In most cases, it is recommended to remove loose or flaking old paint before applying a new coat. However, if the existing paint is in good condition, you can sand it lightly to create a suitable surface for the new paint to adhere to. It is important to ensure a clean and smooth base for optimal results.
How many coats of paint should I apply to my boat?
The number of coats depends on several factors, including the type of paint, desired color intensity, and personal preference. In general, it is recommended to apply at least two or three coats of paint to achieve good coverage and durability. Follow the paint manufacturer’s instructions for the specific product you are using, as they will provide guidance on the recommended number of coats.
How do I maintain and protect the newly painted boat?
To maintain and protect your newly painted boat, it’s important to follow proper care and maintenance practices. Regularly clean the boat’s surface using mild cleaners and avoid abrasive materials or harsh chemicals that could damage the paint. Apply a protective wax or polymer coating to enhance the paint’s durability and UV resistance. Additionally, inspect the painted surface periodically for any signs of damage or wear and address them promptly to prevent further issues.

Painting a boat is a rewarding and satisfying part of boat maintenance, and with the knowledge gained from this comprehensive guide, you can achieve a fresh and impressive paint finish. Let’s recap the key steps and considerations discussed:
- Assess the boat’s condition, identifying any damage, corrosion, or surface imperfections that require repair before painting.
- Gather the necessary supplies, including marine-grade paint, primer, brushes or rollers, masking tape, sandpaper, and protective equipment.
- Prepare the boat’s surface by cleaning it thoroughly, removing loose or flaking paint, and sanding to create a smooth base.
- Apply primer to ensure proper adhesion and durability, following the manufacturer’s instructions for mixing, application, and drying times.
- Apply paint using even strokes, ensuring proper coverage, avoiding drips or runs, and allowing each coat to dry before applying the next.
- Pay attention to specific considerations for different boat surfaces, such as fiberglass, wood, or metal.
- Attend to finishing touches, such as removing masking tape and ensuring clean lines.
- Clean paint brushes or rollers immediately after use, following the manufacturer’s instructions for the specific type of paint used.
- Dispose of paint cans and cleanup materials responsibly, following local regulations to protect the environment.
Thorough preparation, selecting high-quality materials, and following proper application techniques are essential for achieving a professional and long-lasting paint finish on your boat. Take pride in your boat’s appearance and enjoy the process of transforming it into a stunning vessel on the water.
With the knowledge and guidance provided in this guide, you have the tools to embark on your boat painting project with confidence. So, get ready to give your boat a fresh new look and take pride in the impressive results you’ll achieve. Happy painting!
Share How to Paint a Boat: A Step-by-Step Guide for a Fresh Finish with your friends and Leave a comment below with your thoughts.
Read How to Remove Water Stains from a Fiberglass Boat? Guide until we meet in the next article.
Similar Posts

Illuminating the Night: A Guide to Boat Lights
As the sun dips below the horizon, a whole new adventure awaits boaters who venture out after dark. But navigating safely at night requires proper lighting, essential for both seeing and being seen on the water. This guide will shed light (pun intended) on the different types of boat lights you need, their purposes, and…

Hewescraft Boats: A Comprehensive Buying Guide
Hewescraft Boats is a renowned name in the world of aluminum boats, known for producing rugged, reliable, and versatile vessels primarily designed for fishing and recreational purposes. Established in 1948 in Colville, Washington, Hewescraft has built a legacy of crafting high-quality boats that stand up to the harsh conditions of the Pacific Northwest and beyond….

Boat Ignition Switches: Everything You Need to Know
Boating is an activity enjoyed by millions around the world, and like any vehicle, boats require reliable ignition systems to function properly. The ignition switch is a crucial component in a boat’s electrical system, acting as the control center that powers up the engine. Whether you’re a seasoned mariner or a beginner, understanding the importance,…

Supercat Boats: The Kings of Speed on the Water
The term “supercat” can encompass two distinct types of high-performance boats, each offering a thrilling ride on the water: Let’s dive deeper into the world of supercats and explore what makes them so special: Super Cat Class Race Boats: Built for Speed and Fury Supercat Catamarans: Combining Performance with Comfort Choosing the Right Supercat for…

Finding the Perfect Pontoon Near You: A Comprehensive Guide
Whether you’re planning a summer filled with leisurely cruises, exciting fishing trips, or fun-filled family outings on the water, a pontoon boat offers an excellent balance of comfort, versatility, and performance. When it comes to finding the perfect pontoon near you for sale, there are several aspects to consider, including types, sizes, features, prices, and…

10 Custom Boat Upholstery Ideas to Increase Look
Boating enthusiasts know that comfort and style go hand in hand when it comes to enjoying life on the water. Your boat’s upholstery plays a pivotal role in transforming your vessel into a comfortable and visually appealing haven. Whether you’re cruising, fishing, or simply soaking up the sun, custom boat upholstery can elevate your experience…
- Start Here!
- Art Tutorials
- Art Lessons
Art Supplies
- Shopping Cart

How to Paint a Sailboat Watercolor Painting Tutorial
Sailing is one of my favorite things to do and painting sailboats is almost as fun! This lovely sailboat flew in the wind on Somes Sound on Mount Desert Island, Maine. It was one of those perfect sailing days. The light sparkled, the wind blew steadily and the last of summer heated the air. Since I didn't have a sailboat there, I sketched and took photos of the sailboats moving up and down the Sound.
The shimmering water is the tricky part of this painting. It's a great opportunity to practice your dry brush! This painting needs rough press paper to get that sparkling water. The rest of the painting is simple. Trees in the distance and a pared down palette. Keep the colors and your brush strokes simple. Sailing at its finest on a summer day in Maine!

Painting Tutorial Level
Skill Building
M. Graham watercolors
Painting Demonstration 1

Always sketch very lightly in watercolor since most pencil lines will show. You want the focus on the painting, not the drawing. Unless, of course, you're highlighting the pencil lines!

Since I'm painting a light object with a lot of brushstrokes around it (for the water) I can either mask it out, preserve highlights with wax or use white gouache. I decide on a combination of the last two since they feel more spontaneous than masking and I don't have too many bright highlights.
When you use a wax crayon, always remember it's there for better or worse. It will not come off and leave paper the same!
Disclaimer: Jennifer Branch Gallery is a participant in the Amazon Services LLC Associates Program, an affiliate advertising program designed to provide a means for sites to earn advertising fees by advertising and linking to amazon.com. I receive a small rebate for your entire order (starting at 4%) if you choose to purchase through Amazon. Most items can be bought multiple places and I highly recommend local art stores if you have one! Any other recommendation links I receive no compensation for. These referrals help me support this website, and I thank you for any purchase you make through them. I will never recommend a product I have not used frequently and believe is the best tool for the purpose!
Painting Demonstration 2

I want barely there water sparkling in the background. Very pale highlights and dark shadows, so dry brush is the solution! Dry brush and texture is why I chose the rough press paper, after all.
With a tricky dry brush where every stroke shows, I like to test the brush a few times on an area of the painting that isn't quite so tricky or a scrap of paper. As you can see, I got the texture just right in the trees at the upper part of the painting. Some extra texture there is perfect and it will be dark enough the individual strokes don't show.
Since all those strokes show up in the water, make them count! Move your brush with the waves. Notice how highlights show up in horizontal swathes across the water. Work with the water, not against it.
A squirrel hair brush is perfect for hit and miss dry brush like this. It barely touches the ridges of the paper so you can really get that sparkle!

Painting Demonstration 3

Since this is dry brush, there's no time between washes! I continue moving around the painting, using slightly varying blues and values. This gives me that great water shimmer! If some of the dry brush hits a still wet area, great! that gives a natural feeling variation.
I still keep everything light in value in this wash. I don't want thick sludgy paint, but effervescent sparkle!
Artist Tips

Painting Demonstration 4

Now that dark background! I want a bit of a a golden glow, but subtle instead of harsh so I use quinacridone gold. This is one of the few paintings I never use a yellow in!
I paint a loose wet brush on dry paper wash of the gold, then drop in pthalocyanine green. I'm keeping it loose since the background is not the focus, the sailboat is!
The reflection of the sailboat is also a golden glow in the water, so I use quinacridone gold again. I'm still painting dry brush since I want the water to sparkle there too, not be dulled. The reflection is also a shadow which makes it quite complicated to paint.
Painting Demonstration 5

Now it's time to turn the golden green into hazy rich darks. While it's drying, I move maroon perylene into the trees to darken them. The rich red helps with the strong, clear color. Then I scrabble in ultramarine blue to make the trees green again. Finally, I add cobalt blue for the slightly opaque haze.
I dash quinacridone dry brush on the wooden mast. A bit of ultramarine blue and pthalo green gives shape to the boat.
Painting Demonstration 6

After the painting has dried completely, I start on the sail. The gorgeous sail is really the star of the painting so it's fun to finally start painting it! Still, it has to be kept simple since there really isn't much to the sail. Quinacridone gold gives the faint glow of the reflecting sun.
I continue adding texture and color to the waves. I need strong darks to balance out the background trees.
I keep a light hand on the waves since the lovely shimmering could be destroyed with a few strokes too many!
Painting Demonstration 7

The last stage is the details and it's hard to keep them from getting too fussy!
I continue the details on the sail. I use the top mainsail reinforcement as an excuse to dull down the arrow pointing the viewer out of the painting!
To purchase How to Paint a Sailboat original watercolor painting, please click!
How to Paint a Sailboat Final Watercolor Painting!
Related Art Lessons

- Painting Galleries
- Latitude Pens
- Contact Me!
All Paintings, Images, Videos, Text and Website Design Copyright 2022 by Jennifer Branch. All Rights Reserved. No Image, Video, Text or Website Design may be used without my written, specific permission.
- How to paint a boat: A step-by-step guide
Painting your boat not only enhances its visual appeal but also protects it from the damaging effects of saltwater, sunlight, and other elements. Whether you have a sailboat, powerboat, or kayak, the principles of boat painting remain largely the same.
Assessing your boat's condition
Before you begin, evaluate your boat's current condition. Inspect the hull for any damage, scratches, or rust that may need to be addressed before painting. Make a list of necessary repairs and tackle them first.
Gathering the right tools and materials
To paint your boat successfully, you'll need a range of tools and materials, including paintbrushes, rollers, sandpaper, masking tape, drop cloths, and, most importantly, the appropriate marine paint.
Preparing the boat surface
Proper preparation is the key to a successful paint job. Start by cleaning the boat's surface thoroughly to remove dirt, grease, and old paint. Sand the surface to create a smooth and clean canvas for the new paint to adhere to.
Applying primer
Priming is a crucial step to ensure good paint adhesion and durability. Apply a marine-grade primer that is compatible with the paint you've chosen. Allow it to dry thoroughly as per the manufacturer's instructions.
Read our top notch articles on topics such as sailing, sailing tips and destinations in our Magazine .
A man taking care of his ship.
Check out our latest sailing content:
Choosing the right paint.
Selecting the right type of marine paint is essential. There are different types of boat paint available, such as antifouling paint, topside paint, and bottom paint. Choose the one that suits your boat's needs and your intended use.
Applying the paint
Start by applying the paint to the boat's surface using a paintbrush or roller. Use long, even strokes, working from one end to the other. Be mindful of the weather conditions, as extreme temperatures and humidity can affect the paint's drying process.
Applying additional coats
For best results, you may need to apply multiple coats of paint. Follow the manufacturer's recommendations for drying times between coats. Applying multiple thin coats is often better than one thick coat.
Drying and curing
Allow the paint to dry completely before launching your boat into the water. The curing time can vary depending on the type of paint and environmental conditions. Follow the paint manufacturer's instructions for specific guidance.
Final touches and cleanup
After the paint has dried, remove any masking tape and clean your tools and equipment. Inspect your boat's finish for any imperfections, and make any necessary touch-ups.
Painting a boat requires careful planning, preparation, and attention to detail, but the results can be incredibly rewarding. Not only will your boat look like new, but it will also be better protected against the elements, ensuring many more enjoyable days on the water.
Whether you're a DIY enthusiast or a boat owner looking to maintain your vessel's beauty and functionality, this step-by-step guide on how to paint a boat will help you achieve a professional and long-lasting finish. So, roll up your sleeves, gather your materials, and give your boat the makeover it deserves. Happy painting!
So what are you waiting for? Take a look at our range of charter boats and head to some of our favourite sailing destinations.
I am ready to help you with booking a boat for your dream vacation. Contact me.

Denisa Nguyenová
How to Paint a Boat

Learning how to paint a boat is easy, and if you want to make your boat look like new, you'll be surprised what a fresh layer of paint can do. Proper boat maintenance will go a long way in keeping your pride and joy looking great, but when that boat starts to appear aged, knowing how to paint a boat is the key to making it look like new again. And although painting a boat can be time-consuming and expensive, there’s no better way to improve an older boat’s appearance. While this is a rather complex process, we can boil it all down to these five basic steps.
How to Paint a Boat Step-by-Step:
- Remove all hardware (like rails, cleats, and vents) and/or any teak or wood trim on the boat.
- Repair any surface imperfections like chips, dings, or gouges.
- Prep the surface by washing, de-waxing, and thoroughly sanding it.
- Apply the primer, then the paint.
- Wax the boat from stem to stern to protect the new paint job.
Then, simply keep it clean, and rinse it thoroughly after use in saltwater. Remember, before you paint a boat always read the warning labels on all of the supplies and be sure to use the proper protective equipment.

How to Paint a Fiberglass Boat
Painting fiberglass boats isn’t really much different from painting wood boats, except for the type of paint you’ll use and a few details in the prep and application. We should note that the very best finish can be attained by professionals who spray on the paint, rather than applying it with a brush and roller. However, anyone can do a bang-up job painting a boat if they make sure the surface has been properly prepped, and take care during the application.
Paints for Fiberglass Boats
- Single-Part Enamel Paints – These paints are easiest to apply and are less expensive than some other options. However, they also are subject to UV damage over time and the gloss doesn’t tend to hold up as well over the long haul especially if it isn’t constantly waxed and maintained.
- Single-Part Polyurethane Paints – Urethane paints are also easy to apply, don’t cost nearly as much as two-part polyurethanes, and have a long-lasting gloss.
- Two-Part Polyurethane Paints – These undisputedly look best and last longest. Many people would even argue they can out-shine a boat’s original gel coat. However, they are very expensive and are more labor-intensive, as they require mixing, an epoxy primer, and specific temperature and humidity levels for application.
Whichever of these you choose, job number-one is following the manufacturer’s instructions to a tee. We can’t lay out all the details here because each paint has its own specific requirements. The bottom line, however, is that each has its own instructions that can be quite exacting. And remember that like any paint job, good prep work is the key to success. De-waxing is one of the most important factors, because even a tiny amount of wax will prevent the paint from adhering to the fiberglass. Either acetone or a dedicated wax-stripper can be used but in either case, be sure to do a thorough job.
Tips for Painting a Fiberglass Boat
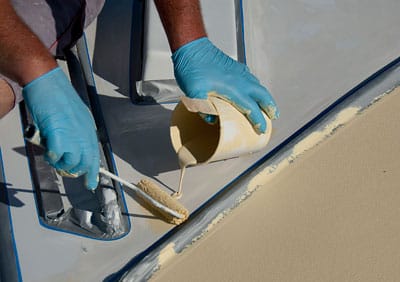
- Most people will use a standard “roll and tip” method for painting large surface areas of a boat. This requires two people and both rollers and brushes. As one person rolls out the paint, another follows behind with a brush and lightly strokes across the paint to brush out the roller pattern.
- One important tip for creating the best surface is to apply multiple, thin, consistent coats, as opposed to one or two thick ones. Three coats of paint is generally considered best.
- Another important tip to keep in mind: be sure to allow the proper amount of cure-time between coats (again following the manufacturer’s recommendations). And if the work takes place outdoors keep an eye on the weather to ensure the temperature and humidity will be acceptable and consistent throughout the entire timeframe.

How to Paint a Boat Bottom
Painting a boat bottom is a completely different experience than painting the boat’s upper hull and topsides. In this case you’ll want an anti-fouling paint that prevents marine growth, and there are countless versions to choose from. Read Antifouling Paints: Which Paint is Best For Your Boat to learn more about some of the different options.
Here’s the good news: learning how to paint a boat bottom is much easier than it is for the rest of the boat, because bottom paint tends to be simpler to apply.
- If the bottom is fresh gel coat, the same sort of prep work (de-waxing and sanding) is necessary.
- If you’re applying over old bottom paint, you can skip the de-waxing process and simply sand or power wash away any old or loose paint. Also, you won’t need to roll and tip; most people skip the tip part of this equation since the bottom will be underwater anyway, and simply roll the paint right on.
- There is, however, one additional factor to applying bottom paint to a boat: you may need to properly time the boat’s launch. Some paints have a minimum dry time but a maximum time as well, and will need to be launched within a certain window.
How to Paint a Boat Hull
Painting a boat’s hullsides is usually a lot easier than painting the topsides, simply because you’re dealing with a large, smooth surface area. There will only be minimal hardware to remove (in this case you may want to simply protect it with masking tape, though this rarely provides as good a final finish), and you won’t have to worry about angled surface areas or tight corners.
There is one variable to note, however, about painting a boat hull. You will be working on a more or less vertical surface, and if you apply the paint too thickly, drips and runs will result. So it’s very important to apply the pint evenly and thinly.

How to Paint a Boat with Non-Skid
Molded fiberglass non-skid and non-slip surfaces can’t be painted the same way as the rest of your boat. It’s impossible to sand or apply paint between the tiny imprints, and even if you did paint it, it would wear unevenly as people walk across the top of the pattern without ever touching between the raised surfaces. But that doesn’t mean you can’t make that old non-skid look like new again.
- The best way to paint non-skid is to apply a textured compound. There are several on the market designed specifically to paint a boat deck. They have some sort of grit or tiny rubberized pellets mixed in with the paint, to give the boat’s deck a fresh look but still maintain its non-slip properties.
- Once again, each has its own set of specific application instructions, prep work is key, and several coats are usually necessary.
- On additional variable you need to know about is the roller; since these paints have solids mixed in, you usually need to use a roller brush specifically designed to spread them.
Yes, painting a boat is a big, time-consuming job. Sure, it requires some expense. But remember, there’s no better way to make an older boat look new again than to give it a fresh paint job.
Editor's Note: Remember that many paints, primers, and wax strippers emit chemical fumes, and sanding can also create potentially harmful conditions for both you and the environment. Before you paint a boat always read the warning labels on all of the supplies and be sure to use the proper protective equipment.
Learn More in our Boat Maintenance Guide
Looking for more on boat maintenance and upkeep? Read...
- Antifouling Paints: Which Paint is Best for Your Boat?
- Boat Storage: What Are My Options?
- How to Winterize a Boat
- Spring Start-Up Checklist

Join Our Newsletter!
Get community news, buying bargains, and how-to guides at your fingertips.

Boating Basics Online is reader-supported. When you buy via our links, we may earn a commission at no cost to you. Learn more
How to Paint a Sailboat? – A Step-by-Step Guide
Written by J. Harvey / Fact checked by S. Numbers

Painting a sailboat hull not only lets you save money, but it can also be quite gratifying. Plus, learning how to paint a sailboat can be likened to taking that one important step of truly claiming your vessel as your own. I mean, they’re our darlings, right?
This simple guide teaches you how to paint the hull of a boat, including a sailboat’s. Overall, it’s not hard to grasp – just a bit tiring, and plenty of waiting is involved.
Table of Contents
Prepare the Following
Step 1. give the sailboat a thorough cleaning., step 2. start sanding the hull’s surface., step 3. prepare the primer, then apply it., step 4. prepare the paint, then start applying the topcoat and antifouling coat., the importance of painting your sailboat, how often do i need to paint my sailboat, some best paints to use for a sailboat, safety tips for painting.

- Marine-grade paint
- Primer (epoxy recommended) and hardener
- Sandpaper (80-grit, 220-grit, and 400 grit)
- Cleaning cloth
- Masking tape
- Roller (or paint sprayer)
- PPEs such as gloves, a coat, and a respirator
Choose a workspace with good ventilation to avoid exposing yourself to fumes, which have many detrimental but highly avoidable side effects. Painting the boat on its trailer on a clear, dry day and positioning it so the paint won’t get direct sunlight exposure are ideal.
Practical Steps for Painting a Sailboat
This guide works well for fresh paint jobs and even if you’re repainting the boat.

Any dirt, debris, and grease should be taken care of in any sailboat paint job. Check for debris and algae clinging to the hull and the sailboat deck, and just use the brush and cloth to get it off.
Double-check parts of the keel because mud and seaweed tend to stick to it the most. If there are barnacles present, you may have to power wash them or any stubborn green stuff you encounter.
Dip the sponge in a mix of boat soap and water, then start scrubbing any stains. Afterward, give the sailboat a good rinse. Wait for it to dry.

Put on your respirator and coat. Use an 80-grit or 100-grit to roughen the surface and remove any lingering trace of old paint by scrubbing in circular motions.
Then, grab the 220-grit to smoothen the surface more. That said, an 80-grit or 40-grit paired with a sander will do just as well, based on my experience every time I repaint a fiberglass boat .
You’d want the surface to be as even and smooth as possible before applying the first coat.

The epoxy primer helps to ensure that the paint will adhere well, too, so I recommend you don’t skip it. Epoxy also acts as a good sealant and prevents cracking and rust.
Before you apply it, put some masking tape over the areas of the hull that you don’t want the coats to go over. It will ensure even coats, too.
Every epoxy primer and hardener combination is different in one way or another. As such, follow what the manufacturer recommends when mixing. Be mindful of how quickly the mixture hardens.
Once you’re done with that step, use the roller to apply even coats of it over the whole surface of the hull. Depending on the size of your boat, this may take a while and can be tiring, so I suggest you ask for help.
Done? It’s time to wait a day to apply another layer. The next day, you can either apply another coat of primer (up to 4 coats is great) or proceed to the painting part.

Mix the paints according to the instructions.
You need to make sure the primer has dried before painting. I suggest two layers of topcoat followed by two equal coats of antifouling paint. But you can also skip to the antifouling paint immediately – your boat, your choice.
- Be sure to pick a good marine-grade paint like TotalBoat’s Alumipaint AF or Interlux’s Fiberglass Bottomkote Aqua. Better yet, you can just head to your local marine shop and ask for recommendations (trust me, they know their sailboat paint best).
- We’re not exactly doing something artsy here, like making an easy sailboat painting with acrylics. You want coats that can take a beating, so choose marine grade only.
Once you’re ready to work, use a roller or a sprayer to apply the paint. Personally, I’d suggest the latter choice because if you spray paint a boat, you’ll get a sleeker, more attractive finish, although it requires some skills.
Therefore, if you’ve never handled a sprayer, the best way to paint a boat would be with a roller. Here are some tips to ensure the best results:
- Pour the paint into the t
- Slightly dampen the roller with clean water.
- Lightly dip the roller into the paint so that no more than half of it is submerged.
- Run the roller on the paint tray’s ramp a few times to evenly distribute the pigment.
- Run the roller from the top to the bottom of the hull. Make sure you apply even pressure as you do so. Remember: the strokes should be parallel and uniform; under no circumstance should you change the stroke to a different pattern.
- Use a paintbrush to access cavities and holes on the hull that your roller can’t reach.
- Apply the suggested number of coats for each type of paint, taking care to sand with the 400-grit or higher with each However, make sure you confirm that it’s recommended by the paint’s manufacturer.

- The first is aesthetics. How can your gaze possibly not be arrested by an exquisitely painted sailboat sailing in the distance? It’s an automatic postcard image.
- Secondly but just as important (if not more), you’re protecting your baby from damage, barnacles, rot, and other nasty things, extending its life and boosting its value.
- It exercises your creativity. Try out some sailboat paint schemes available on sites like Pinterest, and you’ll know what I’m talking about.
I’ve certainly tried one or two of these ideas myself, but not on a skiff and jon boat that I made from scratch. My wife and buddies were positively mesmerized.
- Much like how videos on YouTube showing easy boat acrylic painting puts my mind at ease, I can say the same for when I’m painting sailboat hulls.
A lot of my friends who love to sail, fish, and paint sailboats on canvas say the same since they’re often more than willing to stop by and lend a helping hand during my paint days. We exchange sailboat painting ideas occasionally, and they like the method I’ve shared here.
As such, painting boats can be a way to relax your mind and help you connect with like-minded people. You may also learn helpful tips regarding sailing and boat maintenance along the way.

You need to paint your boat every year if you let it sit in the water all the time and the vessel shows signs of degradation.
That said, if you paint your sailboat with high-quality products, such as marine-grade paint, the coating can last for as long as 10 years, especially if you’re extra careful with your boat and have proper storage for it.
Besides the two brands I mentioned above, you can also try antifouling paints by Rust-Oleum. I just rotated between TotalBoat, Rust-Oleum, and Interlux because these three provided the best results among the sailboat paints I tested.
Rust-Oleum’s Topside Paint paired with the brand’s fiberglass primer work well with fiberglass hulls. But I can say the same for TotalBoat’s Topside Paint. To me, it’s really just whichever of the three is available on my local marine shop’s shelf. Besides choosing the right paint, you may also ask yourself how much it costs to paint a boat. Is it worth it? Check out this article to get the answer!

If you follow most of the preliminary preparatory steps I’ve shared here, you will be keeping yourself safe from start to finish.
- Wear the PPEs I said above every time you’re sanding and applying epoxy and paint on the surface.
- Read any warning labels on the paint and other chemicals you use, like acetone for drying the paint quickly. Handle it with care always.
- Learn how to dispose of your paint properly. It’d be even better if you learned how to recycle it.
- Beware of accidents that may happen while you’re doing the cleaning and prep work. I mean, I’ve hit my head on a sailboat mast while doing them, so I reckon the chance of such misfortunes happening isn’t zero, even on a paint job.
To recap everything I’ve said regarding how to paint a sailboat:
- Position your boat in a good workplace.
- Clean and sand its hull well using boat soap and water and sandpaper.
- Apply 4 coats of the primer, 2 coats of the topcoat, then 2 antifouling coats, or skip to the antifouling paint coat immediately.
- Decide how you’re going to apply the paint based on the finish you want and your skill in using each tool.
We wish you the best of luck with your painting project. If you want to share your results with us, feel free to reach out via the comment below.

“My intention from the first day establishing Boating Basics Online is to provide as much help as possible for boaters who want to experience a first safe and convenient trip. So feel free to join us and share your beautiful journeys to the sea!”

Ridetheducksofseattle is reader-supported. When you buy through our links, we may earn an affiliate commission. Learn more
How to Paint a Sailboat? Expert Tips and Techniques
Written by Anthony Roberts / Fact checked by Jonathan Larson

Some folks don’t like their sailing vessel’s color, so they may want to learn how to paint a sailboat DIY style. Or maybe the boat needs a retouch for a brand-new and more vibrant look while on the sea.
Regardless of the reason, this easy-to-follow sailboat painting guide will help you splash colors and breathe life into your sailing vessel. The steps are straightforward, although patience is essential.
Let’s start.
Table of Contents
Step 1. Clean and sand the sailboat.
Step 2. apply primer on the sailboat’s hull., step 3. get the paint ready., step 4. apply the paint., sailboat maintenance tips , ways to paint a sailboat.
Painting a sailboat is like coloring any object. It requires preparation, elbow grease, and commitment to complete the job.
Things you’ll need:

- Marine-grade sailboat hull paint
- Paint roller, brush, and paint tray
- Primer and hardener
- Mask, gloves, goggles, and coat
- Soap and sponge
- Scrubbing brush
- Water hose (or power washer)
- Cleaning cloth
- Masking tape
We understand painting a sailboat can be intimidating for beginners. It can be a fun experience (though tiring), too. So, we prepared a four-step process to make this activity as easy to follow as possible.

Surface preparation is crucial in any paint job. You’ll want a clean, contaminant-free, and smooth surface to ensure the paint adheres to the hull. Here’s how to get your sailboat ready for a paint job.
- Wear your protective gear.
- Check for any signs of damage and repair them accordingly.
- Spray your sailboat clean using a power washer or a hose until the hull is free of dirt, grease, barnacles, etc.
When encountering stubborn objects, scrape them off with a scrubbing brush.
- Create a soapy solution and moisten the sponge. Scrub the boat with the cleaning agent to remove stains.
- Rinse thoroughly.
- Once dry, roughen the boat with 80- to 100-grit sandpaper. Finish the job with 220-grit sandpaper to smoothen the surface.
Pro Tip: Use an orbital sander with a 40- to 80-grit sanding disc for better results.

A paint primer is crucial for any painting project, whether by hand or machine. This initial coat gives the boat paint something to “cling” to, ensuring it lasts longer than a primer-less surface.
- Remove all the hardware from the vessel.
- Cover sailboat trims and other elements you wish to leave unpainted. The tape’s straight edge also guarantees more uniform coats.
- Combine the epoxy polymer and hardener following the brand’s instructions.
- Pour the mixture into the paint tray and run the roller to coat it with the priming solution.
- Apply the primer on the sailboat’s hull, covering every square inch.
- Leave the primer to dry for about a day.
- Repeat the primer application three more times, allowing each coat to dry for a day before applying the next layer.
- Lightly sand the primed surface with 300- to 400-grit sandpaper until the boat is smooth.
- Dip a clean rag into a solvent, such as mineral spirits and xylene, and wipe the boat again.
Pro Tip: Use a small paintbrush to apply primer on corners and other areas the paint roller cannot reach.

You can either retouch your boat with acrylic paint or a marine-grade variant.
- Acrylic is water-based. Therefore, applying it on a boat might not provide adequate waterproofing, which can result in premature peeling.
However, acrylic paint has the advantage of drying quickly and containing less toxins. To mitigate its drawbacks, you can apply a waterproof coating as the final layer.
- Marine-grade paint is usually the preferred choice, as it’s waterproof, UV-resistant, and salt-resistant.
That said, marine-grade paint is not for easy sailboat painting since it’s a lot harder to apply and requires meticulous handling. In addition, it’s also pricier than acrylic paint.
In either case, please follow the paint manufacturer’s instructions on preparing and mixing the pigment.

You’re ready to apply paint colors to your sailboat. This step might vary a bit depending on the paint manufacturer. Hence, we highly recommend reading the painting instructions.
- Hose down the area you’re working to settle the dust.
- Pour the boat paint into the tray and lightly dampen the roller with water.
- Immerse half the roller into the paint can and run it several times on the tray for even distribution.
- Paint the sailboat’s hull, ensuring firm and even pressure. Maintain uniform strokes.
- Dip the paintbrush into the paint and remove excess pigment. Paint areas the roller cannot reach.
- Leave the paint to dry following the manufacturer’s recommended curing time.
- Smoothen the surface with 400-grit sandpaper (you can use finer-grit sandpaper). However, you might want to check the paint manufacturer’s guidelines if this step is necessary.
- Apply a second and third paint coating, ensuring the recommended drying time between applications.
Pro Tip: Apply two layers of top coat and antifouling paint to make your DIY sailboat paint job last longer.

Maintaining a sailboat is crucial because it prolongs its lifespan and boosts its resale value. After all, nobody would want to buy a barnacle-ridden, stain-filled watercraft.
- Wash and clean your sailboat periodically with mild, boat paint-friendly cleaners to avoid removing the paint’s protective coating.
- Use soft water when cleaning the sailboat because hard water can strip pigments off the hull.
- Apply a marine-grade UV protectant or sealer after every wash to leave the sailboat looking pristine and brand-new.
- Repaint a boat with marine-grade pigments at least once annually, especially if you don’t take it out of the water and notice telltale signs of damage or deterioration.
- Choose a sailboat paint to meet your needs. For example, gelcoat paints are ideal for creating a mirror-like finish but require frequent reapplication. Meanwhile, polyester-based topcoat paints can produce gelcoat-like finish but last longer.
Learning how to paint a sailboat offers many benefits beyond extending your watercraft’s lifespan, allowing you to enjoy more leisurely cruises with your loved ones. Painting a boat can be relaxing and rewarding, too. It unleashes creativity and empowers you to be more productive.
However, painting a sailboat takes time, although the process is easy. And if you are a busy bee, you’re better off handing this task to the pros. The results might even be better, except nothing can bring more joy than a project you complete with your hands.

I am passionate about water sports and technical fields, so combining both makes me interested in making contents about boat accessories. With my partner, we went on many trips and sports games together, which led us to think about how we can spread our joys and passions to many people.
- BOAT OF THE YEAR
- Newsletters
- Sailboat Reviews
- Boating Safety
- Sails and Rigging
- Maintenance
- Sailing Totem
- Sailor & Galley
- Living Aboard
- Destinations
- Gear & Electronics
- Charter Resources
- Ultimate Boat Giveaway
How to Paint Sailboat Decks
- By Tom Zydler
- Updated: March 14, 2013
Painting a sailboat
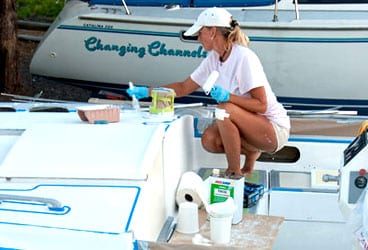
Janet Van Leuwen and Steve Van Wig own a Whitby 42. Looking at their beautiful, well-groomed ketch, you’d never guess it was built in 1982. The name on the stern, Lunacy , may be the only hint of the incredible amount of work that the couple has put into rejuvenating their boat. Bringing the decks and the coachroof top to their present glory was a large part of the project, as these tasks would’ve been on any glass boat more than 25 years old. This is how they did it. And frankly, this is how it should be done.
Before the couple could begin doing any prep work for painting, the deck hardware had to be removed. They needed access to tight spaces where the horizontal deck surface turned into vertical bulwarks, around the masts’ partners, near the windlass base, and so on. (They also removed the chainplates, which needed attention as a separate project.) Out came all stanchions, their bases, various padeyes, winches—anything and everything, in fact, that could obstruct the power sanders required to remove the worn-down, cracking, original nonskid pattern. Steve then used silicon sealant to plug all the fastener holes that would be reused; silicon repels paint, so the fastener locations would be visible when they began reinstalling the hardware.
Donning breathing masks and kneepads, the couple spent days grinding the old surfaces with 80-grit discs. Using thick foam pads on machines running at high rpm prevented any gouging in the laminate. Smaller sanders (both round and square) helped them to negotiate tight turns; at times, they resorted to manual sanding blocks. Working with thickened polyester and epoxy resins, Steve filled several hairline cracks and dings. They then sanded this filler with 80-grit, then 100-grit, and finally 120-grit sandpaper to achieve a smoother surface before vacuuming up all the accumulated dust.
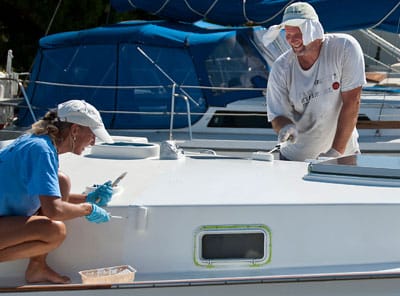
Next, to keep paint drips off teak handrails, the windlass, and the portholes, they masked these with heavy paper and tape. Right after the final wipe with a cleaning solvent, they took two days to roll and brush on two coats of epoxy primer, the base for the final topcoat. Over the next few days, the primed surfaces were sanded with 120-grit paper, followed again by vacuuming and hosing the resulting dust. Afterward, Janet cleaned all the surfaces with non-sticky tack cloths designed for multipart polyurethanes.

At this juncture, Steve identified and outlined the future nonskid areas, then spent a couple of days taping their inner edges with long-life 3M masking tape. At the corners, joining short lengths of tape on tight curves required meticulous care. After they wiped everything with cleaning solvent, they applied the first coat of multipart polyurethane to all the surfaces outside the future nonskid. Two more topcoat applications followed within allowable, 16-hour intervals. After sanding with 220-grit paper, dusting, using the tack rag, and wiping the solvent, they rolled and brushed on the fourth and final topcoat. The solvent-resistant, ultra-smooth, high-density foam-roller covers and quality brushes delivered the best finish. Working in the hot Florida sun required frequent additions of brushing reducer.
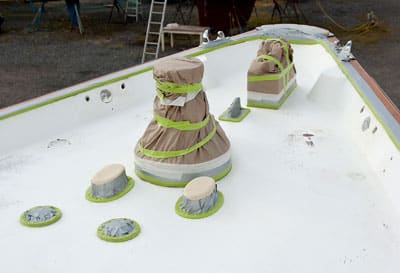
After allowing 48 hours to fully cure, they removed the masking tape. Fresh tape was then applied along the outside margins of the nonskid areas. All was ready for applying the nonskid coats. But first Steve spent a few days experimenting. He mixed his own color tints—too dark, and you couldn’t walk barefoot on the sun-heated deck; too white, and the deck glare was intolerable.
Also, he tested paint combined with various nonskid additives on scrap plywood; very coarse grit could damage human skin if a sailor knelt or fell on deck. He decided to combine equal amounts of coarse and fine grit. Significantly, this mixture prevented the coarse grit from settling down in the paint in lumps. On the big day, Steve and Janet mixed the activator with the paint base in a large container, added the correct nonskid grit, poured in the brushing reducer, and thoroughly stirred it all. After pouring small dollops within a taped area, Steve spread it out with a roller with Janet assisting, adding more paint or grit as necessary. She also wiped up Steve’s occasional paint drips with a solvent-soaked rag. The work went quickly and smoothly, though constant stirring of the paint/grit mixture was absolutely vital.
Twenty-four hours passed before heavy, late summer rain rolled in. By then, the paint had cured hard, and the coachroof was finished. They then repeated the whole operation to paint the deck. Nobody said rejuvenating a classic-plastic yacht would be quick or easy. But when the entire project was finished and Lunacy ‘s deck sparkled, the two sailors realized that all their meticulous efforts had been well worth it.
Steps:** 1. In preparation for the job, much of the deck hardware, including the stanchions, had to be removed. The remaining gear was carefully and completely covered and masked. 2. All the fastener holes were filled with silicon sealant, and the couple spent days grinding the old surfaces. Then Janet used a solvent wash to ensure a strong bond with the primer paint. 3. After dings and cracks were repaired and sanded, two coats of epoxy primer were applied. 4. Following another round of sanding, vacuuming, cleaning, and taping, the couple rolled and brushed on a fresh coat of Awlgrip topcoat. 5. After four coats of Awlgrip, it was time for the nonskid. First, Steve experimented with colors and grits. Once under way, he poured on a dollop of pre-mixed paint and spread it evenly. Note the paint stirrer, which was used to prevent the grit from settling. 6. Stirring frequently, to make sure the coverage was even in each masked area, Steve worked quickly and efficiently while Janet addressed small splashes with a solvent-soaked cloth. 7. Voilà! Once the masking tape was removed, the fresh decks fairly glistened.
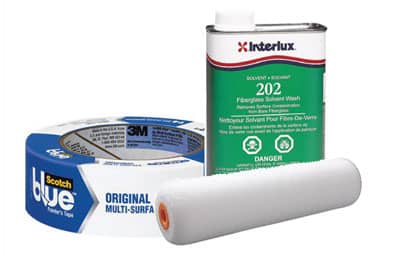
What You’ll Need: • Hook-and-loop sanding discs, sized to fit the sander pads • Sheets of sandpaper of grits 80, 100, 120, 180, 220, and 320 • 3M masking tape in widths of 1/2 inch (No. 256), 1 inch (No. 2090), and 2 inches (No. 225) • Gerson synthetic tack cloths • Roller frames and roller covers, with phenolic cores: ultra-smooth, high-density 4-inch and 6-inch roller covers (available from Home Depot; for the primers and topcoats) and Yellow stripe 3/8-inch nap (from West Marine; for the nonskid paint mixture) • Good-quality varnishing brushes • Cabisil (colloidal silica) thickening agent for making fairing putty with epoxy or polyester resin • Plastic putty knives • Interlux Fiberglass Solvent Wash 202 (for cleaning surfaces) • M.E.K. solvent (for cleaning all brushes) • Disposable paper/plastic pails of various sizes • A dozen wooden paint stirrers • Interlux Epoxy Primekote • Awlgrip topcoat (with Brushing Reducer and brushing converter) • Awlgrip Griptex nonskid additive (fine and coarse grades) • Ryobi and Makita random orbital sanders • Ryobi 6-inch palm polisher (used with a foam pad as a sander in complex spaces) • 3M breathing dust masks, ear protection, and solvent-resistant gloves
Longtime CW contributor Tom Zydler and his wife, Nancy, plan on spending this summer exploring the coast of Labrador aboard their Mason 44, Frances B .
- More: boat maintenance , How To , maintenance
- More How To

Grease the Wheels of Your Boat: A Guide to Proper Lubrication

A Bowsprit Reborn: A DIY Renovation Story

Rigging Redo: Our Switch to Synthetic

Top Tools for Sailboat Cruising: Must-Have Gear for 2024

From Paradise to Medical Emergency: A Bahamas Nightmare Turns Lesson Learned

Free Medical Advice: The Unwarranted, Unprofessional Edition

Gatekeepers of the Waterway

- Digital Edition
- Customer Service
- Privacy Policy
- Terms of Use
- Email Newsletters
- Cruising World
- Sailing World
- Salt Water Sportsman
- Sport Fishing
- Wakeboarding
Please verify you are a human
Access to this page has been denied because we believe you are using automation tools to browse the website.
This may happen as a result of the following:
- Javascript is disabled or blocked by an extension (ad blockers for example)
- Your browser does not support cookies
Please make sure that Javascript and cookies are enabled on your browser and that you are not blocking them from loading.
Reference ID: fa64b91b-64d1-11ef-98c4-3c9b10897c2d
Powered by PerimeterX , Inc.
Sailboat Bottom Paint: 10 Best Paints

Last Updated by
Daniel Wade
June 15, 2022
If you leave your boat without protection, it's beyond question that it will start attracting several marine organisms such as slime, algae, mussels, barnacle, and seaweed. This will cover the bottom of your sailboat and may negatively affect your boat's speed and fuel efficiency.
This is exactly why you need to apply the best sailboat bottom paint on your boat.
The freedom that sailing and being off land gives you are immense and almost unmatched.
But do you know that having multiple organisms such as algae, slime, barnacle, seaweed, and mussels grow on your boat can throw everything out on the wind and leave you with a very unreliable boat?
These pesky hangers will put a huge dent in your boat's speed, its movement, fuel efficiency, and overall aesthetic.
That's why you need the best sailboat bottom paint to greatly minimize any damage that might be caused to your boat's hull by marine biological growth.
Also known as antifouling paint, bottom paint is essentially a paint or coating that's specifically designed with elements that prevent various marine organisms such as algae, seaweed, barnacles, slime, and mussels from attaching themselves to your boat's hull or any other part of the boat that's below the waterline.
One of the most important elements of bottom paint is the inclusion of a biocide and copper is the most common. This may, however, depend on the type of boat that you have, how, and where you always use it.
But because there's an ocean of bottom paints out there on the market, choosing the best sailboat bottom paint can be an overwhelming task for most of us.
Fortunately, you can always count on us to make it a lot easier for you. We've gone through many bottom paints and we do not doubt that we've selected the most effective, reliable, and best sailboat bottom paint.
Our unbiased selections will not only match your needs and budget but will be available in a variety of colors to complement and augment your boat's visual appeal.
Table of contents
What to Consider when Purchasing Sailboat Bottom Paint
If you're on the market for the best sailboat bottom paint, it's crucial to go for top quality; something that will offer efficiency, top speed, and excellent performance for your sailboat. With that in mind, here are a few things to consider before spending your hard-earned money on bottom paint.
Your Sailing Location
Where are you planning to sail? Is it on a freshwater body or in a saltwater location? This is essential in helping you determine whether to go for a bottom paint that's meant for saltwater, freshwater, or both. It's generally recommended that you go for a bottom paint that will serve you perfectly well in both freshwater and saltwater. This gives you the versatility of sailing anywhere without worrying about marine organisms damaging your boat's hull.
Launch Time and Recoat Time
It's important to keep in mind that bottom paint products have specific launch time limits. The idea here is to ensure that you launch it within the required timeframe and ensure that recoating is done as required. You should, therefore, choose a bottom paint that offers a lengthy launch and recoat time while offering durable protection for your vessel is the right thing to do.
Type of Boat
You should determine whether your boat is made of wood, fiberglass, or aluminum and go for bottom paint that's suitable for that particular surface. Many bottom paints work perfectly with fiberglass but some work great with aluminum or wooden surfaces.
The Fouling Condition
Having a deeper idea of the type of fouling that you might deal with can be crucial when buying the right bottom paint for you. Whether you're dealing with slime, algae, mussel, or any other type of marine organism, knowing the type of fouling you're dealing with will make it a lot easier to pick the best sailboat bottom paint for your vessel.
Best Sailboat Bottom Paint
Rust-oleum marine flat boat bottom antifouling paint.
As one of the most respected brand names in the bottom paint industry, Rust-Oleum is known for producing some of the best sailboat bottom paint and the Marine Flat Boat Bottom Antifouling Paint is one of them. This bottom pain is designed to be suitable for various conditions (both freshwater and saltwater) and is designed with moderate copper that works great if you are environment-conscious.
This bottom paint does an excellent job of offering a protective coating to ensure that your boat is free of all sorts of unwanted marine organisms. You'll love this paint because it is thick and spreads so easily and will not be a problem even if you're a beginner. This bottom paint offers top-notch antifouling properties and is very easy to apply as long as you use a soft brush and mix it carefully. This is a great bottom paint choice that will offer a sleek multi-season finish and ensure that your boat's hull is always awesome and in great condition.
- Easy and simple to apply
- Great for both freshwater and saltwater
- Offers gentle fouling conditions
- Excellent in antifouling
- Offer a sleek and awesome finish
- Quite expensive
- Has a very strong smell that can cause headache
Interlux Fiberglass Bottomkote Antifouling Paint
This is another great brand that is considered as one of the best bottom paint in the sailing world. Even though it's a bit pricey, it offers great features that will ensure that your boat remains in tip-top shape. It is an excellent option if you're looking for a sailboat bottom paint that brings to the fore a unique dual resin approach.
This is a very reliable bottom paint that will not only prevent your boat's hull from the effect of marine organisms but also prevent premature deterioration. It offers an awesome polishing action and is perfecting if you want to discard unnecessary paint buildup. This bottom paint is also very economical and a small quantity will cover a considerable surface area of your boat's bottom.
This is, without a doubt, a superb buy in terms of its practicality and economical nature. It is excellently formulated to prevent marine organisms from damaging your boat and also to ensure that premature wear and tear doesn't exist in your vocabulary.
- It's formulated with a unique dual resin approach to prevent premature wear and tear
- It prevents early decline
- It prevents unnecessary paint buildup
- Great for ensuring that your boat is fuel effective
- Great for all conditions (both freshwater and saltwater)
- It's expensive
- The quantity and size can be misleading
TotalBoat JD Select Bottom Paint
As one of the few bottom paints that's formulated with low Volatile Organic Compounds (VOC), this bottom paint is one of the most cost-effective on this list. With one gallon, you can easily cover about 400 square feet and the application is a breeze since it's even much easier to clean up.
When you purchase this bottom paint, the package will come complete with a pair of latex gloves, a wooden stir stick, an abrasive pad, a metal tray kit, a paint suit, a roller, a painter's tape, and many more. The inclusion of all these accessories makes it a quite cost-effective purchase.
Again, this is one of the most durable bottom paints. Apply it on your boat's hull and you're guaranteed that it will offer excellent protection for the next 18 months. On the downside, this paint is too thick and you'll have to buy an excellent thinner for it to work perfectly.
Nonetheless, this is an ablative bottom paint that is easy to apply and does an excellent job of protecting your boat's bottom for close to two years.
- Perfect for all conditions
- Easy to apply and clean up
- Can improve your boat's speed and fuel efficiency
- Comes with all accessories required for the paint job
- It's one of the best water-based bottom paint products in the industry
- It contains low VOC
- You'll need a top-quality thinner for it to work perfectly
Aquaguard Water-based Antifouling Bottom Paint
An excellent choice for both wooden and fiberglass boats, this is the most perfect bottom point for saltwater conditions. This is a water-based bottom paint that's very easy to apply and clean up (using soap and water) and is formulated with an ablative action that makes it superb for preventing any marine organism that may negatively affect your boat.
This is a bottom paint that is EPA-approved and surpasses the set VOC standards. It has an extended shelf life and offers durable protection for your sailboat. It doesn't contain toxic fumes and is great even for novices. Its drying time is also excellent, so you won't wait for far too long to get your boat out there on the water.
- Excellent for saltwater conditions
- Application and cleaning is very easy
- It's approved by the US EPA
- You don't have to use a primer
- The color selection is limited
- A bit pricey
Pettit Hydrocoat
This is another water-based bottom paint that offers outstanding ablative properties that will protect your boat from marine organisms throughout the seasons. It offers good value for money and is easy to apply and clean up with just water and soap.
We're talking about a bottom paint product that will protect your boat's hull for months on end. You also do not need a full tank of the paint to complete the job. With just a single gallon, you can be sure to complete an area as big as 430 square feet.
This is also one of the few bottom paints that can perfectly prevent your boat from damage when being trailered, launched, or beached. More importantly, it's not irritating to the nose and eyes because it has low VOC.
- It will dry in 3 hours
- It's easy to apply and clean up
- It offers multi-season protection
- It's not irritating to the eyes and nose
- It's quite economical
- May not be the best in antifouling
- You have to apply at least two coats
SEA HAWK PAINTS Aluminum Boat Paint
One of the best aluminum boat paints in the market, this bottom paint is formulated to offer quick-dry corrosion-blocking, high-solid features. This bottom paint is specifically manufactured to be used in aluminum boats and doesn't require the addition of any primer.
While it doesn't have an antifouling feature, it stands out and can be used both below and above the waterline as it is risk-free and free or chromate. It is also formulated to offer a unique dual resin approach and can be used both as paint and a primer at the same time.
This is a great paint for both freshwater and saltwater conditions and can be applied as a primer or topcoat on a fiberglass boat. This is an excellent sailboat boat bottom paint that's worth every coin as it is practical, versatile, and can combat both rusting and lifting.
- The application and cleanup process is easy
- Great for both freshwater and saltwater conditions
- It doesn't require a primer
- Can be used as primer or topcoat in fiberglass boats
- Can prevent rusting and lifting
- It has quick-dry and anti-corrosion features
- Can produce deadly fumes
TotalBoat Spartan Boat Bottom Paint
If you've been looking for a practical, reliable, and cost-effecting bottom paint that will offer durable performance and protection, the Spartan Boat Bottom Paint. Perfect for both freshwater and saltwater, it can be perfect for protecting your boat and ensuring that it is fuel-efficient and reliable.
This bottom paint is formulated with advanced copolymer ablative to ensure that it doesn't deteriorate instantly. This is a very dependable bottom paint that will serve you perfectly throughout the year and will ensure that your boat easily defies fouling while reducing unnecessary buildup and sanding on your boat.
This is a very adaptable bottom paint that not only offers great value for money but is very easy to apply. More importantly, it is very durable and will protect your vessel for at least 12 months on any type of water.
- Great for all types of water
- It offers a very durable protection
- Available in a wide variety of color selection
- Offer a visually appealing abrasion-proof finish
- The included accessories aren't up to the right quality
To this end, we must put a lot of emphasis on the importance of having the right bottom paint for your boat. In addition to being an antifouling agent, bottom paint will significantly increase the fuel efficiency of your boat and ensure that it performs optimally at all times. Of course, you do not want to diminish your sailing escapades or have your nice and beautiful vessel damaged by marine organisms just because you didn't apply the right sailboat bottom paint. If you're unsure how to proceed, here's how to paint a sailboat.
Related Articles
I've personally had thousands of questions about sailing and sailboats over the years. As I learn and experience sailing, and the community, I share the answers that work and make sense to me, here on Life of Sailing.
by this author
Repairs and Maintenance
Sailboat Upgrades
Most Recent

What Does "Sailing By The Lee" Mean?
October 3, 2023

The Best Sailing Schools And Programs: Reviews & Ratings
September 26, 2023
Important Legal Info
Lifeofsailing.com is a participant in the Amazon Services LLC Associates Program, an affiliate advertising program designed to provide a means for sites to earn advertising fees by advertising and linking to Amazon. This site also participates in other affiliate programs and is compensated for referring traffic and business to these companies.
Similar Posts

How To Choose The Right Sailing Instructor
August 16, 2023

Cost To Sail Around The World
May 16, 2023

Small Sailboat Sizes: A Complete Guide
October 30, 2022
Popular Posts

Best Liveaboard Catamaran Sailboats
December 28, 2023

Can a Novice Sail Around the World?
Elizabeth O'Malley

4 Best Electric Outboard Motors

How Long Did It Take The Vikings To Sail To England?

10 Best Sailboat Brands (And Why)
December 20, 2023

7 Best Places To Liveaboard A Sailboat
Get the best sailing content.
Top Rated Posts
Lifeofsailing.com is a participant in the Amazon Services LLC Associates Program, an affiliate advertising program designed to provide a means for sites to earn advertising fees by advertising and linking to Amazon. This site also participates in other affiliate programs and is compensated for referring traffic and business to these companies. (866) 342-SAIL
© 2024 Life of Sailing Email: [email protected] Address: 11816 Inwood Rd #3024 Dallas, TX 75244 Disclaimer Privacy Policy

How to Prep and Bottom Paint Your Boat
A step-by-step process for sanding, prepping and bottom painting your boat [video].

Bottom paint (also known as antifouling paint) helps protect your boat from barnacles, weeds and other aquatic organisms from attaching to the underwater portion of your boat’s hull. If you leave your boat in the water all season, you need bottom paint.
One of the final spring preparation jobs before launching your boat for the boating season is typically painting the bottom.
As I prepared my sailboat Bay Poet for launch this spring, I started with a winter hull inspection in the yard. That is when I determined what projects need to be completed before launch. This year, I took the opportunity to install a new shower sump and then I replaced the sacrificial zincs on the prop shaft (an annual task for me).
Then it was time for final preparations before launch. This includes washing and waxing the hull, followed by preparing the bottom for painting and then, of course, painting.
Here is the step-by-step process that I took this year to prep and paint the bottom of my boat.
Preparing to Paint the Bottom
Determine the Scope of the Work
During that walk-around inspection to which I referred, you may have identified some dings and defects in your fiberglass. If you did find any, you will need to have those repaired or do that yourself.
Those sorts of repairs are beyond the scope of this article. If any deep repairs are necessary…and that would be any damage that might compromise the integrity of the fiberglass, they will need to be addressed and absolutely so if the core is exposed.
It is important to get any such repairs made BEFORE you proceed to sand the bottom in preparation to paint. This way any fiberglass repairs or patches can be faired before your paint. The repair may also need a barrier paint applied before you apply the bottom paint.
Understand that the purpose for sanding is not to remove all of the existing bottom paint, if any. It is to create a surface which will allow better bonding with the new layer of paint. In other words, you want the surface to be painted to have some “tooth”.

Preparing to Sand
A note of caution here: Bottom paints are generally toxic. That is the purpose for them – to inhibit the attachment and growth of organisms, both plant and animal. It will do this by sloughing off microscopic layers while underway. However, the paint itself will often contain a biocide. That biocide is generally non-specific and somewhat toxic for humans as well.
Before attempting to sand your boat’s bottom, check with your marina for their guidelines. You will likely be required to use a ground cover to catch any falling paint particles and dust. You may also have to connect your electrical sander to a dust collection system, generally a shop vac with a HEPA filter installed. Under no conditions should you allow any of the sanding dust to wind up in the water.
Allow for a full day or more. The more helpers you have, the faster it will go. But don’t rush because that will lead to a poor surface preparation or injury. Do not assume that you will be able to sand and paint all in one day.
Before sanding, you may need to use a stiff brush or scrubbing pad to wash away any remaining dirt or organic material. Be very careful with barnacles as they can be very sharp and cause injury. Sometimes you can pop them off with a paint scraper. Other times, you might have to sand them off.
As with woodworking, you want to start the sander before putting it on the hull and then keep it moving so it does not remove too much material in one spot. If you paint your prop shaft and propeller, don’t forget to sand them as well but you are likely to have to do those by hand.
Sanding is generally tedious and some of the positions in which you find yourself will be uncomfortable. I guarantee that you will “feel your work” the next day or two after you are done!
When you are all done with that, dispose of any collected dust and debris in an approved manner. This is a matter of local environmental regulations and just plain common sense. You may also want to throw away your coveralls as they will be very dusty.
Bottom Painting
Tools and Protective Clothing
For the best quality job, you will want to purchase good quality brushes and rollers. At the same time, it will probably not be worth the effort to clean your rollers and brushes at the end of the job. I choose to just throw those away along with the pour spout, rags, and disposable gloves. I do keep the roller handles, extension rods, and plastic painting tarps.
I also wear Tyvek coveralls but not the same ones I might have used during sanding. I will reuse my painting my coveralls until they become too damaged for use. I also wear safety glasses. If you have to get paint off your prescription glasses, it can damage the lenses and coatings. So for the tools that you can reuse, it is worth buying good quality. For items that will be used only once, buy good quality but not top of the line.
Painting Day
I have seen marina staff paint a boat and immediately launch it. I am not sure about that but while you might be able to paint in damp weather, you probably won’t want to do so for your personal comfort, if nothing else.
Next I spread a plastic drop cloth and keep moving it to keep it underneath the area on which I am working.
(NOTE: some marinas will put down a ground cover for you when your boat is hauled out. Of course, there is a cost but that is a decision you may be able to make.)
My preference is to start from the rear since all of the more complicated structures like the rudder and the through-hull box from which the prop shaft exits are in the back.
Work from the wet edges. For all the crevices and corners that your roller can’t quite reach, go back afterward with a smaller roller or a 2 to 3-inch brush. I do not worry about the complete underside of the bulb keel but I will do the underside of wings and under the front of the bulb.
Do NOT attempt to move jack stands on your own when you paint. Coordinate with your marina to have their staff move the stands or alternatively, the marina may paint the areas under the jack stand pads when they launch the boat.
Cleaning Up
I have used my left over paint 2 years later with no problems. It had not even skinned over. This may be a little bit of a challenge next time because the type of paint I have used the last 6 years has been discontinued. I will need to find a compatible replacement both in terms of bonding to the current paint and mixing with the half gallon of my left overs.
All the rollers, brushes, disposable gloves, and even the pour spout should go into a heavy duty plastic bag that gets tied closed securely and then put into the appropriate waste container. Check with your marina for information on proper disposal.
Check out Spring Prep Gear for bottom paint options
Watch this recap video highlighting how I painted the bottom of my sailboat, Bay Poet .
Painting prep and painting can be physically tedious but your bottom needs fresh paint for best performance. If you do the job right, your bottom paint could last more than one season, especially on sailboats. The ablation that occurs is likely to be more pronounced on power boats owing to the higher speeds at which they travel through the water. In any case, inspect, prep, and repaint as necessary.
Likewise, check your sacrificial zincs yearly. You will probably have to replace them at least once a year.
A little bit of maintenance will allow you to enjoy your boat for a long time!
Subscribe to my YouTube Channel for more how-to videos, sailing excursions and more!
Trending Now: Must-Have Boat Gear for Your Boat Life

Starlink Standard Kit for Stationary Use: High-Speed, Low Latency Internet

Spinlock Deckvest Junior Inflatable Life Jacket

Geckobrands Float Phone Dry Bags

Mustang Survival Lil’ Legends Infant Jacket
Trending now: custom nautical decor for your boat life.

Custom Compass Captain First Mate Crew Metal Ornaments

Custom Our First Boat Ornament – Acrylic or Glass

Boat Pillow with Boat Name & LAT LONG Coordinates

Coastal Blue Stripes Bathmat with Anchor & Boat Name

Capt. Rob Chichester
Related posts.

How To Inspect Your Boat After A Storm
May 8, 2024
A Step-by-Step Guide to Protecting Your Boat’s Surfaces
February 20, 2024

A Step-by-Step Guide to Cleaning Your Boat’s Teak
February 19, 2024

I like your advice to do a walk-around inspection to identify any dins or defects in the boat’s fiberglass to get them repaired. When adding a top or bottom coating to your boat, it would probably help to hire a professional. A professional could ensure that it’s inspected and prepped properly so that it’s ready for the coating, which can then be applied correctly so you have the best results.

I have found the cost of have the marina prep and paint my 41-foot sloop to be somewhat cost prohibitive. The quoted cost is about $6000. I feel very comfortable prepping my bottom myself. I did my research and spoke with the marina service manager before starting. I have had to patch my rudder a couple of times but the bottom paint holds up at least 2 years.
It might not be a bad idea to inspect the boat with a professional in case one misses an important detail. However, from both a cost consideration and to become more familiar with my boat, I always prefer to do as much of the work myself as possible.
Comments are closed.
BIG LABOR DAY SALE!! Save on essential boating gear with some of the lowest prices of the season West Marine's Labor Day Sale valid Aug. 22 - Sept. 2
COMMENTS
Hello my creative friends! In this acrylic painting tutorial we will go step by step to learn how to paint a sailboat in the ocean. Thank you to my awesome p...
Painting your sailboat may be tricky at first, but over time you will get the hang of it. The problem with painting your boat is that it can be a very expensive mistake if you get it wrong. It is important to read this guide carefully, take your time, and make sure you do the job properly. It may be slow going at first, speed will come over time.
In today's acrylic painting tutorial we paint a sailboat out on the ocean at sunset. This relaxed painting lesson is done in real time and will cover the ste...
Learn how to paint a sailboat scene in this, step by step, acrylic painting tutorial with artist Ashley Krieger. This lesson will teach you the steps to take...
Apply primer, if necessary, and resand. Apply the finish paint with a partner, using roller and brush. Let each coat dry completely before lightly sanding for the next, laying on a minimum of two coats. Protect yourself and the environment. A smooth application of bottom paint helps boat performance.
Use a high-pressure hose, a scrapper, and rags to make the boat spotless. 2. Remove hardware from the boat. You want to take off as much as possible, down to any aluminum window siding. This could cause a crease between the hardware and the paint, which will allow water to get into the cracks and ruin the paint.
Project Description: Easy Sunset with sailboat painting on canvas full tutorial of this relaxing Serene Seascape. Fully guided Step by step in live and replay for the brand new art student. This is a colorful fiery simple sunset you will love to put on you wall and drift off to summer. Full Image : goo.gl/GYpfW7.
Apply the filler or fairing compound with a putty knife, smoothing it out to create a level surface. Once the filler has cured, sand it lightly to ensure it blends seamlessly with the rest of the surface. By cleaning the boat's surface and removing loose or flaking paint, you create a clean canvas for the new paint.
Sailing is one of my favorite things to do and painting sailboats is almost as fun! This lovely sailboat flew in the wind on Somes Sound on Mount Desert Island, Maine. It was one of those perfect sailing days. The light sparkled, the wind blew steadily and the last of summer heated the air.
Whether you have a sailboat, powerboat, or kayak, the principles of boat painting remain largely the same. Assessing your boat's condition. Before you begin, evaluate your boat's current condition. Inspect the hull for any damage, scratches, or rust that may need to be addressed before painting. Make a list of necessary repairs and tackle them ...
Prep the surface by washing, de-waxing, and thoroughly sanding it. Apply the primer, then the paint. Wax the boat from stem to stern to protect the new paint job. Then, simply keep it clean, and rinse it thoroughly after use in saltwater. Remember, before you paint a boat always read the warning labels on all of the supplies and be sure to use ...
Check out the full article: http://www.boats.com/how-to/how-to-paint-a-boat/Watch How to Prep a Boat for Painting: http://www.boats.com/how-to/maintenance/ho...
Step 1. Give the sailboat a thorough cleaning. Step 2. Start sanding the hull's surface. Step 3. Prepare the primer, then apply it. Step 4. Prepare the paint, then start applying the topcoat and antifouling coat. The Importance of Painting Your Sailboat.
The basics of how to paint a boat: Set up in a well-ventilated work space. Repair and fair any dings or gouges in the hull or deck. Sand carefully and remove all dust. Apply primer, if necessary, and re-sand. Apply the finish paint with a partner, using roller and brush.
Pour the boat paint into the tray and lightly dampen the roller with water. Immerse half the roller into the paint can and run it several times on the tray for even distribution. Paint the sailboat's hull, ensuring firm and even pressure. Maintain uniform strokes. Dip the paintbrush into the paint and remove excess pigment.
Steps:**. 1. In preparation for the job, much of the deck hardware, including the stanchions, had to be removed. The remaining gear was carefully and completely covered and masked. 2. All the fastener holes were filled with silicon sealant, and the couple spent days grinding the old surfaces.
4+ gal. 8 qt. 3 gal. 4 pt. 2.5 gal. 1 gal. Bottom Shield is designed for easy application and clean up making it a great bottom paint for DIYers. Another way to determine how much bottom paint you need to paint your boat is to estimate the approximate surface area of the hull below the waterline. The formula below works as an easy bottom paint ...
Get this FULL SERIES here: https://www.offcenterharbor.com/yt-boat-paint-2204/Get a grip on how to paint a boat — before you head off to the marine paint sto...
Mar 27, 2020 - Explore Modern Art Gallery's board "sailboat painting", followed by 1,594 people on Pinterest. See more ideas about sailboat painting, painting, canvas painting.
First, lay out a large tarp or dropcloth to cover the entire work area. Knock off any loose paint with a scraper and, using either a sanding block or a dustless DA sander, lightly sand the entire bottom with 80-grit sandpaper. Spend a little extra time on any high or uneven areas.
Hello my creative friends! In this acrylic painting tutorial we will go step by step to learn how to paint a sailboat with a sunset over the ocean. Thank you...
Rust-Oleum Marine Flat Boat Bottom Antifouling Paint. As one of the most respected brand names in the bottom paint industry, Rust-Oleum is known for producing some of the best sailboat bottom paint and the Marine Flat Boat Bottom Antifouling Paint is one of them. This bottom pain is designed to be suitable for various conditions (both ...
Coordinate with your marina to have their staff move the stands or alternatively, the marina may paint the areas under the jack stand pads when they launch the boat. Bottom paint is expensive. If you have any left over, seal the can well and you will be able to use it again. This is where the pour spout is most useful.