- PRO Courses Guides New Tech Help Pro Expert Videos About wikiHow Pro Upgrade Sign In
- EDIT Edit this Article
- EXPLORE Tech Help Pro About Us Random Article Quizzes Request a New Article Community Dashboard This Or That Game Popular Categories Arts and Entertainment Artwork Books Movies Computers and Electronics Computers Phone Skills Technology Hacks Health Men's Health Mental Health Women's Health Relationships Dating Love Relationship Issues Hobbies and Crafts Crafts Drawing Games Education & Communication Communication Skills Personal Development Studying Personal Care and Style Fashion Hair Care Personal Hygiene Youth Personal Care School Stuff Dating All Categories Arts and Entertainment Finance and Business Home and Garden Relationship Quizzes Cars & Other Vehicles Food and Entertaining Personal Care and Style Sports and Fitness Computers and Electronics Health Pets and Animals Travel Education & Communication Hobbies and Crafts Philosophy and Religion Work World Family Life Holidays and Traditions Relationships Youth
- Browse Articles
- Learn Something New
- Quizzes Hot
- This Or That Game
- Train Your Brain
- Explore More
- Support wikiHow
- About wikiHow
- Log in / Sign up
- Hobbies and Crafts
- Paper Craft

How to Make a Paper Boat
Last Updated: November 10, 2023 Fact Checked
This article was co-authored by Robert Homayoon . Robert Homayoon is an Origami Expert known for his engaging YouTube videos and accessible instructions. He has been teaching origami on YouTube since 2009. His channel has a following of over 676,000 subscribers, and his videos have garnered over 211 million views. Robert uses his channel to highlight his passion for teaching people origami, crafts, and how to solve puzzles. He graduated from SUNY Albany in 2007 and earned his D.M.D degree from Temple University Dental School in 2013. There are 7 references cited in this article, which can be found at the bottom of the page. This article has been fact-checked, ensuring the accuracy of any cited facts and confirming the authority of its sources. This article has been viewed 4,572,174 times.
Making an origami paper boat is a great activity that’s easy to finish and doesn’t require a lot of materials. The beauty of making a paper boat is that you only need one piece of printer paper to complete the task! By folding the paper with sharp creases and shaping it carefully, you can make a great-looking origami boat in minutes. We'll walk you through folding your own paper boat with our complete step-by-step instructions.
Creating the Initial Folds

- To strengthen the crease, run your finger down the fold 3-4 more times.
- You should now have 2 creases along both centers (x-axis and y-axis) of the page.
- Use the crease you made before to help line up the folds coming in from the corners.
- The 2 folds should line up with each other.
Tip : When you go to fold the second side, use the first fold as a reference point.
- The flaps closest to you should be folded in front of the back flaps, not over them. If you fold over the back flaps, you won’t be able to fold the back flaps themselves.
Making the Final Folds
- Crease the paper along its edges so that it stays in the square shape.
- The bottom of the diamond should be the part of the paper with extra folds.
- The bottom corners will line up to become the bottom point of a square diamond.
- You may need to pull up the triangle inside the diamond while pulling apart the two sides. Try to keep the triangle inside the diamond sticking straight up as this will be your boat's "mast."
- You can reinforce the corners with clear tape and tape around the bottom to keep your boat dry.
Tip : Waterproof your boat! Use a waxed paper from an art store to make your boat last longer, or color one side of the paper completely with a crayon. You can also try to make your boat out of aluminum foil.
Expert Q&A

- If you are floating your boat on a large body of water, like a pond, you can tape string onto one end of the boat. Hold on to the other end of the string so that it doesn't float away! Thanks Helpful 312 Not Helpful 147
- Try to get the edges of the paper to line up. An evenly made boat means less chances of tipping over. Thanks Helpful 59 Not Helpful 32
- If you are making a tiny boat, don’t float it on a big body of water. You may lose it! Thanks Helpful 17 Not Helpful 11
Tips from our Readers
- If you don't have specialty supplies like wax paper or crayons, no need to fret. You likely already have the tools to waterproof your delicate paper boat right at home. Simply construct two separate boats out of ordinary printer or construction paper. Then, gently place one inside the other, nesting them together into a double-walled vessel. This should reinforce them to better withstand water without getting too soggy. Though, test float gently, as the extra weight could cause sinking if the little boat gets overburdened.
- Missing wax paper for true waterproofing? Simply equip your artist's toolkit by raiding the crayon bin! Thoroughly color one whole side of the boat with thick crayon before setting it afloat in a pool, pond or puddle. The waxy buildup should act as a shield against light water exposure. Though if embarking on choppier seas, extra reinforcements may still be needed, matey!
- Forego the plain printer paper and opt for fun vibrant colors and patterns! Tissue paper can make for a festively hued sail, but be extra delicate as it shreds easily, especially once wet. For best durability, stick to construction paper or card stock to give your boat more sturdiness as you launch it into the open water.

- Make sure you don't have any holes, as one little hole can turn into a huge rip. This could be good in a procedural text. Thanks Helpful 17 Not Helpful 3
You Might Also Like

Expert Interview

Thanks for reading our article! If you’d like to learn more about origami, check out our in-depth interview with Robert Homayoon .
- ↑ https://ussconstitutionmuseum.org/wp-content/uploads/2018/09/Make-a-Paper-Boat-Hard.pdf
- ↑ https://www.youtube.com/watch?v=b3QZpBL8-Tg#t=1m20s
- ↑ https://www.origamiway.com/origami-boat.shtml
- ↑ https://kids.nationalgeographic.com/nature/article/make-a-paper-boat
- ↑ https://www.origamiway.com/origami-boat-2.shtml
- ↑ https://www.youtube.com/watch?v=b3QZpBL8-Tg#t=2m54s
- ↑ https://kids.nationalgeographic.com/explore/nature/make-a-paper-boat/
About This Article

If you want to make a paper boat, fold a piece of paper in half from top to bottom. Then, fold it again from side to side and unfold so you have a crease in the center. Fold the top right corner down towards the center. Next, flip the paper over and fold the other corner down on the other side. Fold each of the bottom edges of the paper up and outwards to make a paper hat shape. Then, open the hat and flatten it horizontally to create a diamond. Fold the bottom edge of the diamond upwards towards the top. Then, turn the paper over and repeat on the other side. Pull the paper apart again and smooth it out to create a boat shape. Did this summary help you? Yes No
- Send fan mail to authors
Reader Success Stories
Emily Rehak
Jul 9, 2016
Did this article help you?

Ken Cunningham
Apr 4, 2016
Desmond Hodges
Jul 1, 2019
Georgiana Lings
Nov 9, 2016
Matthew Griffin
Mar 29, 2022

Featured Articles

Trending Articles

Watch Articles

- Terms of Use
- Privacy Policy
- Do Not Sell or Share My Info
- Not Selling Info
Get all the best how-tos!
Sign up for wikiHow's weekly email newsletter
Making an Easy Origami Boat
:max_bytes(150000):strip_icc():format(webp)/chrissy-pk01-56a6d65e3df78cf772907c07.png "paper sailboat tutorial")
The Spruce Crafts / Chrissy Pk
- Total Time: 10 mins
Origami comes from the Japanese. The word means the art of folding paper. " Ori " means "folding," and kami means "paper." In modern usage, the word "origami" is used as an inclusive term for all folding practices. The goal is to transform a flat square sheet of paper into a finished sculpture through folding and sculpting techniques.
Learn how to make the most well-known origami boat with this quick and easy step-by-step tutorial. This origami boat can also float in water .
Watch Now: How to Make an Origami Boat
This origami boat is a great model to teach kids. It is similar to the origami hat that you make with newspaper. Also, origami can be a great math-related activity for kids as your child creates using geometry.
What You'll Need
- 1 Rectangular sheet of paper
Instructions
Make the first folds.
Start with your rectangular paper, orient it vertically, with the long edges going up and down. Fold the bottom half up to the top.Fold the bottom right corner over to the left corner and make a small pinch, just enough to crease the paper. Open it back up.
Create a Triangle Shape
Using the crease as a guide, fold the left and right bottom corners up and to the middle. Flatten the folded pieces down. Rotate the paper. Fold one layer from the bottom up along the bottom of the front flaps.
A Boat Begins to Take Shape
Flip the paper over to the other side. Fold the bottom edge up in the same way. Unfold, and then fold the bottom right corner in along the crease you made. Repeat on the bottom left flap.
Form the Bottom of the Boat
Re-fold the bottom edge back up. Open the bottom of the model. Look at the corners. Flatten and then insert the overlapping flap on the left underneath the right section.
Continue Folding
Fold one layer up to the top. Repeat on the back. Open the bottom of the model.
Finalize the Folds
Pull apart the left and right flaps. Flatten it out, in the shape of a boat. Open it slightly. The triangle in the middle resembles a sail.
More from The Spruce Crafts
- How to Make Origami Lucky Stars
- How to Make a Cute Origami Sail Boat!
- How to Make an Origami Crane
- How to Make an Easy Origami Dollar Shirt
- How to Make an Origami Elephant
- How to Make an Origami Witch Hat
- How to Make an Origami Mouse
- How to Make an Origami Ninja Star
- How to Make a 3-D Origami Apple
- How To Make an Origami Flower
- Japanese Origami Doll Tutorial
- Origami Star Box Tutorial
- Decorative Origami Lotus Flower
- How to Make an Easy Origami Envelope
- How to Make an Origami Purse
- Origami Octahedron Instructions
- Butterfly Craft
- Origami Boat
- Dream Catcher
- How to Make a Paper Boat
- How to Make an Envelope
- Ladybug Craft
- How to Draw
- Your free coloring book
- Fairy Tales & Fables
- Crafts for Kids
Your Origami Adventure: Step-by-Step Guide to Crafting a Paper Boat

Step 1: Fold twice
Take a square sheet of paper and fold it once in the middle from one corner to the opposite one. You smooth out the fold and unfold the triangle into a square again. Then you take the other corner and do the same. In front of you is a sheet of paper with two lines crossing like an X.

Step 2:Fold vertically and horizontally
Now fold the paper from one edge to the other. To do this, place the square straight in front of you and fold the right side over the left, so that the edges lie directly on top of each other and a rectangle is formed. You stitch over the fold and open the rectangle again. Then take the top edge of the square and fold it down, creating a fold in the middle again. After opening, the sheet is divided into eight pieces like a cake.

Step 3: Corners inward
Take the upper left corner and fold it inward so that the tip is exactly in the middle of the square. Do the same with the lower right corner.

Step 4: Sides in
Now you need a little dexterity. You press the flat sides inward at the same time. In doing so, you push the center fold slightly upward so that the two corners automatically fold inward. Then flatten the shape. A small square lies in front of you.

You fold the left corner of the top folded layer over to the opposite side and smooth the fold. The cross-shaped lines are visible again.

You turn the square and fold it over so that a square with one closed and one open tip is formed. The closed part lies on the table with the tip down. The upper part consists of two triangles. There is a gap between the triangles.

Step 7: Sail of the paper boat
You fold the right triangle down and bend it back up so that it shortens by about a centimeter. This is the shorter sail of the paper boat. You put the sail in the pocket that has formed in the middle.

Step 8: Stand
You fold the bottom corner and in front of you is the finished paper boat. The folded corner serves as a stand. You place the boat so that the stand is on the back and can not be seen from the front.
More Crafting Ideas

More Ideas for Drawing

Origami Way
Make a paper boat origami boat instructions and diagram.

If you've always wanted to play with boats in the tub, but your parents wouldn't get one for you, don't worry. I will show you how to make an origami boat out of paper, and yes it floats...for a little bit, but it's still fun nonetheless. However, I heard that if you color the bottom of the boat with crayon, then it will float longer. Just be careful not to splash too much water on it!
Before we get into how to make an origami boat, let us first discuss where this paper folding originated and where it first appeared. If you're interested in the history of paper folding, continue reading to learn the fundamentals of origami.
Research studies say that origami was first invented about a thousand years ago by the Japanese, but its roots may well be in China. The term refers to the craft of paper folding. The word "origami" is an inclusive term for the folding process of paper. "Ori" means "folding," and "gami" means "paper." The objective of origami is to transform a flat square sheet of paper into a fully completed piece of art through folding techniques and cutting methods.
How to Make a Paper Boat Float Longer?
If you're ready to make your paper boat origami, keep these tips in mind to ensure it will last a long time on the water. The most common is that if you color the bottom of the origami boat with crayons, it will float longer but not long enough to reach the finish line. Some people also say that to make the boat last longer when it is on water, try using foil paper or grease-proof paper.
How to Make a Paper Boat?
The origami boat is actually very simple to make. All you need is a rectangular piece of paper, so any 8.5x11 copy or lined paper will do. Then follow the instructions and pictures carefully and you'll be able to make your own origami boat that floats.
With the help of this simple step-by-step lesson, you can quickly and easily create the most well-known origami paper boat.

- © Origamiway.com
Paper Boat Instructions

Introduction: Paper Boat Instructions

Here is a fun, quick and easy paper sail boat that can be made in no longer than 5 minutes.
Step 1: Materials

Get one piece of a simple sheet of paper. It can be out of a notebook or even just regular printer paper.
Colors to draw stuff with.
Step 2: Decorate Both Sides of the Paper

With your colors create any design you wish to draw on both sides of the paper
Step 3: Fold the Paper in Half

Make a Horizontal fold.
Step 4: Fold in Corners

Now that the paper is folded in half find the center of the half piece and fold in the two corners so that they are evenly folded. These corners should be from the side where it does not open.
Step 5: Flip Up the Open Side and Bend in the Corners.

With the top corners folded in get the open side of the paper and fold them up, then bend in the corners.
Do this for both sides so it looks like the bottom picture.
Step 6: Open Up the Bottom of the Triangle and Fold in Half So the Two Corners Meet.

The flaps that you should have folded have now created a triangle with a bottom side that can open.
Open up that bottom part of that triangle so you can see the inside of that triangle.
With the two corners that are opposite of each other bring those in so that they're touching and form a diamond shaped paper.
Step 7: Fold in the Open Flaps of the Diamond Up to Form Another Triangle.

Get those opposite corners on the diamond you met up and fold those corners up on both sides to form another triangle that is sort of like the one before.
Just like the first triangle we had, open it up from the bottom so you can see the inside and meet those two opposite corners so that it creates a smaller diamond.
Step 8: Pull Open the Diamond.

Place the diamond as shown in the picture so that looking at your diamond you see two triangles meeting at their base.
On those corners that are on the base of the triangle, one is able to open while the other can not.
Pull the corner that can open on both of these triangles so that it looks like the second picture.
Keep pulling those corners till you have what seems like a flat boat.
Step 9: Making the Boat Stand on Its Own.

Finally you have what seems like a boat, but can't stand on its own.
Simply open up the bottom of the boat much like how we did with the triangles and the boat should be able to stand on its own.
Step 10: Set for Sail!

Now place in any puddle of water wether it is a river, stream or even a bath tub and watch your boat sail.
Recommendations

Colors of the Rainbow Contest

Puzzles and Games Contest

Water Contest

Make a paper boat
Explore a creek or stream by setting sail! With nothing more than some paper and a few folding tricks you can make your own vessel to investigate the water's currents. Text adapted from the Nat Geo Kids book Get Outside Guide by Nancy Honovich and Julie Beer.
Take a piece of paper and place it in front of you with the shorter side at the top. Fold the paper in half from top to bottom.
Fold left to right to find the center and reopen. Bring the top two corners together to the middle, forming a point, and crease.
Fold the top flap at the bottom of the paper up; turn over and fold the other flap up. Fold the triangle tabs in over each other so you have a triangle.
Pop open the center like a hat, push the pointed sides to meet, and crease down so that you now have a square.
With the opening facing you, fold the top layer up to meet the other point. Turn the paper over and repeat.
Gently pull apart the top two points while pushing out with your fingers to form the bottom of the boat. Reinforce corners with clear tape, and also tape around the bottom to keep your boat dry. Now you're ready to launch your craft!
Read this next!
Craft corner, (ad) make this, (ad) get outside guide, (ad) nat geo kids cookbook: a year-round fun food adventure.
- Terms of Use
- Privacy Policy
- Your California Privacy Rights
- Children's Online Privacy Policy
- Interest-Based Ads
- About Nielsen Measurement
- Do Not Sell My Info
- National Geographic
- National Geographic Education
- Shop Nat Geo
- Customer Service
- Manage Your Subscription
Copyright © 1996-2015 National Geographic Society Copyright © 2015-2024 National Geographic Partners, LLC. All rights reserved
- Experiments
How To Make An Easy Origami Paper Boat
- Paper Art Videos
When I as a kid, I used to make paper boats during the rains and float them in a large puddle that collected outside my grandmother’s place. The basic origami boat is another model that many children come across and we forget as adults. Let’s float back down memory lane.
Best Paper for the Paper Boat
The basic paper boat requires a rectangular sheet of paper, so if you’re using square origami paper, cut off a strip to make it rectangular.
Like most basic models, this is very forgiving and you can get away with using almost any sort of paper. If you plan on actually floating it in water, however, paper that’s too thin will not last very long, so keep that in mind.
Paper Boat Instructions

To begin, keep the rectangle in portrait format in front of you, i.e. laid tall rather than wide. Fold the paper down in half, making it half as tall.

Next you should fold it in half again along the width of the sheet. That’s 4 layers of paper, so be careful to make a neat crease.

Open up the last fold and now fold down one half of the top folded edge down towards the central crease. It will form a triangle like this.

Mirror the same fold on the other half and you’ll create this peak or point at the top of your paper.

The model now has two loose layers of paper towards the bottom. Lift the top layer and fold it upwards. Turn the model over and do the same with the bottom flap of the paper again.

The model is now almost a perfect triangle except for these extra corners at the bottom. Fold the extra bits over the sides of the thick triangle, and repeat from the other side. Now you have a perfect triangle with a hollow bit at the bottom.

Open up the hollow gap and bring the two side corners of the triangle flat together like this. Fold the rest of it flat to form this small square.

The square still has a hollow area inside and one end has two free corners. Fold one of them to the opposite corner like this to form a smaller triangular shape.

Turn the model over and repeat with the remaining free corner.

You now have a smaller triangle with a hollow area inside. Like before, open this up and fold it flat into a smaller square.

The top end now has two loose triangular corners like you can see here. Pull those apart, and fold the base of the boat flat.

Open up the boat model and it should look like this with a triangular shape sticking out from the middle.
That triangular shape is hollow and can be opened up from the bottom. Pull it apart a little to make the boat more stable, It will also help it float on water without tipping over.
Your boat is done. Try it out!
P.S. Please subscribe to Papernautic on YouTube to keep track of the latest videos and tutorials.

How to make a paper boat (step-by-step instructions)

I think everyone has made a paper boat at least once in their lifetime. Making paper boat is easy as we don’t need many materials to make it.
This is an origami craft, so all you need is a sheet of paper.
And this is a craft that every parent passes onto their kids, right?
Here is the step-by-step way to make a boat out of paper.
Materials required
A4 sheet / Letter size paper/Any rectangular paper
Step-by-step tutorial to make an easy paper boat for kids

a. Take an A4 sheet paper. Hold it horizontally as shown in the picture.
b. Fold it from left to right.
c. Make a crease.
d. Now, fold the paper from bottom to top.

e. Fold it well and make a crease.

f. Unfold the fold we just made in step d.
g&h. Now, fold the right corner towards the centre and make a crease.
i. Similarly, fold the left corner towards the centre.

j. Flatten the folded pieces down and now you have the figure as shown in pic j.
k&l. Now, from the bottom, fold one layer upwards along the bottom of the folds we made in j.
m. Make a crease and flatten it well.

n. Turn the figure over.
o. Now, like we did in the previous step, fold the bottom layer upwards.
p. Flatten the fold and make a crease again.

q&r. Open the bottom of the figure.
s. After opening as shown in pic r, flatten the top corner to the bottom as you can see in pic s.
You can see that the edges of the paper boat are overlapping on each other.
t. Insert one edge into the other (see pic t).

u. You get the figure in u.
v. Now, fold the layer from bottom to the top as shown in pic v.
w. Flatten the fold.
x. Flip the paper over and fold the other layer too. You will get the triangle shape in x.
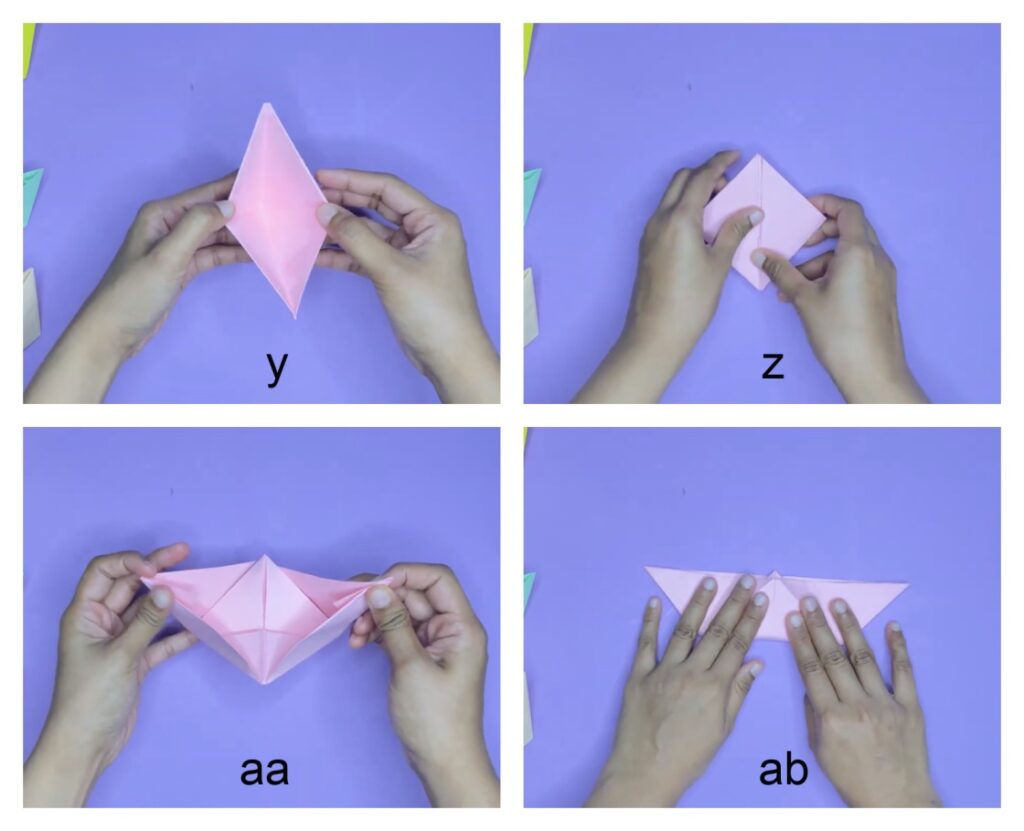
y. Open the bottom of the figure again by pulling the flaps apart.
z. Flatten it out and you will get a diamond shape now.
aa. Open the figure by pulling the sides apart from the top to get the shape of the boat.
ab. Flatten it out an open again and your paper boat is ready.

In case you have any doubt regarding any step, feel free to watch the step-by-step video tutorial below. Please make sure you also subscribe to our Youtube channel to get more craft ideas for kids every week.
Never miss new craft ideas!
Subscribe to get our latest content by email.
Video tutorial to make a paper boat
More paper crafts for kids
- How to make a paper airplane step-by-step
- How to make an easy and beautiful paper flower
- How to make an Origami jumping frog step-by-step
Similar Posts

DIY Mother’s day handprint card kids Can make
DIY handprint Mother’s Day card for mothers (&grandmothers) Is there anything sweeter than making a keepsake gift for mom? Be it for Mother’s Day or mom’s birthday. We, mothers, know for a fact that kids grow up at lightning speed. The saying, “Days are long, but years are short” was made aptly for parents who…

St. Patrick’s Day shamrock craft for kids
Easy paper shamrock garland craft idea for kids The shamrock is a symbol of St. Patrick’s Day. The three leaves of the shamrock denote faith, hope, and love. Saint Patrick used the shamrock to teach people about the concepts of Christianity. And later it became a symbol that represents Ireland itself. In Ireland, many believe…

How to make a simple paper fish step-by-step
This Origami fish is an easy paper craft your kids can learn to make. Not only for kids, it’s ideal for beginners to Origami. After making the paper fish, let them draw the eyes and the scales. If you have google eyes, you can use it too. Materials required: Origami paper / Color paper (Any…

Paper octopus craft for preschoolers (step-by-step tutorial)
If you are looking for an easy octopus craft for preschoolers, you are in the right place. This is an easy craft your kids can do with basic materials. Here we made the octopus using an Origami paper. You can use Origami sheets or construction paper to do this craft. If your child likes to…

How to make paper leaves step-by-step
Learning to fold paper leaves is one of the basic things you can learn in paper crafts. It will be handy to learn making leaves because you can do crafts with leaves, make paper leaf garlands, use it in making paper flowers, etc. Here, we have done a step-by-step tutorial of making two types of…

Easy DIY mother’s day gift idea – Box of Love
Nicknamed as “Box of Love”, this DIY gift is an excellent one to make your mother happy this Mother’s Day. It’s easy to make if you have a few craft materials to home and it is not time-consuming at all. If you ask me, making handmade gifts is a beautiful to express your love and…
Leave a Reply Cancel reply
Your email address will not be published. Required fields are marked *
Save my name, email, and website in this browser for the next time I comment.

Step-by-Step Guide: How to Make a Paper Sailboat for Endless Fun
Alex Morgan
Introduction to Paper Sailboats
Making a paper sailboat is a fun and creative craft activity that can be enjoyed by all ages. Whether you want to engage in a rainy day activity or simply have some leisurely fun, paper sailboats are a great option. In this article, we will explore the materials needed to make a paper sailboat, provide a step-by-step guide to creating one, and offer tips and tricks for making the perfect paper sailboat. We will explore different variations and designs for paper sailboats, as well as fun activities and games that can be enjoyed with them. Let’s dive into the world of paper sailboats and let our imaginations set sail!
Key takeaway:
- Making paper sailboats is a fun and creative activity: Paper sailboats provide an enjoyable way to explore the art of origami and enhance creativity.
- Using the right materials is crucial: Different types of paper can be used for making paper sailboats, and additional materials like adhesive might be required for certain designs.
- Step-by-step guide simplifies the process: Following a structured guide with clear steps helps in folding the hull, creating a sail, and attaching it to the hull, ensuring a successful paper sailboat creation.
Materials Needed to Make a Paper Sailboat
To create a paper sailboat, you will need the following materials:
- Paper: Ensure you have a square piece of paper. You can fold an 8.5×11-inch sheet into a square shape.
- Scissors: Cut the paper into a square.
- Pencil or pen: Use a pencil or pen to mark the paper for folding lines.
- Ruler: Make use of a ruler to create straight and accurate folds.
- Decorative materials (optional): If desired, you can decorate your sailboat using colored pens, stickers, or markers.
To make your paper sailboat, carefully follow these steps:
- Begin with a square piece of paper.
- Fold the square in half diagonally to form a triangle.
- Unfold the paper and fold it in half again diagonally in the opposite direction.
- Unfold the paper once more and fold each corner into the center, creating a diamond shape.
- Take the top point of the diamond shape and fold it down towards the bottom point, creating a triangle shape.
- Fold the two bottom corners of the triangle up towards the top, forming a smaller triangle with a flat bottom.
- Open the flaps at the bottom of the triangle and fold them outwards to shape the base of the sailboat.
- Use colored pens, stickers, or markers to decorate your sailboat as desired.
- If you used any wet materials for decoration, allow the sailboat to dry.
- Your paper sailboat is now ready to set sail!
By following these steps and gathering the necessary materials, you can easily create a paper sailboat for fun and imaginative play.
What Types of Paper Can be Used?
When making a paper sailboat, it is important to consider what types of paper can be used to ensure sturdiness and flexibility . There are several options to choose from.
One option is origami paper , which is lightweight and easy to fold. It holds its shape well, making it a good choice for creating the structure of the sailboat.
Another option is cardstock , which is thicker and more durable. It provides stability and strength to the sailboat, ensuring that it will hold up well during use.
Construction paper is also a versatile option, offering a wide range of colors. This type of paper can add color and creativity to the design of the sailboat, making it visually appealing.
For those looking for a thicker paper with a variety of designs, scrapbook paper is a great choice. It enhances the visual appeal of the sailboat and adds an extra layer of interest to the design.
Personally, I have made a paper sailboat using origami paper in the past. It was a vibrant and easy-to-fold option, allowing for intricate details on the sailboat. The lightweight nature of the paper also made it glide smoothly on the water. It brought joy to my nephew as he watched it float in a mini pool.
When making your own paper sailboat, it is important to consider the type of paper you choose. The right paper can make a huge difference in the overall experience. So, be sure to choose wisely and enjoy the process of creating your very own paper sailboat!
Additional Materials Required
The construction process of a paper sailboat requires additional materials such as scissors and glue . These materials are essential for improving the sturdiness of the sailboat. Scissors are utilized for precise cutting, resulting in clean edges. Glue plays a crucial role in securing all parts of the sailboat, guaranteeing its integrity during both playtime and display. Incorporating both scissors and glue into the process significantly enhances the quality and durability of the paper sailboat.
Step-by-Step Guide to Making a Paper Sailboat
Get ready to set sail with a step-by-step guide on making a paper sailboat ! We’ll take you through the process of folding the hull , creating the sail , and attaching it to the hull. From the first fold to the final touch, you’ll have all the know-how to create your own miniature vessel . So grab some paper and let’s navigate the seas of creativity together!
Step 1: Folding the Hull
To make the hull of a paper sailboat, follow these steps:
– Step 1: Start with a square piece of paper.
– Step 2: Place the paper in front of you in a diamond shape, with one corner pointing towards you.
– Step 3: Fold the bottom corner up to meet the top corner, creating a triangle.
– Step 4: Unfold the triangle, then fold the left corner to the center of the triangle.
– Step 5: Repeat with the right corner, folding it to the center of the triangle.
– Step 6: Flip the paper over to the other side.
– Step 7: Take the top layer of the left corner and fold it towards the center line.
– Step 8: Repeat with the right corner.
– Step 9: Unfold the left and right corners.
– Step 10: Take the bottom corner and fold it up towards the top point of the triangle.
– Step 11: Flip the paper over to the other side.
– Step 12: Fold the bottom corner up again, leaving a small gap between the fold and the top point.
– Step 13: Unfold the paper completely, and you now have the folded hull of your paper sailboat.
Following these steps will allow you to create a sturdy and functional hull for your paper sailboat. Be precise with your folds to ensure the best results.
Step 2: Creating the Sail
- Select an 8-inch by 8-inch square piece of paper.
- Fold the square in half diagonally to create a triangle.
- Unfold the paper and fold the top two corners down to the center crease to make a smaller triangle.
- Fold the bottom point of the triangle up towards the top point, leaving a small space at the top.
- Fold the two outer edges of the triangle inward to meet at the center crease and create a diamond.
- Flip the diamond over and fold the bottom point up towards the top point, leaving a small space at the top again.
- Fold the right and left corners of the top layer towards the center line of the diamond.
- While still folded, fold the entire diamond in half vertically.
- Unfold the top layer to reveal the sail of your paper sailboat.
- Optional: Use markers, stickers, or other decorations to personalize your paper sailboat.
Origami sailboats , originated in Japan , have a long-standing tradition dating back centuries. These miniature vessels , with their intricate folds and precise techniques, have been passed down through generations, bringing joy to both children and adults. Paper sailboats were commonly used in traditional Japanese celebrations and festivals, symbolizing good luck and prosperous journeys. Today, making paper sailboats remains a popular craft activity, providing a fun and creative way to explore origami .
Step 3: Attaching the Sail to the Hull
- Begin by folding and creating the sail.
- Next , position the sail on top of the hull, making sure to align the bottom edge of the sail with the top edge of the hull.
- To secure the sail in place, use a small amount of glue or adhesive tape.
- Make sure that the sail is straight and centered on the hull.
- Gently press down to create a strong bond between the sail and the hull.
- Before moving or playing with the paper sailboat, allow the glue to dry completely.
Paper sailboats have been a cherished tradition originating in ancient China. Just like origami boats, they were used in various festivities to symbolize good luck and prosperity. Nowadays, both children and adults enjoy making paper sailboats as crafts. These boats not only provide entertainment but also serve as a reminder of the beauty and simplicity of handmade objects. Attaching the sail to the hull is a crucial step in completing the paper sailboat and preparing it for exciting adventures in bathtubs, puddles, or miniature ponds.
Tips and Tricks for Making the Perfect Paper Sailboat
To create the perfect paper sailboat , follow these tips and tricks for making the perfect paper sailboat . Begin by starting with a square piece of paper , as this will ensure balanced proportions and make folding easier. Fold the paper in half diagonally to form a triangle , making sure to press firmly to create a sharp crease . Next, unfold the triangle and fold the bottom edge up to meet the top, creating a smaller triangle shape .
Then, take the right corner of the triangle and bring it towards the center , repeating this step with the left corner . After that, fold the bottom edge of the paper up to meet the top, resulting in a square shape . Fold the sides in towards the center . Flip the paper over and fold the bottom corners up to the top, forming a diamond shape .
Carefully unfold the two sides of the diamond to create the sail . Adjust the angle of the sail by making small folds along the bottom edge . To ensure proper flotation , fold the bottom edges inward to create a small base for balance in the water . Test your boat in a basin of water to ensure it floats correctly.
By following these tips and tricks , you will be able to create a perfect paper sailboat . Enjoy the process of crafting your own miniature boat and have fun sailing it in the water .
Different Variations and Designs for Paper Sailboats
If you’re ready to embark on a paper crafting adventure, you’ll be amazed at the plethora of different variations and designs available for making paper sailboats . From the simplicity of a basic origami sailboat to the intricate techniques of an advanced cut and fold sailboat , these sub-sections offer a range of possibilities to explore. So grab your paper, fold, cut, and let your creativity set sail !
Simple Origami Sailboat
To create a Simple Origami Sailboat , you just need to follow these steps:
- Start with a square piece of paper.
- Place the paper in front of you with one corner pointing towards you.
- Fold the paper in half diagonally, bringing the opposite corners together.
- Unfold and repeat step 3, folding it in half diagonally in the opposite direction.
- Rotate the paper so that one of the folded corners is facing towards you.
- Fold the two outer corners of the paper towards the center, forming a triangle shape .
- Flip the paper over and fold the bottom edge upwards to create the sailboat’s hull.
- Open up the bottom of the hull to make a flat base.
- Create the sail by folding a small rectangle of paper in half diagonally.
- Tuck one corner of the triangle sail into the opening at the top of the hull.
You can experiment with different sizes and colors of paper to make a fleet of simple origami sailboats .
Advanced Cut and Fold Sailboat
To create an Advanced Cut and Fold Sailboat , follow these steps:
1. Choose sturdy paper, like cardstock or construction paper , for support.
2. Start with a rectangular piece of paper, preferably 8.5 x 11 inches .
3. Fold the paper in half lengthwise to create a center crease .
4. Unfold the paper and fold the top edges towards the center crease , creating diagonal folds meeting at the top.
5. Flip the paper over and fold the bottom corners up towards the center crease , following the previous diagonal folds .
6. Fold the bottom edge of the paper up to meet the top edge , aligning the sides and creating a triangle shape at the bottom.
7. Flip the paper over, keeping the triangle shape at the bottom. Fold the bottom corners inwards towards the center crease , creating 45-degree angles .
8. Unfold the previous step and carefully cut along the creases , starting from the bottom and stopping before reaching the top.
9. Fold the paper back into its original shape, tucking the triangles created in step 7 into the slits made in step 8.
10. Create a sail by cutting a small rectangle from a different colored paper. Attach the sail to the back of the sailboat, near the top.
11. Your Advanced Cut and Fold Sailboat is now complete! It is ready to set sail in the imagination of your paper fleet.
Fun Activities and Games with Paper Sailboats
Looking for some fun activities and games with paper sailboats? Here are some ideas to get you started:
1. Racing: Set up a racecourse in a pool or a bathtub and have a friendly competition to see whose paper sailboat reaches the finish line first.
2. Obstacle Course: Create an obstacle course using household objects like pillows, books, or small toys. Test your skills by navigating your paper sailboat through the course without touching any obstacles.
3. Float and Sink: Test the stability of your paper sailboat by adding different objects one by one. See how many objects it can hold before sinking.
4. Design Challenge: Have a design contest with your friends or family. Each person creates their own unique paper sailboat design using colorful paper, markers, and craft materials. Then float them in water and see whose design performs the best.
5. Treasure Hunt: Hide small objects around the house or yard and use the paper sailboats as vessels for finding treasure. Sail them to discover hidden treasures and collect them along the way.
These activities and games with paper sailboats are not only fun but also great for enhancing creativity and problem-solving skills. So get ready to set sail and embark on some exciting adventures with your paper sailboats!
Some Facts About How To Make A Paper Sailboat:
- ✅ Making a paper sailboat is a fun and easy craft project that introduces the art of origami. (Source: One Little Project)
- ✅ All you need is a piece of printer paper to create a paper sailboat. (Source: One Little Project)
- ✅ The process involves folding the paper in half lengthwise and width-wise, and then folding the top corners downwards to align with the center fold. (Source: One Little Project)
- ✅ After folding the bottom flaps and creating a square shape, the paper sailboat is ready to be floated on water. (Source: WikiHow)
- ✅ Adding tape to the corners and bottom of the paper sailboat can help make it waterproof and prevent water from seeping in. (Source: WikiHow)
Frequently Asked Questions
How do i make a paper sailboat with printer paper.
Step 1: Start by folding a piece of letter-sized printer paper in half lengthwise and then width-wise.
Step 2: Rotate the paper and fold the top corners downwards to line up with the center fold.
Step 3: Fold one layer of the bottom flap upwards and flip the paper over to fold the little flaps behind the triangle shape.
Step 4: Fold the remaining bottom flap upwards.
Step 5: Pick up the folded paper and pull your thumbs apart to flatten it.
Step 6: Fold the bottom point up to meet the top point and flip the paper over to repeat the fold.
Step 7: Run your fingers along the folds to ensure they are flat and all edges are folded.
Step 8: Pull apart the sides of the folded paper at the top point to create a boat shape. Pinch along the bottom edges to make folds on each side and your paper boat is complete.
Can I make a paper sailboat with origami paper?
Yes, you can make a paper sailboat with origami paper. Follow the same steps mentioned earlier, but remember to use proper cutting techniques if needed.
How long will the paper sailboat float in water?
The paper sailboat will float in water for at least 10 minutes before becoming waterlogged. To make it last longer, you can add a layer of tape to the bottom for better waterproofing.
What kind of paper should I use to make a paper sailboat?
You can use regular printer paper or construction paper to make a paper sailboat. If you have origami paper, that can also be used with proper cutting techniques.
Can I put things in the paper sailboat?
Yes, you can put lightweight items in the paper sailboat. If you are placing the boat in water, make sure to only put lightweight items to prevent the boat from tipping over.
How long does it take to make a paper sailboat?
Making a paper sailboat with regular printer paper typically takes about five minutes. It is a quick and easy craft project that can be enjoyed by kids.
About the author

Leave a Reply Cancel reply
Your email address will not be published. Required fields are marked *
Save my name, email, and website in this browser for the next time I comment.
Latest posts

The history of sailing – from ancient times to modern adventures
History of Sailing Sailing is a time-honored tradition that has evolved over millennia, from its humble beginnings as a means of transportation to a beloved modern-day recreational activity. The history of sailing is a fascinating journey that spans cultures and centuries, rich in innovation and adventure. In this article, we’ll explore the remarkable evolution of…

Sailing Solo: Adventures and Challenges of Single-Handed Sailing
Solo Sailing Sailing has always been a pursuit of freedom, adventure, and self-discovery. While sailing with a crew is a fantastic experience, there’s a unique allure to sailing solo – just you, the wind, and the open sea. Single-handed sailing, as it’s often called, is a journey of self-reliance, resilience, and the ultimate test of…

Sustainable Sailing: Eco-Friendly Practices on the boat
Eco Friendly Sailing Sailing is an exhilarating and timeless way to explore the beauty of the open water, but it’s important to remember that our oceans and environment need our protection. Sustainable sailing, which involves eco-friendly practices and mindful decision-making, allows sailors to enjoy their adventures while minimizing their impact on the environment. In this…
ann wood handmade
sewing patterns, crafts and diy projects
make a paper boat : a free tutorial

Some projects are most satisfying to work on in batches. These paper boats are like that. They are quick and easy and you can make a bunch at once without much extra effort. Plus the finished group is very satisfying. You probably already have most of the materials you need and you could easily be hanging a respectable fleet by the end of the day, who doesn’t want that?
download the boat template
You will also need:.
- heavy paper (I’m using water color paper) or light cardboard (like poster board)
- a bamboo skewer
- paper for the sail
- elmer’s glue
- embroidery thread or light string (like baker’s twine)
- paints, brushes and/or collage materials
- exacto knife
- clothespins or paperclips for clamping
*Please read through all the steps before beginning.
*Also note I included some simple directions on the sail template for your convenience but the directions below include more details and options.

1. Cut out the boat and mast support templates and trace them onto light cardboard or a heavy weight paper. I’m Using water color paper (140 pound hot press is my favorite). Optional – paint both sides. I almost always paint a wash of water color on both sides of the boat and mast support.
2. Place the template back on the boat and poke your pencil through where the score lines intersect. Mark with a dot. Remove the template and draw on the score lines. Draw the score lines on the mast support too and mark an X on the center of the top section.

3. Use the back of an x-acto knife to score the lines on the boat and mast support.
4. Gently fold the boat and mast support at the score lines.

5. Add glue to the last section of the mast support, fold it into a triangle and glue the top section over it.
6. Clamp with paper clip or clothespins while it dries.

7. While your mast support dries paint or collage or draw on your boat. I did all three. I used a wash of watercolor, some pencil lines and a little collage. If you’re doing lots of collage I recommend using nori paste instead of blue stick . It is awesome. You can find it here . * FYI – this is an affiliate link – meaning I get a small commission if you purchase through the link.

8. Apply glue to the bow as indicated on the template.
9. Fold the boat together at the front and clamp with clothespins or paper clips while the glue dries. Alternatively – you can skip the glue, bring the front sides together and stitch on the sewing machine close to the edge.

10. Fold the center back ( A on the template) and apply glue to the top.

11. Bend up tab B – covering the top of tab A and matching the top edges. Apply glue and bend up tab C covering the top of tab B and matching the top edges. Clamp and let dry. Alternatively – skip the glue and attach the three layers with a stitch and a button (step 16 below).

12. Use and xacto knife to poke an X at through the center of the mast support.
13. Snip iff the tip of your skewer and insert it into the hole – push it all the way to the bottom of the mast support. Make sure it is straight and add glue (lots) to the insertion point. Let it dry, mast support end up.

14. Cut out a sail and flag from paper. Poke a hole at the center of the top and bottom and insert the mast through the holes.

15. Cut a 36 inch length of embroidery thread or fine string (like baker’s twine) and tie a loop in the center. Apply glue to the top 1/2 inch of the mast and wind the tails on to attach. This leaves most of the strings hanging down below.

16. Add a button at the back. Use a large needle to poke a hole through all the layers and ties on a button. Poke a hole through the tip of the bow as well and tie on one or two buttons.

17. Fold the flag in half, unfold it and apply glue stick. Fold it over the mast. Press the sides together and if you like trim and curl the ends.

18. Place the mast support into the boat. You can glue it in place or use the strings to attach hold it in place (see below).

19. Hold (or glue) the mast support in the boat and wind the strings around the buttons. To add flags fold a 1 inch strip of paper in half the long way and cut into flags, open the flag, apply glue stick and fold over the strings.
I hope you make lots of paper boats! And for variety you can mess around with the sail configurations, scale and the edges of the boat template. If you make boats I’d love to see – please use #annwoodpattern on instagram or email a photo to me at info at ann wood handmade dot com.

Get my free weekly-ish newsletter, there are tips and tricks, ideas, stuff to try, all the latest news and blogposts and extra stuff, just for subscribers, delivered mostly on Friday. Pretty much.
17 comments.
Thanks so much, Ann. I was recently wondering what new thing I could make with my paper, stamps and watercolors.
So exciting to share with my grandchildren, thank you!
This is lovely – thank you for sharing.
I can’t wait to make these! I made a big fleet of the paper boat ornaments last Christmas as gifts. I’ve been wanting to make boats to keep. This is it! Thank you so much!
This is a wonderful project! Thank you so much for sharing. Love your blog, I always take time to read through, “and smell the roses”.
Love them! What is the little connector you have used to connect them to the string that is holding them up to the ceiling? Thank you as always……
Thanks Gail! I put a little button on the end of each string so I could move the boats around easily when I was arranging them. Just slip the loop at the top of the boat over the button to hang.
You let our imaginations set sail upon a sea of dreams. A perfect ship for my little spool and button dolls to sail away. Thank you!
I am quite sure that I will be making some little boats in the near future!
What a lovely place to create, that library and cabin and the scenery look so peaceful and inspiring.
For some reason I have never commented before, not sure what that is as I have enjoyed your blog a lot, and I think I have made about twenty of your little tiny rag dolls now! The first three made just after you first published the pattern, the rest I’ve made this year. Just made the jacket last night and my newest one ‘Clipper’ loves it.
Thank you for your generosity in sharing these marvellous patterns.
I so ♥ this, and the fact that you are still blogging & making fun tutorials Ann! So many bloggers have stopped and I miss them all!
I recently printed the pattern for the needle case and will make myself one soon, with fabric inherited from my grandmother.
This post got me started on a most enjoyable series of paper mache boats using your “Dear Little Boats” pattern – thank you for being so generous with your creativity.
Dear Ann, How generous of you to share such detailed instructions for free! I haven’t had the courage yet to make a ship, but I am much inspired. Thank you for the lovely world, mood, spirit, and community you have created with this faithful, long-running blog. It is balm and a well of inspiration for creative, like-minded souls. Blessings, Hollyann
So so elegant simple and beutifull
I am finishing up my little wire bed for mouse. I am having so much fun! You’d think I was a little girl or teenager, and not a 73 year young women. Great to be able to do whatever you want to do.
[…] Quote from the source: … […]
I have made these mini boats and people love them. The instructions are clear and easy to follow and the result is precious.
Comments are closed.
Privacy Overview

Get all the latest news, sales and discounts, blogposts and extra stuff, just for subscribers, delivered mostly on Friday. Pretty much.
How to Make a Paper Boat: Easy Step-by-Step Guide
Making a paper boat is a classic and entertaining activity for kids and adults alike. It's a simple and creative way to spend time and learn basic origami techniques. What's more, making a paper boat is not only an enjoyable pastime, but it also teaches patience and focus, making it an excellent educational activity.

In this article, you'll learn how to make a paper boat using a step-by-step tutorial. This guide will cover everything from selecting the appropriate materials to folding and decorating your paper boat, ensuring that it's both aesthetically pleasing and capable of floating. By carefully following the instructions provided, you'll be able to create a variety of boat shapes and sizes to suit your preferences.
Key Takeaways
- Learn how to make a versatile and entertaining paper boat with a clear, step-by-step tutorial.
- Discover creative ways to decorate your boat and how to make boats with different shapes and sizes.
- Explore educational activities related to paper boat making to enhance the learning experience.
Materials Needed
Choosing Your Paper
When making a paper boat, the first decision to make is the type of paper to use. While traditional origami paper can be used, it's not a requirement. A simple square sheet of paper will work well. If you're starting with a rectangular sheet, simply trim it down to a square before proceeding. Construction paper, card stock, and even waxed paper can be utilized for this project. For a more durable boat, consider using aluminum foil as an alternative material.
Preparing Additional Supplies
Aside from the paper, you can gather a few additional items to enhance your paper boat crafting experience. If you're using plain white paper, consider adding some colors to your boat with crayons , markers, or colored pencils. Younger children might enjoy decorating their boats with stickers or other craft supplies.
When selecting your materials, keep in mind the end goal of your paper craft . If you plan to float your boat on water, avoid materials that are too heavy or prone to absorbing water. Additionally, for increased stability, consider using heavier papers like card stock or waxed paper.
With the right materials, making a paper boat can be an enjoyable and educational activity. Remember to experiment with different types of paper and decorations to create unique and personalized boats.
Basic Paper Folding Techniques
Making Creases
Before folding a paper boat, it is essential to learn how to make creases properly. Creases are the foundation for any paper folding project. To create a strong and precise crease, first, align the edges of the paper and hold them in place using the thumb and index finger of one hand. Gently press down the folded edge with the other hand's thumb, moving from one end to the other, making sure it is even and firmly pressed. The more accurate the creases, the better the end result will be.
Basic Folds
There are a few basic folds that one must master to make a paper boat. Here's a list of folds used in creating a paper boat:
- Valley fold : Fold the paper towards itself, creating a downward crease.
- Mountain fold : Fold the paper away from itself, resulting in an upward crease.
- Triangle fold : Create a triangle shape by folding one edge of the paper to meet the other edge.
- Diamond fold : Form a diamond by opening up the bottom of a previously made triangle, aligning the bottom corners of the triangle, and folding them over each other.
These basic folds play a crucial role in creating a well-executed paper boat that not only looks good but also floats stably on water.
Unfolding Tips
As important as folding techniques, unfolding tips should be considered to ensure a successful paper boat. When unfolding the paper , be cautious not to tear or wrinkle it, as this can impact the boat's balance and appearance. One should be gentle when opening flaps, using fingertips to apply_even pressure on both sides to maintain the paper's overall structural integrity.
Utilize the basic folding techniques, like making precise creases and understanding the essential folds, combined with careful unfolding to create a perfectly-shaped paper boat . Remember, practice makes perfect, so don't be discouraged if the first few attempts are not perfect—keep folding, and soon creating a paper boat will become second nature.
Step-by-Step Guide to Making a Paper Boat
Creating the Base Shape
Begin by selecting a square sheet of paper, preferably origami paper . Place the paper in front of you with one corner facing upwards, forming a diamond shape. Fold the paper in half diagonally, so that the top corner meets the bottom corner, creating a triangle shape. Make sure the edges align perfectly and press firmly to create a sharp crease.
Forming the Boat
Now, grab the triangle and rotate it 45 degrees. Gently open up the bottom of the triangle and pull the paper apart until it pops into a square shape. Make sure the bottom corners of the triangle overlap each other, forming the bottom corner of the new diamond shape. Next, pick up the folded piece of paper and at the top point, pull apart the two sides. As you pull it apart, it should open into a boat shape. Adjust the paper as needed to make sure it's boat-shaped and pinch along the bottom edges to create a fold on each side.
Adding the Mast and Sail
To complete your paper boat, consider adding a mast and sail for added flair. With a separate piece of paper, cut a smaller square and fold it diagonally to create a triangle. This will serve as the sail. For the mast, use a thin wooden dowel or a straight piece of string and insert it through a small hole in the center of the sail. Attach the other end of the mast to the bottom center of the boat using glue or tape.
Your paper boat is now complete. Follow the above instructions to create more paper boats and enjoy your new fleet!
Decorating Your Paper Boat
Coloring and Customization
Before assembling your paper boat, it's a great idea to add some personal touches. Crayons , markers , and colored pencils can be used to create unique designs on your boat. You can also print coloring pages with different patterns or themes and use them as templates for your boat.
To further customize your paper boat, consider using stickers or other decorative items. Be creative and think of ways to make your boat stand out. For a more detailed guide on decoration techniques, refer to this video tutorial .
Waterproofing Considerations
When decorating, it's important to consider waterproofing as well. After all, a paper boat must withstand water. Common waterproof materials include clear tape, wax paper, or even a layer of wax from a candle.
Here's a brief list of materials that can be used to waterproof your paper boat:
- Waterproof spray
Remember to apply these waterproofing materials as an extra layer of protection after you've finished decorating your boat. This will help ensure your boat stays afloat and retains its colors and designs.
By following these decorating and waterproofing tips, your paper boat will not only look visually appealing, but also be ready for its maiden voyage.
Making Different Shapes and Sizes of Boats
Altering Dimensions for Variability
In order to create different shapes and sizes of paper boats, you can experiment with the size of the paper itself. A larger paper size will result in a larger boat, while smaller paper will create a smaller boat. Additionally, the paper shape can be altered for variability. For example, you can use a square or a rectangular sheet , which will result in slightly different boat shapes.
To begin, choose a paper size appropriate for your desired boat size. Here are some suggestions for paper size and corresponding boat shapes:
- Square paper (e.g. 20cm x 20cm, 30cm x 30cm): Traditional boat shape
- Rectangular paper (e.g. 20cm x 40cm, 30cm x 60cm): Longer, narrower boat shape
Experiment with folding techniques that involve triangles , diamonds , and other shapes. For instance, folding a rectangular sheet of paper in half, followed by folding the corners down into triangular shapes will eventually result in a boat shape. Such techniques can help create various boat styles and shapes.

Advanced Origami Boats
For those interested in trying more complex boat designs, advanced origami techniques can be used to create a variety of intricate boat shapes. Some examples include:
- Double-layered boats : These boats can be made by folding the paper in a way that creates two layers, adding stability and a unique appearance to the boat.
- Boats with sails : Create boats with sails by folding additional paper into triangular shapes and attaching them to the boat's top.
- Multi-hulled boats : Construct multi-hulled boats, such as catamarans or trimarans, by folding multiple boat shapes and connecting them together.
In summary, by varying the paper size, shape, and folding techniques, you can create an array of different boat shapes and sizes. Experiment with square and rectangular sheets of paper, and try advanced origami techniques to take your paper boat-making skills to the next level.
Ensuring Your Boat Floats
The Science of Floating
To ensure that your paper boat floats, it's essential to understand the basic science behind the floating phenomenon. When an object is placed in water, it displaces an amount of liquid equal to its own weight, in accordance with Archimedes' principle . If the displaced water weighs more than the object, the object will float as it experiences an upward buoyant force.
In the case of a paper boat, it is important to create a design that will displace enough water to counteract its weight. Key factors that affect the boat's ability to float include:
- Surface area: A wider base increases the surface area in contact with the water, which helps increase water displacement and stability.
- Weight distribution: Distributing the weight evenly across the base will help the boat remain stable and balanced.
- V-shape: Origami paper boats usually have a V-shaped hull , which helps them cut through the water and maintain stability while moving.
Testing and Troubleshooting
Once you have crafted your paper boat, it's crucial to test and troubleshoot its ability to float. Some key steps include:
- Make sure the boat's surface area is wide enough and the shape is correct, as shown in this tutorial .
- Test your boat in calm water conditions, avoiding windy areas or strong currents that can tip the boat over.
- If the boat is sinking, you may need to adjust the shape and make sure all folds are properly made.
- If the boat is unstable, check the weight distribution and ensure that the sides are symmetrical.
- To enhance your boat's stability and buoyancy, you can add waterproof material like tape or a layer of wax on the paper.
Testing and troubleshooting are essential steps in achieving a boat that floats and is stable in water. Once you are confident in your paper boat's ability to float, you can enjoy watching it sail across the water surface or even set up races with your friends.
Educational Resources and Activities
Incorporating Paper Boats into Lessons
Teaching the art of paper folding , also known as origami, is a wonderful way for teachers and parents to engage children in creative and educational activities. Paper boats are a perfect example of an easy-to-learn origami craft that can be incorporated into various subjects such as history, geography, and physics. One of the main advantages of this activity is that it only requires a single piece of paper - making it a cost-effective and easily accessible craft.
To incorporate paper boats into lessons, teachers can use Japanese origami as a starting point for discussing the history and cultural significance behind this art form. In geography, they can explore the role of boats and water travel in different countries. For physics, young learners can experiment with the buoyancy of their paper boats, demonstrating principles like Archimedes' principle.
Some useful resources for teaching origami paper folding include:
- Online tutorials: Websites like wikiHow and YouTube channels offer step-by-step guides on how to fold a paper boat.
- Books: Origami-themed books are available at local libraries or bookstores, which can provide inspiration for both children and adults.
- Workshops: Some museums, cultural centers, and schools may offer workshops on origami paper folding, where children can learn from a knowledgeable instructor.
Craft Ideas for Parents and Teachers
When it comes to incorporating paper boats into kids' craft activities, the options are endless. Here are a few Summer-themed ideas to consider:
- Nautical-themed parties: Use paper boats as decorations or centerpieces at a kids' summer party, encouraging the children to race their boats in a kiddie pool or a shallow water area.
- Storytelling sessions: Incorporate paper boats into your storytelling sessions, using them as props to act out scenes from classic tales like "The Owl and the Pussycat" or "Paddle-to-the-Sea."
- Art projects: Encourage your kids to decorate their paper boats with paint, glitter, or colored pencils, making each boat unique and personal.
- Races and competitions: Organize paper boat races, offering small prizes or certificates of achievement to the fastest boats.
Remember, involving the children in the creative process helps to foster a sense of accomplishment and reinforces the educational benefits of these activities. So, whether you're a teacher, a parent, or simply a fan of Japanese origami craft, there are countless ways to enjoy and share the fun of making paper boats with the younger generation.
Frequently Asked Questions
What are the steps to create a floating paper boat?
To create a floating paper boat, first, fold a square piece of paper diagonally in half to form a triangle. Then, fold the bottom corners of the triangle towards the center, forming a diamond shape. Open up the bottom of the diamond and shape it into a square. Gently pull the top flaps apart to form the boat shape. For detailed steps, visit this tutorial .
Can you show how to make a paper boat with a sail?
Yes, to make a paper boat with a sail, start by following the steps for a basic paper boat. Then, create a small sail out of a rectangle of paper. Finally, attach the sail to the boat using a small piece of tape or glue. You can watch this video for a visual guide.
What is the ideal paper type for constructing origami boats?
The ideal paper type for constructing origami boats would be a lightweight yet sturdy paper, such as origami paper or regular printer paper. Keep in mind that heavy paper may not fold as easily, and thin paper may not hold its shape well. Visit this guide for tips on choosing the right paper.
How can I make a simple paper boat for children?
For children, start with a square piece of paper and follow the same steps mentioned above for creating a floating paper boat. Make sure an adult is present to supervise and help children with folding. Visit this tutorial for an easy-to-follow guide specifically designed for children.
Are there any specific designs that help paper boats float better?
Yes, specific designs can help paper boats float better, such as wider and more stable bases. Experimenting with different folding techniques and boat shapes can lead to more efficient designs. Refer to this step-by-step guide for more ideas on paper boat designs.
Could you provide a guide on making a paper boat using square paper?
Certainly. To make a paper boat using square paper, begin by folding the paper diagonally in half to form a triangle. Then, fold the bottom corners towards the center to create a diamond shape. Open the bottom of the diamond and re-shape it into a square. Gently pull the top flaps apart to form the boat shape. For a detailed guide, check out this tutorial .

Related Articles

Boats For Sale Sarasota: Models, Specs, Prices, and Competitors Analysis

Electric Jet Ski Revolution: Changing the Watersports Landscape

How Do You Know When You Are Operating Your Vessel at a Safe Speed? Essential Tips and Guidelines

Axopar Boats: Unrivaled Performance and Innovative Design

Cobia Boats: An Insight on Performance and Accessibility

Wicked Tuna Cast 2024: Meet the Expert Fishermen Dominating the Seas

Baltimore Bridge: Ship Collision Causes Toppling, Investigation Underway

Bass Boat Central: A Comprehensive Overview of the Iconic Website
Trending post: Easy Cupcake Liner Flower Tutorial
How To Make An Easy Paper Boat
- Pinterest 34
Quick and easy to make a paper boat, step-by-step tutorial with pictures. It is a simple origami project from just a piece of paper and lots of fun!
Origami Paper Boat
One of the simplest origami you can make to bring back memory and fun times. All you need to do is fold some paper a few times, add a few decorations or doodles you like, and your paper boat is ready in no time.

This paper boat is the exact one I used to make and play with when I was little. It is fun to make paper boats with various paper colours, and you can make them in different sizes too.
How To Make An Origami Boat
The only material you need to make a paper boat is print-size A4 paper. The colourful crafting paper is also fantastic for this project.
You can use stickers, pencil colour, or marker to add decoration or doodles.
The paper size should be rectangular. If you use a square shape like the paper specifically for origami, cut it into a rectangle for this project.

- Prepare the paper you like. First, fold the paper half downward or lengthwise. Next, fold it again in half, then open it up.
- Fold two corners on the top to the middle so both corners will meet up in the center along the folded line and resemble a triangle.

- Fold up both rectangle shapes under the triangle. Put your thumb on the opening right in the centre by the folded line.

Pull both corners in the opposite direction. Now the paper resembles a diamond shape folded paper.
- Press the paper flat. Fold the lower side upward, align it with the top, and do the same for the opposite side.

Put your thumb on the opening right in the centre by the folded line. Then pull both center lines in the opposite direction so you will have diamond shape paper.
- Slowly pull both of the top parts outward in opposite directions. Adjust the paper boat to smoothen up the fold if needed.
- Your paper boat is ready.
How To Play With The Paper Boat
A paper boat is floating in the water. That’s how I used to play with it. I had so much fun racing the paper boat on the bucket of water.

Because it is made of paper, it will float, but it is not waterproof. However, you can add clear tape or Mod Podge to seal the bottom of the boat to last longer.
Put the paper boat in a shoebox-sized plastic container with some small figurines. That sure will provide hours of fun.
If they like, let them decorate or doodle on their paper boat before putting it in the water.
More Easy Origami
- Paper Frog Puppet
Easy Step-by-Step Origami Paper Boat Tutorial

- A4 paper size or colourful crafting paper
- Pencil or marker (optional)
Instructions
- Pull both thumbs in the opposite direction. Now the paper resembles a diamond shape folded paper.
- Again, put your thumb on the opening right in the centre by the folded line. Then pull both center line in the opposite direction so you will have diamond shape paper.
- See the step-by-step picture tutorial for more detail.
- Use smaller size rectangle paper to make a small size boat.
Leave a Reply Cancel reply
Your email address will not be published. Required fields are marked *
Save my name, email, and website in this browser for the next time I comment.
IMAGES
VIDEO
COMMENTS
1. Make the triangle into a square. Pick up the triangle, rotate it 45 degrees, then use your fingers to open up the bottom of the triangle. Pull the paper apart gently until it pops into a square shape. Make sure the bottom corners of the triangle fold over each other and become the bottom corner of a diamond.
Learn how to make a paper boat with easy steps and video tutorial. Have fun with this simple origami project for kids and adults.
Pick up the folded piece of paper. At the top point, pull apart the 2 sides of folded paper. As you pull it apart, it should open up into a boat shape, as shown in the photo below. Adjust the paper if needed to make sure it's boat-shaped, then pinch along the bottom edges to make a fold on each side.
Dear Origami and Paper Crafts Lover, Welcome to my channel "Colors Paper". In this video I will show you step by step how to make an Origami Boat that Floats...
Welcome to our paper sailing boat tutorial where we'll guide you through creating a charming paper sailboat with ease! In this step-by-step guide, learn how ...
Finalize the Folds. Pull apart the left and right flaps. Flatten it out, in the shape of a boat. Open it slightly. The triangle in the middle resembles a sail. Make the most well-known origami boat at home. This paper boat can float in water and is a perfect project for kids.
Step 7: Sail of the paper boat. You fold the right triangle down and bend it back up so that it shortens by about a centimeter. This is the shorter sail of the paper boat. You put the sail in the pocket that has formed in the middle. Step 8: Stand. You fold the bottom corner and in front of you is the finished paper boat.
With the help of this simple step-by-step lesson, you can quickly and easily create the most well-known origami paper boat. Step 1: Start with an 8.5x11 sheet of rectangular paper. Step 2: Fold the paper in half left to right, then unfold. Step 3: Fold in half again, this time folding top to bottom. Step 4: Fold the upper left and right corners ...
Let's Make an Origami Sailboat! [INSTRUCTIONS] In this folding tutorial, I use a multi-color 6 x 6 sheet of origami paper that is blue on one side and white on the other. To make the boat blue and the sails white, I started on the colored side. If you need a square piece of paper, you can cut a regular printer sheet into a square. 1.
Here is a fun, quick and easy paper sail boat that can be made in no longer than 5 minutes. Step 1: Materials. Get one piece of a simple sheet of paper. It can be out of a notebook or even just regular printer paper. Colors to draw stuff with. Step 2: Decorate Both Sides of the Paper.
Step 6. Gently pull apart the top two points while pushing out with your fingers to form the bottom of the boat. Reinforce corners with clear tape, and also tape around the bottom to keep your boat dry. Now you're ready to launch your craft! Get outside with this cool paper boat you can make and race yourself!
2D Paper Sailboat Making Out of Color Paper for makers. Its a DIY origami sailing boat making video tutorial where I've shown how to make a paper boat that h...
Step 12. Open up the boat model and it should look like this with a triangular shape sticking out from the middle. That triangular shape is hollow and can be opened up from the bottom. Pull it apart a little to make the boat more stable, It will also help it float on water without tipping over. Your boat is done.
Here is the step-by-step way to make a boat out of paper. Materials required. A4 sheet / Letter size paper/Any rectangular paper. Step-by-step tutorial to make an easy paper boat for kids. a. Take an A4 sheet paper. Hold it horizontally as shown in the picture. b. Fold it from left to right. c. Make a crease. d. Now, fold the paper from bottom ...
To fold the base of the sailboat, follow these steps: Step 1: Start with a square piece of paper. Step 2: Place the paper in front of you with one corner pointing towards you. Step 3: Fold the paper in half diagonally, bringing one corner to the opposite corner, and crease firmly.
Step 1: Folding the Hull. To make the hull of a paper sailboat, follow these steps: - Step 1: Start with a square piece of paper. - Step 2: Place the paper in front of you in a diamond shape, with one corner pointing towards you. - Step 3: Fold the bottom corner up to meet the top corner, creating a triangle.
Use the back of an x-acto knife to score the lines on the boat and mast support. 4. Gently fold the boat and mast support at the score lines. 5. Add glue to the last section of the mast support, fold it into a triangle and glue the top section over it. 6. Clamp with paper clip or clothespins while it dries. 7.
How to make paper sailing boat with color paper easily for beginners is shown in this paper crafts video tutorial for beginners. Its an easy origami sailboat...
To create a floating paper boat, first, fold a square piece of paper diagonally in half to form a triangle. Then, fold the bottom corners of the triangle towards the center, forming a diamond shape. Open up the bottom of the diamond and shape it into a square. Gently pull the top flaps apart to form the boat shape.
Paper Boat Tutorial. These paper boats at The Handmade Adventures of Captain Crafty are a great combination of origami and artwork made into a toy and a fun activity for kids of all ages to do something together. 08/06/2013 in 12+ years old, 3 - 5 years old, ...
How to Make a Paper Boat for Kids that Floats. Origami Step by Step Tutorial. Origami Boat Tutorial. How to fold a paper boat (Full HD). DIY Easy Paper Speed...
Quick and easy to make a paper boat, step-by-step tutorial with pictures. It is a simple origami project from just a piece of paper and lots of fun! Origami Paper Boat. One of the simplest origami you can make to bring back memory and fun times. All you need to do is fold some paper a few times, add a few decorations or doodles you like, and ...
How to Make a Paper SailBoat Model Tutorials..This video is on the Paper SailBoat Tutorials! I would like to show origami the Paper Toy..Material = Color Pap...