5 Basic Boating Knots for Beginners

Every boat owner needs to know how to perform some important tasks, like docking a boat , tying up a boat , and anchoring a boat . All of these endeavors and many other common boating procedures share one thing in common: they involve handling lines. And just about any time line-handling is involved, knot tying may be, too. Here are the five most commonly used boating knots.

5 Basic Boating Knots:
- Cleat Hitch
- Clove Hitch
- Half-Hitch (also call the Overhand Knot)
- Figure Eight
Bowline Knot
The bowline is used to create a loop in the end of a line, which can come in handy for any number of reasons ranging from securing a line to a piling, to attaching two lines together. The big advantage it has over other knots one might use to put a loop in the end of a line is that it’s very easy to un-do, even after the line’s been under a large amount of tension.
- Step 1: Make a small loop in the line a couple feet from the end, then pass the end of the line up through the loop you just made.
- Step 2: Wrap the end around the main line above the loop, turn the end back down, and thread it back down through the loop.
- Step 3: Tug hard on the end and on the main line above the loop you’ve created, to snug the knot down.
Cleat Hitch Knot
Whether you’re pulling into the fuel dock or cleating off an anchor line, you need to know the cleat hitch. The good news? It’s amazingly simple.
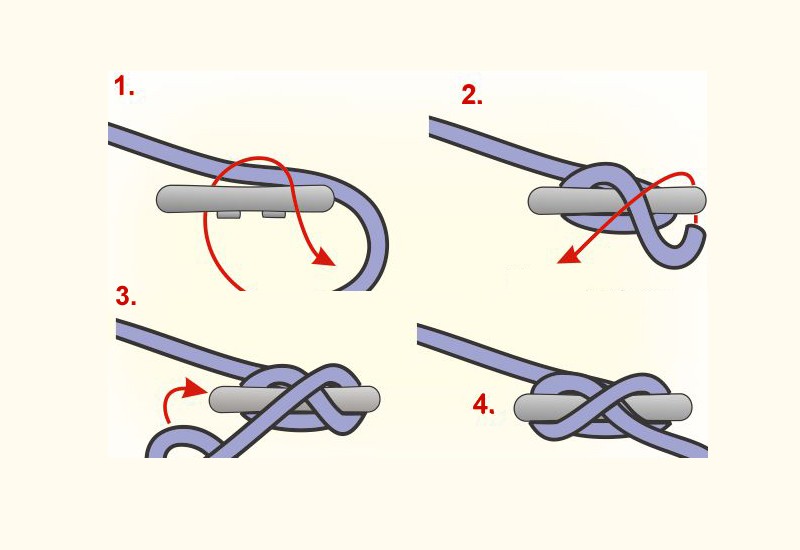
- Step 1: Wrap the line around one side of the base of a cleat, under the “horns” (the ends on either side).
- Step 2: Pull the line across the top of the cleat, then loop it under the horn on the other side.
- Step 3: Reverse directions, and go across the top of the cleat going the other way.
- Step 4: To finish the cleat hitch, reverse direction again as though you were going to wrap under the opposite horn again. But instead of passing the line under it, form a small loop and flip it upside-down. Put the loop you just made over the horn, the pull hard so the line cinches down on itself. Then repeat the same process, on the second horn of the cleat.
Clove Hitch Knot
Clove hitch knots come in handy when you want to secure a line to a rail. Many boaters use them for tasks like hanging coils of line for neat stowage, or securing fenders so they hang down from a bowrail. You can actually tie the clove hitch in one of two different ways, depending on if you’re tying it around a rail, or if it’s a pole or post with an open end. First, let’s look at the rail method.
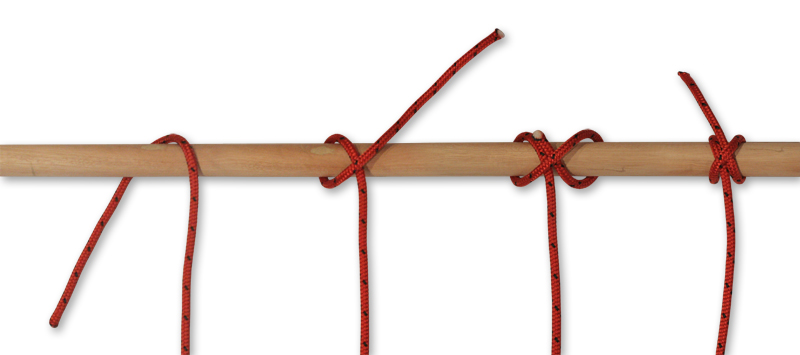
- Step 1: Wrap the line one time around the rail or pole.
- Step 2: Begin wrapping around the rail a second time, with the line crossing over top of the first wrap. Finish the second wrap, but before pulling it tight, pass the tag end back underneath. Then tug, to secure the clove hitch in place.
If you’re tying a clove hitch to a pole with an accessible end, you can cheat a bit and make it faster and easier with the same result.
- Step 1: Make a loop, and pass it over the end of the pole.
- Step 2: Make a second loop and flip it over so the tag end faces the first loop, then pull it tight.
One word of caution about the clove hitch: if the line isn’t under slight pressure all the time, or if it rotates on the rail or pole, it can come undone. So never use this knot for heavy-duty tasks like securing a boat to a dock. Some people even like to add a half hitch knot on top of a clove hitch, just to be safe.
Half Hitch (Overhand) Knot
Just about the simplest knot on the face of the planet, remember that half-hitches aren’t reliable all on their own. But they are a good way to secure then end of the line after tying a different knot, two half hitches together work just fine for securing a light-duty load, and they can be tied in a fraction of a second.
- Step 1: Pass the tag end of the line across the main line, pull it through the loop you just made, and give it a tug.
That’s it! You can tie a half hitch both in a line, and around a rail.
Figure Eight Knot
The figure eight knot is useful when you want to stop a line from passing through something, like a chock or a pulley (and is sometimes called a “stopper” knot for that reason). Be careful, though, because if both ends of the line are put under a lot of stress, you may have difficulty getting the figure eight back out of the line later on.
- Step 1: Make a loop in the line.
- Step 2: Wrap the tag end over the main line, and pass it back through the loop.
- Step 3: Pull both ends to cinch it tight, or push the knot to adjust its position and then cinch it tight.
Bonus Knot: Loop-to-Loop
Okay, a loop-to-loop is really more of a tactic than a knot. It’s used to join two lines with loops on their ends to one another, so as you know how to tie a bowline, you can always use the loop-to-loop to connect lines with one another. And, it’s uber-easy and fast. Just pass the tag end of a line through the loop of line number two, and then pass it through the loop in its other end. Then pull on the tag end until the two loops come together.
Read Next: How to Tie Up a Boat
You Might Also Like:
- How to Dock a Boat
- Anchoring a Boat: Step-by-Step Guide
- How to Tow a Boat
- Best Boats for Beginners
- The Ultimate Boat Buyer's Guide
Join Our Newsletter!
Get community news, buying bargains, and how-to guides at your fingertips.
- 9 essential sailing knots
Ropes are one of the most important things on board any yacht and you simply can’t do without their ability to fasten, join and connect. Learning at least a few basic sailing and boating knots is absolutely essential for sailing, anchoring and mooring. As it isn't just novices who make mistakes, we've prepared a guide of the 9 most important sailors knots for all your boating needs.
1. Figure eight knot (figure 8 loop)
This is a stopper knot that is relatively gentle on the rope and has a wide range of applications. At sea, it is often used at the end of lines to stop them running through the hand or unreeving. The figure-eight is the stopper knot most commonly used by sailors. Even after a heavy load, it loosens much easier than other knots.
The so-called figure-eight bend or Flemish bend is used to securely join two ropes together. A loose figure-eight knot is tied at the end of one rope and the second rope is threaded backwards parallel to the first rope.
The figure-eight knot is also often used to form a figure-eight loop. This is exactly the same as the knot but formed at the end of a doubled rope. Because of its numerous advantages, the figure-eight knot has also proven very popular among climbers.
Figure-eight knot (figure 8 loop)
2. Clove hitch
This knot was originally used to moor boats to bollards in the harbour. It is a very simple knot, but it does also have its disadvantages. It consists of two simple overhand knots stacked in different winding directions. However, the use of a clover hitch is not recommended when the object tied to the cylindrical object can rotate, as it will almost certainly loosen.
This knot also holds poorly on lines made from synthetic fibres and in cases where the knot load slackens or its intensity changes significantly. At present, therefore, other knots are used for mooring boats, with a fixed or loose loop on the bollards and the line tension being regulated by the mooring on board the boat.
The clover hitch can prove useful when tying a rope to a ring . When not yet loaded, the knot is simple to adjust, so the length of the rope can be easily altered. Even in this case, it is still recommended to secure the free end of the rope with at least another simple knot. The big advantage of the clove hitch is that it can be loosened relatively easily, even after its been tied tightly.
Clove hitch knot
3. Bowline knot
This knot is highly versatile and one of the most popular knots, not just among mariners and sailors. Most commonly it is used to form a fixed loop at the end of a line. It’s very secure, does not slip and, as a result, won't reduce the strength of the rope on which it is tied. It’s very easy to loosen even when tied tightly and after high tension. For it to work properly, you need to tie it tightly .
The bowline is a great aid when mooring to a ring, to bollards and other spots. You can even use two bowline knots to join two ropes together , although there are more elegant and secure solutions. The bowline can also be tied on a doubled rope to create a solid knot with two loops , each of which can be set separately. Quick and precise tying of a bowline knot is worth practicing, at sea it will be a lifesaver.
The bowline used to be very popular among climbers, until several deaths occurred as a result of the knot coming undone under particular conditions. In the mountaineering world, it has almost been doomed to oblivion. On ropes with a braided core (which all climbing ropes are), this knot is unstable.
Bowline knot
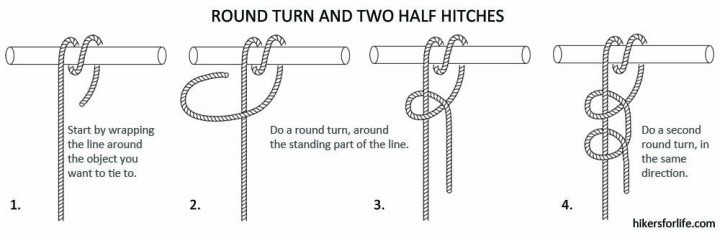
4. Round turn with two half hitches
This knot is also sometimes called a fishing tie. Secure and solid, ancient sailors did not hesitate to use it to attach the most important thing — the anchor . However, it is also used to tie a boat to a ring or equipment , such as seat harness rings. To tie it, a double loop is secured by two half hitches.
Round turn with two half hitches
5. Cleat hitch
Strictly speaking, looping a line around a cleat is not really a knot. However, this does not diminish its importance for sailing. It is one of the most useful things you’ll do with a rope when sailing. The line is firmly attached with several figure-of-eight turns to the cleat. It is worth making sure that the rope leaving the boat makes as sharp an angle as possible with the longitudinal axis of the cleat so that the cleat engages as much as possible in the longitudinal direction and least in the transverse direction.
It takes just a second to learn the cleat hitch, but in naval circles you’ll definitely get some casual admiration for a precisely tied one. In short, learn to make this knot to the left, to the right, upside down and blindfolded, because you will need it often. Tethering a boat securely is definitely a good thing
Cleat hitch
6. Reef knot
You may know it from childhood summer camps as a square knot. On a boat, it is called reef because it is used for reefing and furling sails, and tethering reefing ropes around the boom. It is formed by tying a left-handed overhand knot and then a right-handed overhand knot, or vice versa.
This creates nice and flat, neatly sitting knot on a furled sail. You can even use it to tie a neckerchief without having to worry about the knot pressing on your throat. However, it isn’t recommended for joining ropes as there are much more suitable and secure knots for this. On a boat, the only real application of a reef knot is for reefing. If the boat's mainsail is furled on the mast, you probably won't use this knot at all.
7. Zeppelin bend
A popular sailing knot for securely joining two ropes, which can be loosened relatively easily even after a heavy load. It actually consists of two intertwined simple knots. Mastering the specifics of this knot is important as it can be easily mixed up with a Hunter’s bend that is far less secure.
According to one legend, it is called a Zeppelin knot because it was used to tie Zeppelin airships. However this claim is almost certainly not true.
Zeppelin bend
8. Rolling hitch
This is a slip knots used to transfer weight from one rope to another, with a knot jamming in one direction. By nature, this knot works best when it is tied on using a significantly thinner rope than the knot will be moving along. However, modern materials bring other problems, for example on polypropylene rope or Dyneema it won’t really work. The rolling hitch is commonly used for rigging a stopper to relax the tension on a sheet so that a jammed winch or block can be cleared.
Rolling hitch
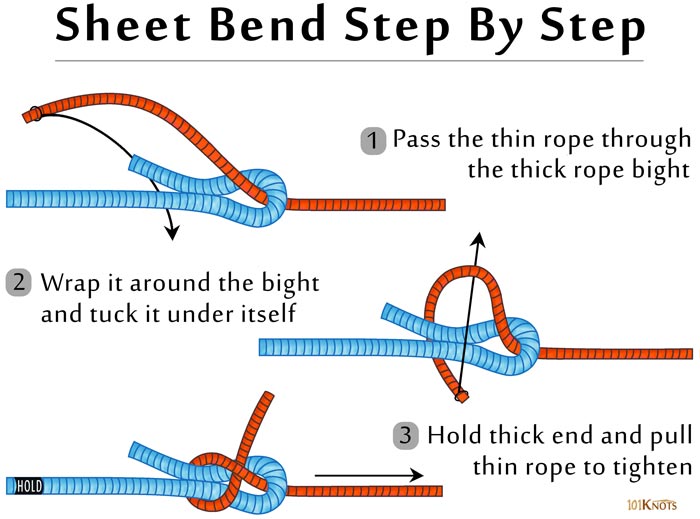
9. Sheet bend (double sheet bend)
The sheet bend is used to join two ropes of different diameter when the diameter difference is not too great. A simple bend is formed on the thicker rope, with the thinner one wrapping around it. This knot holds well only on ropes that are under permanent load, otherwise it tends to untie. The greatest stability is achieved when the free ends of the two ropes end up on the same side of the knot .
If the diameters of the ropes are different, we recommend doubling the sheet bend. This means we wrap the thinner of the two ropes twice around the thicker rope. Again, it is important to start wrapping the shorter end of the thick rope loop first. This is the only way to make sure that the ends of both ropes protrude from the knot on the same side, giving the knot the greatest possible stability.
Sheet bend (double sheet bend)
Once you know these nine essential knots, you’re ready to set sail on your adventure. It couldn't be easier to book your dream boat in the most beautiful destinations for a well-deserved vacation.
Do you already know how to safely secure your yacht in a marina?
I'd be happy to help you choose a boat. If you need a recommendation for a suitable boat or more information on price or destination, just email me or give me a call.

Denisa Kliner Nguyenová
What types of sailing lines and ropes will you come across.
The ropes themselves can be roughly divided according to the material used and their knit. Polyamide (PA) ropes are very elastic but do not float and partially lose their strength when wet. They are mainly used for anchoring, mooring and towing wherever it needs to absorb large shocks. Polypropylene (PP) ropes, on the other hand, float well and are produced in bold colours, emphasizing their use as rescue ropes .
Modern polyethylene (PE) ropes are known for their strength and stiffness , and don't mind getting wet at all. Artificial ropes can be comparable in strength to steel ropes. PE ropes are widely used on high-performance yachts and sailboats .
Polyester ropes (PES) are as strong as nylon ropes, but their strength is not affected by water. PES fibres are highly flexible , abrasion-resistant and stretch significantly less than nylon. They are often combined with polypropylene to achieve high durability.
Rope can be twisted (laid rope) , braided or plaited (made by braiding twisted strands). This creates a variety of combinations, each with a different and more appropriate usage.
Essential sailing tips:

- All Blog Posts
- Sailing Education Posts
- Boating Knowledge
- Free Sailor Toolkit
- Sailing Vacations Posts
- Yacht Charter Guides
- Join a Sailing Flotilla
- Sailing Adventure
- FREE Virtual Reality Sailing Training & Racing
- 2 Free Courses >
- Online Courses
- Vacations & Charters
- Schools & Instructors
- International Sailing License
9 Essential Knots Every Sailor Should Know
Bights, Bends, and Bitter Ends by Bill Ibsen – NauticEd Sailing Instructor
Sailing knots are nothing short of mechanical genius. It’s not just that these knots hold fast; they can also be easily untied under load or once the load is eased. Unlike the overhand knots we tied in our sneakers as kids, which sometimes became nearly impossible to untie, many sailors’ knots can hold hundreds or even thousands of pounds of force yet remain relatively easy to untie.
Much like the elegant simplicity of a hairpin design, many of these 9 essential knots are as simple in form as possible. There’s a unique beauty in their design. I marvel at every correctly tied Trucker’s Hitch I create, both mechanically and aesthetically.
If you think my knot passion is a bit much, consider Clifford W. Ashley. His 1944 compilation, The Ashley Book of Knots , is esteemed as the definitive book on knots. He spent eleven years identifying and sketching 3,900 knots with 7,000 illustrations. If this article ropes in your interest, I highly recommend buying his humor-filled book, which details “every practical knot—what it looks like, who uses it, where it comes from, and how to tie it.”
For most readers, this article serves as a quick primer on the world of knots—some of which date back to ancient Egypt. If you’re skeptical, check out this photo I took at the Great Pyramids where archaeologists found a Pharaoh’s Nile River transport vessel sporting at least a square knot. We’re tying knots today as part of a long nautical tradition.

Understanding Knots and Lines
Lines have many fascinating features (who would have thought that something as simple as a line would have parts!). Check out the image below, and you’ll quickly grasp the concepts. But first, here are several quick tips:
- A “knot” is formed by tying a line to itself.
- A “hitch” makes a rope fast to another object.
- A “bend” joins two lines together.
- The “bitter end” of a line refers to the tail end of a line that fastens to the vessel but is often used to refer to the end of a line or its “working end.”
- A “bight” is not a “loop”—they are different. A bight becomes a loop when the two lines cross.
- Overhand loops are also called “traps” as they are often used to trap a bight, as in a Trucker’s Hitch.
Now, study this picture to get a tighter grasp of knot anatomy:

1. Cleat Hitch
My most frequently tied knot. Every time you pick up a mooring ball, you’ll tie two cleat hitches. You’ll also use it every time you secure your dinghy to a cleat on your moored yacht. That’s why the cleat hitch is #1 on my list.
Hey, did you know that cleats have discrete parts, too! They have “horns” connected to “shoulders” which is fairly self-explanatory if you just look at the overall shape.
Animated Knots offers two versions of cleat hitches: “dock lines” and “halyards.” NauticEd and other sailing schools teach the “halyard” version for docking. My friend, Captain Jeremy Elwell, confirms that his 36” sailboat remained securely tethered to the dock during 2018 Hurricane Michael’s category 5 winds (peaking at 160 mph) as it made landfall, thanks to the halyard version of the cleat hitch.
But if you’ve got a large boat (60’+), you may want to use Animated Knots Cleat Hitch (Docking Version) which substitutes lots of cute little figure-8’s in lieu of the “halyard” version’s final locking hitch, which indeed can get jammed under heavy loads like 40+ knot winds securing a 50’ catamaran with lots of windage. The many figure-8 wraps are super easy to untie under heavy load.
- Always initiate the cleat hitch by wrapping the line around the FAR shoulder of the cleat relative to the direction of load.
- The finished product should look like “two roads under a bridge.”
- The input and output lines should enter/exit on opposite sides of the cleat. If they exit from the same side, try re-tying it.
More info at https://www.animatedknots.com/cleat-hitch-halyard-knot
2. Round Turn and Two Half Hitches
If the round turn and two-half hitch was a baseball player, it would be considered a “utility player” because it can play so many different positions very well. Use it to secure your dinghy painter to the dinghy dock. Use it to tie your fenders to the lifelines – because you don’t trust the clove hitch to hold fast your heavy fenders. Use it to stern-tie your catamaran to a big rock or tree ashore.
More info at https://www.animatedknots.com/round-turn-two-half-hitches-knot
A workhorse knot that does not slip or bind under load. Use a bowline to tie jib sheets to the jib clew, or to join two lines.
Etymology : The bowline has been in use for thousands of years, but the name first appeared in written English in 1627, when one John Smith called it the “Boling Knot.”
Engineering Note: Bowline knots break at about 70-75% of the line’s full strength. For example, a 3/4” nylon double braid dock line with a breaking strength of about 19,000 lbs. could take over 13,000 lbs. to break with a properly executed bowline knot.
Animated Knots notes that the bowlines’ “principal shortcoming is that it cannot be tied, or untied, when there is a load on the standing end. It should therefore be avoided when, for example, a mooring line may have to be released under load.”
A memorable method to tie a bowline is: “The squirrel goes through the hole, around the back of the tree, and back through the hole.”
Note: If you’ve got a long, relatively thick (e.g. 3/4” diameter) double-line dinghy painter, tying a “bowline on a bight” is a great way to quickly tie up to a dinghy dock or dock pylon, and not have to hassle with all the extra length of line. Just tie a normal bowline midway on the line using the double line as if it were just a single line.
More info at https://www.animatedknots.com/bowline-knot
Also, watch how to tie a Bowline on a Bight
4. Figure 8
This simple knot is used as a stopper knot on the end of a line, such as a jib sheet led through a fairlead or cam cleat. It prevents the line from whipping loose in a gust of wind, potentially smacking you or your crew in the face or elsewhere.
More info at https://www.animatedknots.com/figure-8-knot
5. Trucker’s Quick Release Hitch
Both sailors and truckers use this handy knot to cinch down a load. Sailors use it to secure a dinghy on the foredeck or for tying up a paddleboard to the lifelines. Its cinching power can create a 2:1 or even 3:1 purchase. Secure the hitch with two half hitches around the purchase.
More info at https://www.animatedknots.com/truckers-hitch-knot-quick-release
6. Sheet Bend
Use this to join two lines of unequal or similar size. The thicker diameter line must be used for the simple bight.

More info at https://www.animatedknots.com/sheet-bend-knot
7. Clove Hitch
This hitch can be tied to a lifeline, pylon, or piling and is often used to tie smaller fenders to lifelines. It is quick to tie but not very reliable under load and can be hard to undo.
More info at https://www.animatedknots.com/clove-hitch-knot-rope-end
8. Square (or Reef) Knot
If your boat’s mainsail has a sail bag with shoelace-like ties, square knots are a tidy solution for securing the bag.
More info at https://www.animatedknots.com/square-knot
9. Rolling Hitch
Use this knot to apply a load to another line or a bar. It is useful for fixing an override in your winch by pulling out the jammed line below some of the wraps around the winch. The knot can slide down the line yet grip when pulled in the direction of the turns (i.e. the direction in which you’ll apply the load).
More info at https://www.animatedknots.com/rolling-hitch-knot
Conclusion +BONUS VID
Now, with these knots mastered, you’re ready to take on the high seas with confidence and flair. So, grab your captain’s hat, light up that pipe, and pull out your rum keg for a well-deserved seat. Practice these knots on the dock with an air of nautical wisdom (an eye-patch and parrot on your shoulder will only add to the mystique). If nothing else, you’ll become the dockside knot-tying legend, mesmerizing kids, and earning the respect (and possibly envy) of your fellow sailors. Who knows, maybe they’ll even start calling you the “Knotorious Captain” !
Happy knotting and smooth sailing!
Bonus content: Watch this Moorings charters dockmaster in Tahiti tie a fender to the lifelines in a clever way which allows the knot to be quickly released yet remains secure.
Thanks to NauticEd Instructor Bill Ibsen for writing this blog article.
Check out our full range of courses at NauticEd Sailing Courses
Learn something new, get certified, or just fill in knowledge gaps

Bill is a co-author of NauticEd’s new course Navigating Emotions: Effective Command through Emotional Intelligence (EQ). He is also a NauticEd instructor, and corporate coach for executive teams and leaders, specializing in cultivating leadership skills, improving EQ, and conflict resolution. He is also a part-time driving instructor at the Porsche Experience Center, Atlanta, GA.
You might also like

TWEET ABOUT

FIGHT CHILDHOOD CANCER
NauticEd is a fully recognized education and certification platform for sailing students combining online and on-the-water real instruction ( and now VR ). NauticEd offers +24 online courses , a free sailor's toolkit that includes 2 free courses, and six ranks of certification – all integrated into NauticEd’s proprietary platform. The USCG and NASBLA recognize NauticEd as having met the established American National Standards. Learn more at www.nauticed.org .

The NauticEd Vacations team are Expert Global Yacht Charter Agents – when you book a sailing vacation or bareboat charter through NauticEd, we don’t charge you a fee – we often save you money since we can compare prices from all yacht charter companies. PLUS, we can give you advice on which destination or charter company will suit your needs best. Inquire about a Sailing Vacation or Charter .
Online Sailing Courses Sailing Vacations | Charters Practical Sailing Courses Sailing Certification | License
Sign up for 2 FREE Sailing Courses Try sailing in Virtual Reality! Gift a Friend a Sailing Course Sailing Events | Opportunities
About NauticEd Contact Us NauticEd Support Privacy Policy

- Boating Gift Ideas
- Boating with Kids
- Boating with Dog
- Boating Advice
Top 10 Basic Boating Knots for Every Beginner Should Know

Boating requires mastering several skills, with knot tying topping the list.
Mastering the art of knot tying is fundamental for every boating enthusiast, from novices to seasoned sailors.
Knots are not just about securing your vessel; they’re about ensuring water safety, efficiency, and reliability.
This guide will introduce you to basic but crucial boating knots , catering especially to beginners looking to develop a solid foundation.
Here Is List of 10 Basic Boating Knots for Beginners
Cleat hitch, clove hitch.
- Half-Hitch (also call the Overhand Knot)
- Figure Eight
Stopper Knot
Rolling hitch.
- Reef Knot/Square Knot
Double Fisherman’s Knot
The Quintessential Sailor’s Knot
- Purpose: To create a secure loop at a rope’s end that won’t slip or bind.
Step-by-Step Guide:
- Make a small loop (the rabbit hole) in the standing part of the rope.
- Bring the end up through the loop (the rabbit comes out of the hole), around the standing part (behind the tree), and back down through the loop (back into the hole).
- Tighten by pulling on the standing part while holding the loop.
This loop is essential for mooring and rescue lines, as it’s easy to untie, even after being subjected to a heavy load.
For Docking
- Purpose: Securely tie a rope to a cleat, typically found on docks.
- Loop rope around the base of the cleat, then over the top and around the opposite horn.
- Make a figure-eight pattern around the cleat’s horns.
- Finish by making an underhand loop and slipping it over a cleat horn to lock.
Ideal for docking, as it provides a firm hold and is quick to tie and release.
Quick and Effective
- Purpose: Attach a rope to a post, pole, or another rope.
- Wrap the rope around the object.
- Cross over the standing part and wrap again.
- Tuck the end under the last wrap and pull to secure.
Great for temporary mooring and securing fenders to a boat.
Half-Hitch (or Overhand Knot)
Building Block Knot
- Purpose: A simple knot used on its own or as part of other knots.
- Pass the end of the rope around an object or the standing part of another knot.
- Bring the end up and through the loop created.
Often used in pairs (Double Half Hitch) for added security.
Figure Eight Knot
Prevents Rope from Slipping
- Purpose: Create a stop at the end of a rope to prevent it from sliding through a retainer.
- Make a loop.
- Cross the end behind the standing part.
- Bring the end through the loop.
Ideal for climbers and boaters alike, serving as a reliable stopper.
General-Purpose Stopper
- Purpose: Prevents the rope’s end from fraying or passing through a hole.
A common version of this is the Figure Eight knot mentioned above, serving the same purpose with easy tying steps.
Joining Two Ropes
- Purpose: Efficiently connect two ropes of different sizes or rigidity.
- Form a bight with the larger or stiffer rope.
- Pass the end of the other rope through the bight from behind.
- Wrap it around both parts of the bight then tuck it under itself.
Stronger than a Square Knot and easier to untie after being strained.
For Strain Relief
- Purpose: Tie a rope to a pole or another rope that’s under load.
- Wrap the rope around the object at least twice.
- Add one or two more wraps in the same direction but slightly looser.
- Tuck the end under the last wrap and pull tight.
Ideal for relieving tension on another rope or redirecting the load.
Reef Knot (Square Knot)
Joining Ends
- Purpose: Tie two ends of a single rope to secure something closed, like a sail around a boom.
- Tie a Left-over-Right Half-Knot.
- Follow it with a Right-over-Left Half-Knot.
- Pull tight to secure.
Not recommended for joining two ropes together, especially under load, as it can easily come undone.
For High-Strength Joining
- Purpose: Securely join two ropes, particularly suitable for heavy loads.
- Tie a loose overhand knot at the end of one rope, using the end of another rope.
- Repeat in the opposite direction with the other end around the first rope.
- Pull both standing ends to slide the knots together.
This knot forms a strong, reliable bond between two ropes, often used in climber’s rigging.
Additional Tips
Knot Maintenance and Safety: Regularly inspect your ropes and knots for signs of wear and tear. Practice tying knots in different conditions to build muscle memory.
Common Mistakes to Avoid: Overcomplicating knots can lead to failure when it’s most critical. Learn to tie each knot properly before moving to the next.
How to Practice and Improve: Create a routine. Practice tying and untying each knot. Use various types and thicknesses of ropes to adapt to different scenarios.
- How do you tie a basic boat knot? To tie a basic boat knot, such as the Square Knot (also known as a Reef Knot), follow these steps:
- Take two ends of your rope.
- Pass the right end over and under the left end.
- Then pass the left end over and under the right.
- Pull both ends to tighten the knot.
- What knot is used to tie up a boat? The most common knot for tying up a boat to a dock is the Cleat Hitch. Here’s how to tie it:
- Pass the rope around the base of the cleat closest to the boat.
- Make a figure-eight pattern around the cleat horns.
- Form an underhand loop with the free end.
- Slip the loop over the cleat horn and pull tightly to secure it.
- What knots should every marine know? Every mariner should know these critical knots:
- Bowline Knot: This is used to create a strong loop at the end of a rope.
- Cleat Hitch: For docking and securing the rope to the cleat.
- Clove Hitch: For attaching a line quickly to a post.
- Rolling Hitch: For attaching a rope to another rope.
- Figure Eight Knot: For preventing a rope end from slipping through a retaining device.
- What are the different basic knots to tie? Different basic knots include:
- Square Knot: For joining two ends of a single line.
- Sheet Bend: This is for joining two ropes of different sizes.
- Two Half Hitches: For securing a rope around an object.
- Bowline: For creating a fixed loop at the end of a rope.
- Clove Hitch: For attaching the rope to an object.
- What is the strongest knot? The Double Fisherman’s Knot is considered one of the strongest knots for joining two ropes. It’s extremely reliable under tension and used by climbers for safety.
- How do you tie a perfect boat? The term ‘perfect boat’ isn’t a standard terminology for a knot, but for securing a boat, tying a secure Cleat Hitch is one of the best methods:
- Wrap the rope’s end around the base of the cleat.
- Cross it over to make a figure-eight around both horns of the cleat.
- Tuck a loop under the last cross to make it fast.
- What is the most secure boat knot? The Bowline is renowned for its strength and security. It creates a fixed loop that does not slip or bind and can be untied easily after being under load.
- Terms of Service
- Affiliate Disclosure
- Privacy Policy
11 Boating Knots You Need To Know | Nautical Knots For Sailing & Boating
Nautical knots for boating and sailing: here is a list of the top boating knots you should know:.

Table of Contents
Essential boating knots.
- Figure-Eight Knot
- Square Knot (Reef Knot)
- Double Half Hitch
- Rolling Hitch
- Clove Hitch
- Round Turn and Two Half Hitches
- Anchor Bend
Most Important Sailing Knots
Best boat knots to dock a boat:, basic boat knots every boater should know, common boating knot questions and answers.
Boating and sailing not only require skill and knowledge of navigation but also a mastery of various knots. These knots ensure safety, efficiency, and reliability. Whether you’re mooring, anchoring, or securing sails, the right knot can make all the difference. Here’s an expanded and detailed guide on essential boating knots, including their uses and step-by-step instructions.
Uses: The Half Hitch is often used in combination with other knots to add security. On its own, it’s a quick and simple way to temporarily secure a rope to a post, ring, or another rope. It’s not highly secure by itself but is a fundamental component of many more complex knots and hitches used in boating and sailing.
How to tie:
- Pass the end of the rope around the object (post, ring, etc.) to which you’re attaching it.
- Bring the end of the rope over and around the standing part.
- Pass the end through the loop you’ve just created.
- Pull tight to secure the hitch.
Note: For added security, multiple half hitches can be used in succession, and they are often combined with other knots to secure the rope more firmly.
Video link: How to Tie a Half Hitch
Uses: The bowline creates a secure loop at the end of a line, ideal for attaching to mooring posts, rings, or through items you’re securing. It’s vital for boating and sailing because it doesn’t slip or bind.
- Create a small loop in the standing part of the line, known as the ‘rabbit hole.’
- Tighten by pulling the standing part while holding the loop and tail.
- Pass the end of the line (the rabbit) up through the loop, around the standing part (the tree), and back down through the loop.
Video link: How to Tie a Bowline Knot
Uses: Essential for securing your boat to a dock or cleat. This knot is quick to tie and release, even under load.
Wrap the line around the base of the cleat, once completely.
- Make a figure-eight pattern around the arms of the cleat.
- On the final wrap, form an underhand loop and slip it over the arm of the cleat.
- Pull tight to secure.
Video link: How to Tie a Cleat Hitch
Uses: A stopper knot, preventing the end of a rope from fraying or slipping through a pulley or block.
Make a loop by twisting the rope on itself.
- Pass the end of the rope over the standing part, then back through the loop you created.
- Pull tight to form the figure-eight shape.
Video link: How to Tie a Figure-Eight Knot
Uses: Joining two ropes of equal thickness, ideal for securing reefing lines or tying off sail material. Not recommended for critical applications due to slippage with uneven loads.
- Take two rope ends, one in each hand.
- Tie a simple overhand knot by passing the right end over the left, then under it.
- Tie another overhand knot, this time passing the left end over the right, then under it.
- Pull both ends to tighten the knot.
Video link: How to Tie a Square Knot
Uses: Joining two ropes of different thicknesses. It’s especially useful in sailing for attaching sheets (lines that control the sails) to the sails themselves.
Make a bight (a U-shape) with the thicker or more slippery rope.
- Pass the end of the other rope through the bight from behind.
- Wrap the end around both parts of the bight, then back under itself.
Video link: How to Tie a Sheet Bend
Uses: Securing a rope to a pole or ring, useful in mooring and securing tarps or covers.
Pass the rope around the object.
- Bring the end over and around the standing part, then through the loop created (first half hitch).
- Repeat the process to create the second half hitch.
- Tighten both half hitches against the object.
Video link: How to Tie a Double Half Hitch
Uses: Attaching a rope to a pole, another rope, or to relieve tension on a jammed rope or pulley in sailing.
Wrap the rope around the object it’s to be attached to.
- Make a second wrap in the same direction, ensuring it lies next to the first.
- Make a third wrap, but this time cross over the first two wraps.
- Tuck the working end under the third wrap and pull tight
Video link: How to Tie a Rolling Hitch
Uses: Starting and securing lashings, tying a rope to posts, and temporary mooring. Not the most secure hitch, but quick to tie and untie.
Pass the rope around the post or object.
- Cross over the standing part to create a second wrap.
- Pass the end of the rope under the last wrap.
- Pull both ends to tighten.
Video link: How to Tie a Clove Hitch
Uses: Ideal for mooring and securing a boat to a dock or a buoy. Provides a secure attachment with the ability to adjust tension.
Wrap the rope around the object twice (round turn) for extra security.
- Tie a half hitch around the standing part of the rope, close to the object.
- Tie a second half hitch for added security.
- Tighten the knot by pulling on the standing part.
Video link: How to Tie a Round Turn and Two Half Hitches
Uses: Primarily for attaching a rope to an anchor. Known for its strength and security.
Wrap the rope around the anchor’s ring twice.
- Pass the end of the rope through the wraps in the direction opposite to the initial entry.
- Secure the end with two half hitches on the standing line.
- Tighten the knot and ensure it’s secure.
Video link: How to Tie an Anchor Bend
In sailing, knots serve critical roles in the handling and adjustment of sails, as well as in securing the vessel. Besides the universally useful Bowline and Cleat Hitch, sailors rely on several other specific knots which we have also covered in detail above:
- Bowline: Essential for creating a secure loop at the end of a halyard to attach sails.
- Cleat Hitch: Used to secure halyards and sheets to cleats on the deck.
- Figure-Eight Stopper Knot: Often tied at the end of lines to prevent them from running through pulleys.
- Single and Double Sheet Bend: Ideal for joining two lines of different sizes, commonly used to attach a jib sheet to the cleat.
- Rolling Hitch: Allows sailors to attach a line to a rod or another line under tension, useful for adjusting the tension on a line without releasing it.
Docking requires knots that can be both securely fastened and easily released, as conditions at the dock can change:
Cleat Hitch: The standard knot for tying a boat to a dock cleat, ensuring the boat stays put while allowing for quick release when needed.
Bowline: Used to create a loop that can be easily placed over a piling or a dock cleat.
Spring Line Hitch: A method of using lines at an angle to prevent the boat from moving forward or backward along the dock.
Fender Hitch: A quick and secure method to hang fenders on the side of the boat to protect the hull when docking.
Other Maritime Knots And Marine Knots Expanded
Beyond the basics, several knots have specialized uses in various maritime activities:
Carrick Bend: Used for joining two heavy lines, such as when towing or mooring.
- Stopper Knot: Essential for preventing a line from slipping through a block or a hole, with the Figure-Eight Knot being a common choice.
- Heaving Line Knot: A knot tied at the end of a light line to add weight, making it easier to throw.
For those new to boating or in need of a refresher, mastering the following knots will cover most scenarios you’ll encounter:
Bowline: The quintessential boating knot for creating a loop that won’t slip under load.
- Cleat Hitch: Essential for docking, allowing the boat to be securely tied but quickly released when necessary.
- Figure-Eight Knot: A basic stopper knot, preventing the end of a rope from running through retainers.
- Sheet Bend: Perfect for joining two ropes of different diameters, a common need in boating.
- Half Hitch: Used for securing a rope to a post, ring, or another rope, often used in combination with other knots for added security.
What is the most useful knot for a boat?
The Cleat Hitch is arguably the most useful knot for boating. It is versatile, easy to tie, and essential for docking, making it indispensable for boaters.
What is the strongest marine knot?
The Double Fisherman’s Knot (also known as the Grapevine Bend) is considered one of the strongest knots. It is primarily used for joining two lines of similar thickness and is known for its strength and stability.
What is a good knot to tie a boat to a dock?
The Cleat Hitch is the go-to knot for tying a boat to a dock. It is secure yet easy to untie, even after being under load. Its simplicity and effectiveness make it ideal for this purpose.
What are the 4 basic maritime knots?
- Bowline: A versatile loop knot that is secure and easy to untie.
- Cleat Hitch: Essential for docking, allowing for quick and secure fastening to a cleat.
- Figure-Eight Knot: A basic stopper knot, providing a quick method to prevent a rope from running out.
- Sheet Bend: Ideal for joining two ropes of different thicknesses, essential for many boating scenarios.
What are the 4 knots essential for sailing?
The 4 basic maritime knots listed above are 4 basic knots that are considered essential for sailing . They include:
- Cleat Hitch:
What are the 8 basic knots?
The 8 basic knots include the 4 basic maritime knots and 4 additional knots. Here is the full list:
- Reef Knot (Square Knot)
These knots form the foundation of maritime knot-tying, covering a wide range of boating, sailing, and general maritime activities. Mastery of these knots ensures readiness for most situations encountered on the water, enhancing safety, efficiency, and the overall maritime experience.
In conclusion, each knot serves a specific purpose, from securing your vessel to a dock, joining ropes of different sizes, to ensuring the safety of your sails and cargo. By familiarizing yourself with these knots, you equip yourself with the knowledge and skills to handle various situations at sea confidently. Practice tying these knots regularly to ensure you can tie them correctly and efficiently when the need arises.
Happy boating!

Related Posts

Australia Boat Navigation App On Apple Store And Google Play | Top Boat GPS App & Marine Navigation App in Australia

Which type of anchor should be used only for small, lightweight boats? | Anchor Types Boating Test Guide

What should you do before fueling your boat? Boat Fueling Boat Test Study Guide

When are you allowed to depart from the United States Coast Guard navigation rules? Boating Test Guide

- Find A School
- Certifications
- North U Sail Trim
- Inside Sailing with Peter Isler
- Docking Made Easy
- Study Quizzes
- Bite-sized Lessons
- Fun Quizzes
- Sailing Challenge
- Knots Made Easy
An American Sailing Association Educational Series
There are as many sailing knots as there are stars in the night sky — or so it seems. But the reality is that most sailors can get along with only knowing a few, as long as they’re the right ones. Our Knots Made Easy video series includes some of the most important sailing knots, explaining what they’re used for and how to tie them. Don’t forget, it’s necessary to practice these in order to get them down. Your fingers need the tactile learning experience in order to develop muscle memory that will allow you to tie them quickly when you need to!
Knowing these basic knots will make you more useful as a sailing companion. Next time you go out sailing with a friend, take a charter, or join a flotilla, you’ll feel more comfortable helping out around the boat when it’s time to put fenders out, tie up to the dock, or make a line fast.
One of the most beautiful and useful sailing knots is the bowline. The bowline forms a temporary eye, or loop, in the end of a line and is commonly used to attach a jib sheet to the clew of the jib. Remember, practice makes perfect! Watch Now >

Fast Bowline
If you want to impress your friends here’s a trick for tying a quick bowline. With a bit of practice this method can be lightning fast. Watch Now >

Cleat Hitch
Every sailor needs to know the cleat hitch. It is essential for docking. Many do it incorrectly – watch this video and learn it the right way. Watch Now >

Clove Hitch
The Clove Hitch is usually employed for temporary needs. Using the Clove Hitch you can quickly tie a line to a pole, a ring, or the standing part of another line. It’s secure, as long as it’s under a constant load, but will work loose when subjected to on and off loads and can be difficult to untie under pressure. Watch Now >

Coiling A Line
Lines on a sailboat need to be kept neatly. Most lines that are not in active use are stowed in a neat coil, and active lines often need to be coiled as well. Check out this video to see how it’s done!. Watch Now >

Figure Eight / Stopper Knot
This knot is fun to tie and can save you a lot of hassle. It’s commonly tied at the bitter end of halyards and sheets to prevent them from getting inadvertently pulled out of the block, fairleads, and jammers they’ve been led through. Watch Now >

Square / Reef Knot
The Square Knot, also called the Reef Knot, is well known to school children who have given up on trying to tie their shoe laces. On a boat it is used primarily for tying a rope to itself. Like when you are securing an item to the boat or a spar. Watch Now >

Rolling Hitch
This valuable hitch can be used to tie a line to the standing part of another line or to a spar. It’s especially useful when you need to transfer the load from one line to another – remember that winch override? It’s similar to the clove hitch but with an extra turn on the side that’s in the direction the load will be applied. Watch Now >

Round Turn & Two Half Hitches
This may be the most underrated knot. It’s fast to tie under load and applicable all around the boat. It’s much more reliable and certainly easier to untie than its cousin the clove hitch. This knot is secure, does not allow the line to chafe, and is easily undone. Use this hitch to tie a dock line to a mooring. Watch Now >

- Learn To Sail
- Mobile Apps
- Online Courses
- Upcoming Courses
- Sailor Resources
- ASA Log Book
- Bite Sized Lessons
- Catamaran Challenge
- Sailing Vacations
- Sailing Cruises
- Charter Resources
- International Proficiency Certificate
- Find A Charter
- All Articles
- Sailing Tips
- Sailing Terms
- Destinations
- Environmental
- Initiatives
- Instructor Resources
- Become An Instructor
- Become An ASA School
- Member / Instructor Login
- Affiliate Login
5 Basic Boating Knots for Beginners
Docking a boat, tying up a boat, and anchoring a boat are all key skills for any boat owner to have. All of these activities, as well as many other basic boating practices, have one thing in common: they all entail managing lines. And if you’re dealing with a tight deadline, knot tying can be involved as well. Here are the top five basic boating knots.
- Cleat Hitch
- Clove Hitch
- Half-Hitch (also call the Overhand Knot)
- Figure Eight

Bowline Knot

Step 1: Make a small loop in the line a couple feet from the end, then pass the end of the line up through the loop you just made.
Step 2: Wrap the end around the main line above the loop, turn the end back down, and thread it back down through the loop.
Step 3: Tug hard on the end and on the main line above the loop you’ve created, to snug the knot down.

Cleat Hitch Knot

Step 1: Wrap the line around one side of the base of a cleat, under the “horns” (the ends on either side).
Step 2: Pull the line across the top of the cleat, then loop it under the horn on the other side.
Step 3: Reverse directions and go across the top of the cleat going the other way.
Step 4: To finish the cleat hitch, reverse direction again as though you were going to wrap under the opposite horn again. But instead of passing the line under it, form a small loop and flip it upside-down. Put the loop you just made over the horn; the pull hard so the line cinches down on itself. Then repeat the same process, on the second horn of the cleat.

Clove Hitch Knot

Step 1: Wrap the line one time around the rail or pole.
Step 2: Begin wrapping around the rail a second time, with the line crossing over top of the first wrap. Finish the second wrap, but before pulling it tight, pass the tag end back underneath. Then tug, to secure the clove hitch in place.
If you’re tying a clove hitch to a pole with an accessible end, you can cheat a little and get the same effect faster and simpler.
Step 1: Make a loop and pass it over the end of the pole.
Step 2: Make a second loop and flip it over so the tag end faces the first loop, then pull it tight.
One word of caution concerning the clove hitch: it can come undone if the line is not constantly under slight tension, or if it twists on the rail or pole. As a result, never use this knot for heavy-duty duties such as tying a vessel to a pier. To be safe, some individuals like to add a half hitch knot on top of a clove hitch.

Half Hitch (Overhand) Knot

Step 1: Pass the tag end of the line across the main line, pull it through the loop you just made, and give it a tug.
That’s all! A half hitch can be tied both in a line and around a rail.

Figure Eight Knot

Step 1: Make a loop in the line.
Step 2: Wrap the tag end over the main line and pass it back through the loop.
Step 3: Pull both ends to cinch it tight or push the knot to adjust its position and then cinch it tight.
Bonus Knot: Loop-to-Loop

Lenco Marine Services
Lenco Marine, a seller of luxury boats, offers exquisite vessels to discerning customers, including you, with unmatched elegance and quality.
Lenco Marine, renowned for selling luxury boats, also provides an exceptional renting experience, offering opulent vessels for your adventures.
Lenco Marine stands out as a premier provider of luxury boats, offering customizations that exceed expectations.
Leave a Comment
Your email address will not be published. Required fields are marked *
Save my name, email, and website in this browser for the next time I comment.
10 Essential Knots Every Sailor Should Know
The art of knot-tying has been practiced for thousands of years and continues to be an important skillset amongst sailors. Scroll down to discover ten common sailing knots, along with simple video instructions so you can become a master knottologist in no time!
Bowlines are used to create a fixed loop at the end of a rope.
Stopper Knot
Stopper knots are used to prevent lines from slipping through narrow holes.
Clove Hitch
Clove hitch knots are used to secure a line to a post.
A sheet bend is used to unite two ropes of different sizes.
Round-Turn and Two Half-Hitches
This knot is used to secure the end of a line to a fixed object.
Rolling Hitch
The rolling hitch is used to attach a line to another line or post.
Cleat Hitch
A cleat hitch is used to ensure a safe and secure mooring line.
Reef Knot/Square Knot
A reef knot (square knot) is used for joining two ends of a single line to bind around an object.
Figure-Eight Knot
The figure-eight is a general-purpose stopper knot.
Double Fisherman's Knot
The double fisherman's knot is used to joining thin, stiff or slippery lines and for backing up critical knots such as the figure-eight.
You may also like
Top 20 sailing superstitions, our favourite maritime podcasts to get you out of the doldrums, 18 salty sailor slang phrases you probably use, sign up to our newsletter.
We manage subscriber name and email details in accordance with our Privacy Policy
SailingEurope Blog - Sailing, Yacht Charter and Beyond
Sailing Knots For Sailing Beginners – Learn How To Tie Sailors Knots
If you’ve ever been a member of Boy Scouts or Girl Scouts, you’ve probably had some lessons on how to tie knots . If you wanted to be a successful scout, you had to get your head around tying knots. Well, the same thing counts in sailing, especially if you’re sailing beginner . If you want to be a successful sailor, you have to learn how to tie sailing knots.
Basic sailing knots
First of all, it is important to stress that there are three general categories when it comes to types of sailing knots. The first category are, simply, knots – they are tied on the end of a line (line is a term for a sailing rope). The second category are hitches – types of knots that are used to tie a line to a cleat on a boat or on a dock. The last ones have the word bend in their name and refer to knots that are used to join two lines together (in sailing language , to bend something means to join).
Now, the most important question is – how to become a master in tying sailor knots? It sure does require a lot of practice, but with the right instructions (or instructor) nothing is impossible. There are lots of knots that are used in sailing , but we will mention eight most common ones, divided into the above-mentioned categories.
1. Bowline Knots
What is a bowline knot?
Well, it is the most useful and most popular knot in the world of sailing – it is easy to tie, but also to untie. It is, however, extremely firm and secure, but also prone to jamming and in some cases hard to untie.
What is the purpose of a bowline knot?
- to form a loop (large or small) at the end of a line
- tie any two lines together
- tie jib sheets to the corner of a sail
- it is used as a rescue rope
How to tie a bowline knot?
- form a loop by simply crossing the two sides of the line
- at this point, you should have two ends – a free and a standing one
- as you’ve made the loop, bring the free end of the line through the rope (as some like to say – the rabbit comes out of the hole)
- then, wrap it around the standing end and bring it back through the loop (the rabbit goes around the tree and then back into the hole)
- tigten the knot by pulling both ends
2. Figure-8 Knot
What is a figure-8 knot?
Also known as stopper knot or Flemish knot, it is very popular not only in sailing, but also in rock climbing and caving. Unlike a bowline knot, even after it’s been jammed, it can be easily undone.
What is the purpose of a figure-8 knot?
- it stops the line from running and sliding out of sight
How to tie a figure-8 knot?
- form a loop by crossing the two sides of a line
- at this point you should have two ends – a free and a standing one
- bring the free end under the standing one
- then, bring it over and into the loop, forming a number eight
- tighten the two ends
3. Square Knot
What is a square knot?
It is also known as a reef knot . It is easy to tie, but when you join two lines together be aware because it easily slips and comes undone, so don’t use it where safety is critical.
What is the purpose of a square knot?
- to tie two pieces of line together
- in sail reefing, i.e. cinching down cords and wrapping together the excess sail so it doesn’t flap around
How to tie a square knot?
- take two ropes – you have a left one and a right one
- cross them to form a half knot
- then, cross them the second time – right over left
- then again, cross left over right and twist
- pull both sides and make sure both parts of the line exit the knot together
1. Cleat Hitch
What is a cleat hitch?
Very useful for sailors, it is easily tied and untied and simple to learn.
What is the purpose of a cleat hitch?
- to secure a line to a cleat
- to tie a boat to a dock
How to tie a cleat hitch?
When tying a cleat hitch, it is important to start passing the line around the right horn of a cleat – there is a far one and a near one – you should start with the far one.
- pass the line around the base of the cleat, around the far horn
- then, pass the line around the near horn and bring it over the top of the cleat
- wrap it around the cleat making a loop
- then, on the other side, i.e. on the near horn, make an under loop and pull
2. Clove Hitch
What is a clove hitch?
Great for tying something up, but only temporarily. It is easy to tie, but also to untie. It is prone to slipping so it cannot be trusted for critical loads. Also, you can adjust it any time, i.e. you can raise or lower it without untying it.
What is the purpose of a clove hitch?
- to secure a line to an object (in most cases to tie a fender to a lifeline)
- it can be used as a temporary mooring knot
How to tie a clove hitch?
- pass the free end around the pole making a loop
- pass it again on the other side making another loop
- pull the free end under the line and pull
3. Round Turn and Two Half Hitches
What does a round turn and two half hitches stand for?
This is a very useful knot; it is easy to tie and it isn’t prone to binding – which means that it is very reliable and useful.
What is the purpose of a round turn and two half hitches knot?
- to secure a mooring post to a dock post or ring
How to tie a round turn and two half hitches knot?
This knot is composed of two parts: a round turn and two or more half hitches.
- pass the end of a line around the post two times – this is a round turn
- then, make the first loop, i.e. wrap the free end around the standing one – this is the first hitch – and pull
- make the second loop – the second hitch – and pull tight (the tighter the better)
1. Sheet bend
What is a sheet bend?
Many sailors use this type of knot, it is secure, easy to untie and works great when tying together two lines of unequal diameter .
What is the purpose of a sheet bend?
- to tie two lines together (that can differ in size, thickness, material exc.)
How to tie a sheet bend?
- take two lines, thicker and thinner
- form a loop (bight) in the thicker rope
- bring the thinner line into the loop and pass it around and behind the thicker one
- pass the free end of a thinner line under itself and pull tight
2. Anchor Bend
What is an anchor bend.
Also known as the anchor hitch or the fisherman’s hitch , or bend. It is easy to tie, holds tight and it is stronger than a bowline knot.
What is the purpose of an anchor bend?
- to connect an anchor line to an anchor
- to join a line to a ring, pole exc.
How to tie an anchor bend?
It is very similar to a round turn and two half hitches knot, but in this case the first hitch is passed under the turn (not over).
- wrap the line around the ring two times
- wrap the free part around and behind the standing one
- make a loop and pass the free end through it
- pull it out tightly
- again, wrap the free end around the standing part
- hold and pull tight
Whether you decide to tie a knot, a bend or a hitch, these instructions will help you take one step forward in becoming a real sailor. Everyone can do it, so can you, you just have to practice and then you are ready to begin your sailing adventure. In fact, go ahead and start practicing today. Because… well, why knot?
1 thought on “Sailing Knots For Sailing Beginners – Learn How To Tie Sailors Knots”

Hello there, just became alert to your blog through web search, and found that it is truly informative. I’m gonna watch out for updates. I’ll be grateful if you continue this in future. Numerous people will be benefited from your writing. Cheers!
Leave a Comment Cancel Reply
Your email address will not be published. Required fields are marked *
Save my name, email, and website in this browser for the next time I comment.
This site uses Akismet to reduce spam. Learn how your comment data is processed .
Sailing Knots
These knots could prove to be some of your best sailing companions. They need ample practice so that you can tie them perfectly and quickly when you need them. Your rope handling skills would come handy whenever you need to tie knots for mooring, anchoring, securing cargo, managing sails, preparing for a storm, towing another vessel, decorative purposes, etc. It helps if you take note of the pros and cons of the popular sailing knots. You should use ropes that can be used repeatedly and can be untied easily. The emphasis here is on reliability, safety and convenience.
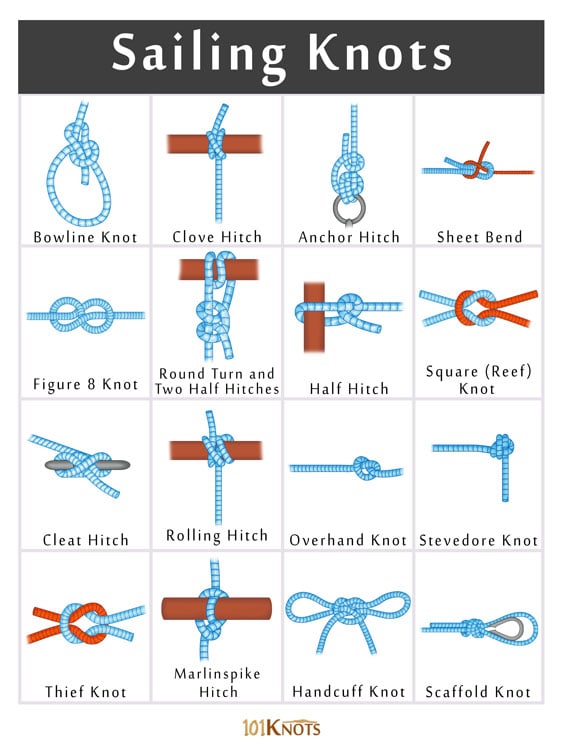
Essential Knots to Know for Sailing
- Bowline knot
- Figure 8 knot
- Square (reef) knot
- Clove hitch
- Round turn and two half hitches
- Cleat hitch
- Rolling hitch
- Anchor hitch
- Overhand knot
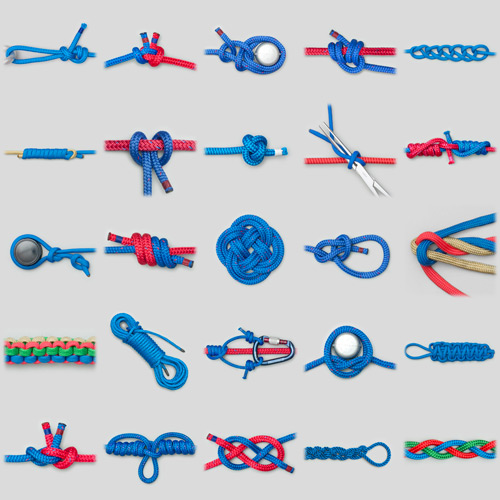
Other Different Sailing (Nautical) Rope Knots
- Stevedore knot
- Scaffold knot
- Diamond (lanyard) knot
- Buntline hitch
- French bowline
- Highwayman’s hitch
- Monkey’s fist
- Barrel hitch
- Marlinspike hitch
- Carrick mat
- Handcuff knot
- Sheepshank knot
- Timber hitch
- Two half hitches
- Double sheet bend

Timber Hitch The timber hitch is used to secure a rope round a post or any cylindrical...
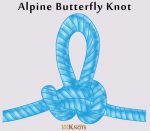
A useful midline knot, the butterfly knot has its uses in glacier travel and rock...
Carrick Bend The Carrick bend is a powerful knot to join two heavy ropes, hawsers...
Dropper Loop The dropper loop, also known as a dropper knot forms a secure structure...
- Privacy Policy
- Terms and Conditions
© 2024 ( 101Knots )

We’ve Got the Knots.
Animated Knots by Grog is the web’s #1 site for learning how to tie knots. From Boating Knots , Fishing Knots and Climbing Knots to tying a tie , or even Surgical Knots — we’ve got it covered.
Follow along as ropes tie themselves, showing just the essential steps, so you can master a knot in no time. Jump into any category to get started. If you’re unsure where to begin, try starting with the Basics , our Knot of the Day , Grog’s Blog or check out every knot we’ve got !
Animated Knots by Grog is the web’s premiere site for learning how to tie knots of any kind. From Boating Knots , Fishing Knots and Climbing Knots to tying a tie , or even Surgical Knots — we’ve got it covered.
SEARCH & RESCUE
HORSE & FARM
Knot of the Day
Check out today’s featured knot. As the name implies, this is a limited time offer. But fear not, there will be a brand new Knot of the Day tomorrow!
Tying a Package
New to knots.
Get started with the basics! Simple to learn, and often form part of more advanced knots.
Click a knot to get started.
Get started with the basics! Simple to learn, and often form part of other knots.

The simplest of the Single-Strand Stopper Knots

Non-binding, quick and convenient stopper knot.

Used to tie rope around an object and back to itself.

Simple way to join two ropes made up of two Half Knots.

Simple loop in rope's end - loosens when tail end is pulled.

Joins two ropes of unequal, or similar, size
FEATURED CATEGORY
How to Tie a Tie
Guess what, gentlemen. It turns out there’s more than one way to tie a tie.
Learn how to look sharper!

Quick, convenient, but slightly asymmetrical, necktie.

Produces a moderately large and symmetrical knot.

Creates a symmetrical and moderately bulky knot.

Produces a bulky, symmetrical, Necktie Knot.

Provides the wearer with formality and elegance.
What type of knot do you need?
Basic Knots
Quick Release
Slide & Grip
COMMENTS
5 Basic Boating Knots: Bowline; Cleat Hitch; Clove Hitch; Half-Hitch (also call the Overhand Knot) Figure Eight; Bowline Knot. The bowline is used to create a loop in the end of a line, which can come in handy for any number of reasons ranging from securing a line to a piling, to attaching two lines together. The big advantage it has over other ...
Form a closed loop in the line, with the working end passing over the standing end. Pass the working end through the loop, around behind the standing end, then back into the loop. Give a hard pull to close the knot up tight. To untie a bowline, turn the knot over and break its back by bending it downward. Stopper Knot.
3. Essential Sailing Knots Every Sailor Should Know 3.1 The Square Knot (Reef Knot) The Square Knot, also known as the Reef Knot, is one of the most basic and versatile knots in sailing. It is primarily used to join two ropes of equal diameter securely. Its simplicity and efficiency make it a favorite among sailors for a wide range of applications.
Clove hitch knot. 3. Bowline knot. This knot is highly versatile and one of the most popular knots, not just among mariners and sailors. Most commonly it is used to form a fixed loop at the end of a line. It's very secure, does not slip and, as a result, won't reduce the strength of the rope on which it is tied.
A "hitch" makes a rope fast to another object. A "bend" joins two lines together. The "bitter end" of a line refers to the tail end of a line that fastens to the vessel but is often used to refer to the end of a line or its "working end.". A "bight" is not a "loop"—they are different. A bight becomes a loop when the ...
The knots are arranged in alphabetical order. Boating Knot Characteristics. Rope used in boating is durable and expensive and is often handling heavy loads, e.g., when berthing, mooring, towing another vessel, preparing for a storm, or managing sails. The emphasis, therefore, is on safety, reliability, and convenience.
Make a small loop at the end of the line by passing the tag end over the standing line. Tie an overhand knot around the standing line and pull it taut. Run the tag end through the loop end. Pull the tag end all the way through and slide the knot down until tight. Pull both ends tight to secure the knot.
Watch as we teach you how to tie basic boating knots, and get your boater education at www.boat-ed.com!Check out the other videos in the 5-Knot Series!:5 BAS...
Step 1 - Start with the end of a line in one hand. Step 2 - Twist the line away from you as you hand it to the hand collecting the line. Step 3 - After all of the line has been coiled, wrap the end around the coil. Step 4 - To make a hanging coil, pass the tail through the loop created by wrapping the line.
Here's a simple and easy guide to some boating knots everyone should know. Don't forget to subscribe: https://www.youtube.com/channel/UCEcFn6tlj_WpZCBBouZ2Vo...
Forget the complicated twists, turns, fancy bends and splices. In this video, Jim Hardin of Grady-White Boats demonstrates four basic boating knots that work...
Knots are not just about securing your vessel; they're about ensuring water safety, efficiency, and reliability. This guide will introduce you to basic but crucial boating knots, catering especially to beginners looking to develop a solid foundation. Here Is List of 10 Basic Boating Knots for Beginners. Bowline; Cleat Hitch; Clove Hitch
Figure-Eight Knot: A basic stopper knot, providing a quick method to prevent a rope from running out. Sheet Bend: Ideal for joining two ropes of different thicknesses, essential for many boating scenarios. What are the 4 knots essential for sailing? The 4 basic maritime knots listed above are 4 basic knots that are considered essential for ...
Our Knots Made Easy video series includes some of the most important sailing knots, explaining what they're used for and how to tie them. Don't forget, it's necessary to practice these in order to get them down. Your fingers need the tactile learning experience in order to develop muscle memory that will allow you to tie them quickly when ...
Five Basic Boating Knots To Know. On most recreational boats under 30 feet or so, the only lines on board are an anchor rode, a few dock lines (usually with an eye spliced into one end), and maybe a ski rope. If you can tie to a cleat and a piling or railing when a cleat isn't available, you're set for the vast majority of situations you ...
Step 1: Make a small loop in the line a couple feet from the end, then pass the end of the line up through the loop you just made. Step 2: Wrap the end around the main line above the loop, turn the end back down, and thread it back down through the loop. Step 3: Tug hard on the end and on the main line above the loop you've created, to snug ...
Double Fisherman's Knot. The double fisherman's knot is used to joining thin, stiff or slippery lines and for backing up critical knots such as the figure-eight. How to Tie a Double Fisherman's Knot. Watch on. Check out this guide to 10 knots every sailor should know, complete with step-by-step video instructions to make learning easy.
Step 1: Hold each end. Hold one end of a rope in your right hand and one end in your left to prepare to tie the knot. Step 2: Loop right over left. Loop the right end over the left end all the way around. Step 3: Loop left over right. Loop the left end, formerly the right end, over the right end all the way around.
Basic sailing knots. First of all, it is important to stress that there are three general categories when it comes to types of sailing knots. The first category are, simply, knots - they are tied on the end of a line (line is a term for a sailing rope). The second category are hitches - types of knots that are used to tie a line to a cleat on a boat or on a dock.
Pull both ends of both lines to tighten. This is one of the best knots for boaters for towing and has multiple uses when sailing, including mending sails. 5. The Fisherman's Bend Knot. The fisherman's bend, a.k.a. an anchor hitch, is one of the strongest boating knots to attach a rope to an anchor or hook.
Marlinspike hitch. Blood knot. Carrick mat. Handcuff knot. Sheepshank knot. Timber hitch. Two half hitches. Double sheet bend. Basic types of sailing knots, best nautical rope knots, how to tie nautical knots with simple diagrams, common knots to know for sailing and their uses.
Animated Knots by Grog is the web's #1 site for learning how to tie knots. From Boating Knots, Fishing Knots and Climbing Knots to tying a tie, or even Surgical Knots — we've got it covered. Follow along as ropes tie themselves, showing just the essential steps, so you can master a knot in no time. Jump into any category to get started.