- Table Dolly Car

- Super Hornet X650

- Build Your Own

- Parts & Accs.
- News/Events

The Victoria R/C Sailing Yacht allows you to enjoy the simply pleasure of sailing on gentle summer breezes on a sunny afternoon....or the intensity of racing in the America's Cup. Ideal for the first-time skipper or beginning R/C enthusiast, the Victoria is a highly prefabricated, easy-to-assemble kit with detailed instruction manual. Recognized by the American Model Yachting Association (AMYA) as a racing class, Thunder Tiger's Victoria has become synonymous with maximum yachting pleasure.


Highly prefabricated with a blow-molded ABS hull/deck, sails, mast, deck fittings and rigging hardware.

The realistic sail and rigging details combine to result in a model that you will be proud to own.

The impressive Victoria stands over 4ft. tall, making it ideal for sailing or display your yacht proudly in home or office.

High performance Plus Tear Resist Racing Sails.
File download.
- VICTORIA v2017 Racing Yacht Manual Size: 4.66MB
THUNDER TIGER / About Us News | Download | Video | Terms and Conditions | Privacy Policy | Contact Us
Copyright © 2019 Thunder Tiger All rights reserved.
Thunder Tiger Victoria Radio Control Sailing Yacht KIT 5556 v2017
- $210 00 $210.00
America' Cup Radio Control Sailing Yacht
The Victoria R/C Sailing Yacht allows you to enjoy the simply pleasure of sailing on gentle summer breezes on a sunny afternoon....or the intensity of racing in the America's Cup. Ideal for the first-time skipper or beginning R/C enthusiast, the Victoria is a highly prefabricated, easy-to-assemble kit with detailed instruction manual. Recognized by the American Model Yachting Association (AMYA) as a racing class, Thunder Tiger's Victoria has become synonymous with maximum yachting pleasure.
- Quality One-Piece ABS HulI/Deck
- Factory Painted & Low Drag Hydrodynamic Ballast
- Light & Strong Anodized Mast & Boom
- High Performance Plus Tear Resist Racing Sails
- Removable Mast/Sails Design For Easy Transport
- New Shell Painting Design
- Wood Display Stand Included
Specification
Items required for assembly.
- 2-Channel Surface Radio System with Two Servos & Battery Pack.
Updates (2022/06/20)
*No epoxy is included in the kit.
CAUTION (2021/04/16)
This is the kit boat. Assembly is required. Radios/Electronics/Tools/Glues are not included. No returns will be accepted because of the above reasons. Thanks.

RC Boat ATLANTIC Motoryacht OBL Brushless 2.4GHz 5128-F13

Desperado Jr. OBL RTR Catamaran Speed Boat 5126-F11 (Free shipping to USA)

Free shipping_Naulantia 1M Racing Yacht Red 5549

Challenger 800 5550-K40 Kit
- THUNDER TIGER Manuals
- Instruction manual
Download manual
Advertisement
Download THUNDER TIGER Victoria Instruction Manual
Please, tick the box below to get your link:.
- Toy Manuals
- Motorized Toy Car Manuals
- Engine Manuals
- Transmitter Manuals
- Drones Manuals
- Black & Decker
Related Manuals for THUNDER TIGER Victoria
- Toy THUNDER TIGER MINI TITAN V2 CONVERSATION KIT Manual 12 pages Conversation kit
- Toy THUNDER TIGER MINI TITAN V2 - MANUAL 2 Instruction Manual 60 pages
- Toy THUNDER TIGER Vocans Instruction Manual 28 pages 1-meter trimaran r/c
- Toy THUNDER TIGER V-Bat Assembly Instructions Manual 6 pages
- Toy THUNDER TIGER Thunder Tiger E325 Mini Titan ARF Assembly Instructions Manual 12 pages Arf
Upload manual
How to build a Victoria RC Sailboat
A blog to document the build of my first remote controlled Victoria Sailboat.
Tuesday, February 16, 2010
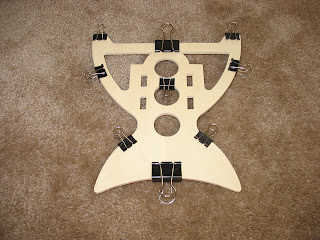
- Building the Stand
Tuesday, February 9, 2010
- Building a Victoria

Blog Archive
Attention! Your ePaper is waiting for publication!
By publishing your document, the content will be optimally indexed by Google via AI and sorted into the right category for over 500 million ePaper readers on YUMPU.
This will ensure high visibility and many readers!

Your ePaper is now published and live on YUMPU!
You can find your publication here:
Share your interactive ePaper on all platforms and on your website with our embed function

Custom Step-by-Step Victoria R/C Sailing Yachts by OMSA ...
- okanaganmodelsailboat.org

You also want an ePaper? Increase the reach of your titles
YUMPU automatically turns print PDFs into web optimized ePapers that Google loves.
<strong>Custom</strong> <strong>Step</strong>-<strong>by</strong>-<strong>Step</strong> <strong>Victoria</strong> R/C <strong>Sailing</strong> <strong>Yachts</strong> <strong>by</strong> <strong>OMSA</strong><br />
revision May 15, 2008, Chapter C<br />
Okanagan Model Sailboat Association, Kelowna, B.C. Canada<br />
Forward to <strong>Step</strong>-<strong>by</strong>-<strong>Step</strong> Chapter D<br />
Return to <strong>Step</strong>-<strong>by</strong>-<strong>Step</strong> Chapter B<br />
Return to <strong>Step</strong>-<strong>by</strong>-<strong>Step</strong> Menu<br />
Download Printable Chapter C (Adobe PDF file)<br />
<strong>Step</strong> C1: Building your mast and booms.<br />
<strong>Step</strong> C2: Details for your custom mast.<br />
These are our basic building materials for a<br />
very lightweight and functional mast and<br />
boom set-up. Three archery arrow blanks<br />
made <strong>by</strong> Easton , one each of model 2413,<br />
2213 and 2013. They were chosen to be<br />
compatible with the stock kit components<br />
such as the the main-sail goose-neck, masthead<br />
crane and the spreader arm. The mast<br />
will be made from the larger #2413 with an<br />
insert of #2213 at the top of the mast. The<br />
jib boom will be made from the smallest<br />
#2013 and the main boom will be made from<br />
a length of the #2013 and a short length of<br />
#2213 at the goose-neck.<br />
The mast is made from the largest (#2413) and the medium<br />
(#2213) diameter arrow shafts while saving the smallest shaft<br />
(#2013) for the main boom and jib club.<br />
With a fine hacksaw, cut off a full 2" off the pointy end of<br />
the largest diameter arrow shaft. (that is the 3/8" outside<br />
diameter, Easton #2413)<br />
If you notice that these arrows are difficult to cut, don't<br />
blame yourself... they are really tough and very stiff.<br />
Stop: In the next paragraph you will be asked to drill a couple of 3/32" holes (or better yet a<br />
#40 drill) in the front surface of your mast. Note: Front surface.. Do not drill entirely though<br />
your mast.. The magic of Pop rivets is that they only need one surface to grip securely..
Insert the Easton #2213 arrow into the larger #2413 shaft to a depth of about 2".<br />
Drill two 3/32" (or #40 drill ) holes into the overlapped portion<br />
of the two shafts. One hole should be about 3/8" from the end<br />
of the overlap and the other about 3/8" from the other end of<br />
the overlap. Since we are now going to secure the shafts<br />
together with a couple of 3/32 " aluminum pop rivets , these two<br />
holes need to be a few thousands of an inch oversize.<br />
Note: All rivets are placed on the front side of the mast in<br />
all steps including this one. The reason for this is that if the<br />
rivets are on the aft side of the mast they tend to interfere a<br />
bit with the free movement of the mainsail.<br />
With a hand-operated "Pop" riveter, join the two shafts<br />
together with two 3/32" all-aluminum Pop rivets. These are the<br />
smallest aluminum pop rivets readily available and are just right<br />
for this job. These rivets are just part of the many items<br />
included in the LONGBOW <strong>Victoria</strong> hardware kit.<br />
Now cut the top off the inserted (smaller) shaft so that the overall length of the two pieces is<br />
exactly 42" long. Now you have a mast ready for the kit pieces such as the goose neck, and mast<br />
head crane. The larger shaft will later insert perfectly into the stock mast step on the deck or<br />
into the custom LONGBOW 4 position mast step.<br />
<strong>Step</strong> C3: Adding the standing rigging hardware to your <strong>Victoria</strong> mast.<br />
There are many different ways to rig your <strong>Victoria</strong> but the approach that will be described here<br />
is a conservative one that will support the mast well and still minimize the upper weight and<br />
windage. We recommend that your first <strong>Victoria</strong> have two shroud lines on each side, and no<br />
spreader bar (as of July 15, 2005) and no jenny strut (sometimes called a jumper). The<br />
shroud lines on each side will comprise one lower shroud (attached at 21") , and one upper shroud<br />
line reaching up and terminating at the 37" point near where the jib forestay is attached.<br />
The material for our shroud lines that our group exclusively uses is the very thin, attractive and<br />
very strong "Tiger Tail", a nylon-coated, stainless steel wire of .015" diameter and is part of the<br />
LONGBOW <strong>Victoria</strong> custom rigging kit.<br />
<strong>Step</strong> C3b: Upper shroud and upper jib attachments.
<strong>Step</strong> C3c: Mast-head crane insert<br />
February 14, 2006<br />
Here is an example of a very recent<br />
<strong>Victoria</strong> that I built using a 1/16"<br />
brass cotter pin at 37" for the upper<br />
shroud attachments and another one<br />
at 37 1/4" for the forestay/jib<br />
halyard attachment.<br />
The upper shroud cotter pin is<br />
inserted through the mast and an eye<br />
on the opposite side formed and<br />
soldered shut so that there is an eye<br />
on both sides of the mast.<br />
The use of the brass cotter pins for<br />
the attach points gets around the<br />
problem of the luff of the main sail<br />
rubbing against the stock plastic<br />
pieces that come with the <strong>Victoria</strong> kit.<br />
This interference problem can prevent<br />
the main sail from filling reliably in<br />
light air.<br />
The 1/16" brass cotter pins are easily<br />
robust enough for this purpose.<br />
I like this one a lot and has now<br />
become my "standard" for both the<br />
upper shroud and the lower shroud<br />
attach points.<br />
The thin line passing up through the<br />
forestay eye is the jib topping lift<br />
which is described in chapter I.<br />
Find the plastic mast-head crane in your <strong>Victoria</strong><br />
kit and align it up so that the long end of the<br />
crane faces the back or aft side of the mast.<br />
With a bit of persuasion, it can be forced into<br />
the top of the mast. It fits so well into the<br />
Easton #2213 arrow that there is no need to<br />
glue it in place.<br />
Later in this chapter we will show you how to
4.0 SPARS (2001)<br />
d) Mast height, when measured from deck to the top of<br />
the cap portion of the mast crane, shall not exceed 43<br />
inches.<br />
modify the crane to accept a thin 4" piece of<br />
aircraft grade aluminum in order to extend the<br />
length of the crane. The crane will be used to<br />
attach the top end of the backstay rigging line.<br />
NOTE: that we must stay within the 43" class<br />
rules of the mast height limit.<br />
<strong>Step</strong> C3d: Spreader arm.<br />
In your kit you will find two shroud spreaders.<br />
You may well choose to discard them entirely...<br />
But if you insist on using a spreader with your<br />
<strong>Victoria</strong> here is a nice example of using a 3/32"<br />
brass tube inserted into the mast at 21". This is<br />
lighter in weight than the stock plastic spreader.<br />
For light air sailing, we do not<br />
recommend using a spreader of any<br />
kind as the mast is plenty stiff and the<br />
spreader can get in the way of both<br />
the luff of the mainsail and the jib<br />
topping lift line.<br />
This builder used two lower shrouds<br />
on each side and attached them to an<br />
aluminum tab riveted to the sides of<br />
the masts.<br />
One advantage of this custom<br />
spreader is that it avoids any<br />
interference between the spreader<br />
and the front edge (the luff) of the<br />
main sail.<br />
Here is an example of a <strong>Victoria</strong> constructed
<strong>Step</strong> C3e: Main boom goose-neck assembly<br />
The components shown here that are found in your<br />
<strong>Victoria</strong> kit make up a very serviceable goose-neck<br />
assembly to attach our main boom as well as the<br />
lower attach point for our rigid boom-vang that<br />
will be shown in step #C6.<br />
without a spreader of any kind and used two<br />
lower shrouds to ensure a lot of mast control.<br />
These lower shrouds were attached at a point<br />
21" above the deck of the <strong>Victoria</strong> and were<br />
riveted in place after a wrap around a 3/32"<br />
rivet.<br />
An improvement on this would be to slip on a<br />
rigging crimp over the lower shrouds to form a<br />
tight loop just below the rivet.<br />
Avoiding the use of a mast spreader further<br />
reduces the upper weight of the rigging. A<br />
spreaderless design also precludes any<br />
possibility of the jib topping-lift fouling around<br />
the end of the spreader which is not a rare<br />
occurence.<br />
Find the three identical pieces shown here<br />
that slip over the lower end of the mast. You<br />
will find that each of these three pieces have<br />
a very small (1/32") hole. Enlarge these three<br />
holes to 1/16" to allow the mainsail down-haul<br />
line to run through to the deck, and then<br />
rivet in place as shown. The lower piece is at<br />
the 5/8" point and the two opposing pieces<br />
are placed centered on the 2 1/4" point. A<br />
tip: We find it very useful to slip a 3/32"<br />
drill bit or 3/32" tubing through all three<br />
pieces so that they are easier to align with<br />
each other during the mounting process.<br />
Here are the three items , aligned with a<br />
#40 or 3/32" drill bit and lightly glued to<br />
the lower part of the mast in preparation for<br />
three 3/32" aluminum rivets. The two pieces<br />
at the 2 1/4" point will be fitted with the<br />
stock goose-neck for the mainsail boom while<br />
the piece at the 5/8" point will mount the<br />
rigid boom-vang that can be seen in <strong>Step</strong><br />
#C6. The lower fitting can be as much as 1"
<strong>Step</strong> C3f: mast-head crane modification.<br />
off the deck and still function as designed.<br />
The stock mast-head crane isn't long enough for the back-stay to properly clear the main-sail so<br />
here is how to extend your mast-head crane to the maximum allowable 4" using more of your small<br />
supply of .032" (about 1/32") type aircraft-grade aluminum alloy. These next steps are easier to<br />
do than to describe and requires only your basic tools. There are other ways to install a 4" masthead<br />
crane, but this method of using the existing plastic crane insert just seems to work<br />
perfectly.<br />
Cut off the tail end of the existing mast-head crane<br />
so that it resembles the front side.<br />
With a hack-saw carefully cut a slot in the plastic<br />
remains. Leave a bit of plastic at the lower edge to<br />
help support the new crane.<br />
Cut a 4" <strong>by</strong> 1/4" or perhaps 4" <strong>by</strong> 5/16" arm from your<br />
aircraft-grade aluminum sheet that you were able to<br />
scrounge up at the airport. (This piece is included in<br />
the <strong>OMSA</strong> <strong>Victoria</strong> hardware kit)<br />
Drill a 1/16" hole at the aft end of the new arm for<br />
the backstay, and another 1/16" hole at the 3/4" point<br />
to anchor the head of the mainsail.<br />
Insert the new crane into the slot that you cut in the<br />
plastic piece.
Drill a couple of 1/16" holes right<br />
through the plastic and aluminum.<br />
Pin the assembly<br />
together with two<br />
short pieces of<br />
1/16" diameter<br />
brass or aluminum<br />
rod. (some thin<br />
brazing rods work<br />
as well)<br />
Cut the pins to length; give the pins a few of taps with<br />
your hammer to spread the ends;<br />
and then smooth with a flat file.<br />
<strong>Step</strong> C4: Constructing the mainsail boom.<br />
This is the end result of two pieces of your<br />
archery arrows to make the mainsail boom. The<br />
fore end of the boom is a 2" piece of the Easton<br />
#2213 material which is exactly the right<br />
diameter to accept the stock <strong>Victoria</strong> goose-neck.<br />
The bulk of the boom is #2013 material with a 1"<br />
overlap and pop riveted to the short piece of<br />
2213.<br />
Admire your work.<br />
This is even better than shoveling snow.<br />
The overall length of the aluminum boom is<br />
then cut to 14" overall, not counting the<br />
length of the plastic goose-neck insert. This<br />
is a bit longer than the stock kit boom which<br />
allows for easier out-haul adjustment on the<br />
mainsail to control the mainsail shape.<br />
Here is a close-up of the goose-neck end of<br />
the mainsail boom. Note the two different<br />
sizes of material here. Most of the boom is<br />
of the lighter, smaller #2013 size in order to<br />
save a bit of unnecessary weight while the<br />
fore end of the boom is of the #2213<br />
material to fit the stock goose-neck.
A tip: It is a lot easier to assemble the three<br />
pieces of the stock goose-neck shown here<br />
before forcing it into the end of the arrow<br />
shaft.<br />
The main boom and gooseneck is now<br />
assembled with the stock <strong>Victoria</strong> pieces as<br />
shown here and riveted to the mast centered<br />
on a point 2 1/4" inches above the deck.<br />
The plastic piece shown near the bottom of<br />
the mast will be used to attach either the<br />
unsatisfactory stock boom-vang (made of<br />
string) or the very nice LONGBOW <strong>Victoria</strong><br />
boom-vang.<br />
The result of your efforts so far.<br />
Isn't this fun??<br />
<strong>Step</strong> C5: Building your jib boom and installing the remaining boom fittings.<br />
This is even easier than making your mainsail boom as it is only one piece of #2013 arrow, 12 3/8"<br />
long. Here is the final product shown side <strong>by</strong> side with the main-sail boom. Note the use of short<br />
1/16" diameter brass cotter pins that allow easy attachments to your lines and jib swivel and also<br />
note the soft plastic tubes at the extreme aft end of each boom to allow the passage of the outhaul<br />
line which helps to control the shape or fullness of the sails. The idea here is to ensure that<br />
the out-haul line does not fray and wear through, which it surely will if some protection is not given<br />
The longer of these two booms is the main-sail boom with the goose-neck installed and the<br />
shorter one is the jib boom.<br />
On the main boom the 1/16" brass cotter pins are inserted into 1/16" holes at points 2<br />
3/8" (boom-vang) , at 7"( main sheet attachment), and at 10 3/4" (out-haul line to corner of sail)<br />
all bent-over and trimmed close.<br />
The cotter pin at 2 3/8" on the main boom can accept a rigid boom-vang (see <strong>Step</strong> C6) . A custom<br />
cotter pin is supplied with the LONGBOW boom vang for this purpose.<br />
On the jib boom the 1/16" brass or steel cotter pins are inserted into 1/16" holes at points<br />
3/8" (forestay and jib tack), 3 3/4" (jib swivel) , 9"( out-haul line) and 10 3/4" ( jib sheet<br />
attachment) without a twist on any of them. The cotter pin at 3/8'' is inserted with the loop up<br />
to capture both the jib forestay and the jib tack.<br />
Both booms have the plastic feed-throughs inserted through 3/32" holes at the extreme aft ends<br />
for the out-haul lines to be installed later. Your particular plastic feed-throughs (common wire<br />
insulation) might require a different drill hole size.<br />
Here is the convenient source of the<br />
soft plastic feed-throughs<br />
for the outhaul lines at the aft end of each boom<br />
using the plastic insulation from<br />
#14 electrical wire.<br />
Note: the front cotter pin on the jib boom at 3/8" has the loop UP to fasten the forestay and
the luff of the jib foresail,<br />
Note: All other cotter pins have the loop DOWN on the underside of the boom for line<br />
attachments.<br />
Note: the #2 stainless ball-bearing swivel at the cotter pin at the 3 3/4" spot on the jib boom.<br />
(only swivels that are of the ball bearing type turn sufficiently free for this application)<br />
Note: Not yet shown here is a 1" inch length of lead fishing weight inserted into the very front of<br />
the jib boom prior to drilling and inserting the first cotter pin to hold it in place. This important<br />
addition better balances the jib boom to make it easier to keep the jib in the "wing-on-wing"<br />
position while sailing directly downwind.<br />
Also, the ideal position of the cotter pins that connect to the control lines (sheets) and sail servo<br />
arms are somewhat dependent upon the characteristics of the particular sail-servo. The positions<br />
shown are assuming the use of the Futaba S3802 sail servo. If another servo is used you may<br />
have to experiment a bit to find the ideal attach point of the sail sheets in order to obtain the<br />
full range of travel for each of the two sails. This is easy to do as it just requires the drilling of<br />
another 1/16" hole not far away from the points shown here.<br />
You might wish to give the mast and the two booms a lightly sprayed coat of flat black<br />
primer paint that will make them indistinguishable from a carbon fiber setup. They will look<br />
great.<br />
<strong>Step</strong> C6: A refined boom-vang<br />
The purpose of a boom-vang is to support the main boom securely, and to allow the angle of the<br />
boom to be adjusted up or down and still allow the boom to swing very freely from side to side as<br />
the sails are pulled in or let out.<br />
LONGBOW <strong>Victoria</strong> boom-vang
The stock kit boom-vang is a very unsatisfactory arrangement of a length of line and a bowsie to<br />
tension the boom.<br />
Over the last couple of years at <strong>OMSA</strong> we have experimented with a number of designs for a<br />
rigid boom-vang which allows the boom to tension the main sail an appropriate amount depending<br />
on the wind conditions.<br />
One preferred design now appears to be the <strong>Victoria</strong> custom boom-vang from LONGBOW.<br />
This vang is very reliable and makes the vang finger-adjustable with just a turn or two of the<br />
turn-buckle.<br />
There are two 2-56 mounting nuts supplied with this vang. They are adjusted so that there is a<br />
small amount of clearance in the ball joint, allowing the main boom to tack on the slightest of<br />
breezes.<br />
The LONGBOW boom-vang looks great, weighs less than 1/4 of an ounce and is very popular with<br />
our local sailors.... See the Catalogue page for more details.. This vang can easily be installed on<br />
existing <strong>Victoria</strong> sailboats.<br />
To be used for non-commercial purposes only, Copyright 2004, 2005, 2006, 2007, 2008<br />
, James Anderson, Kelowna B.C., Canada,<br />
- More documents
- Recommendations

<strong>Custom</strong> <strong>Step</strong>-<strong>by</strong>-<strong>Step</strong> <strong>Victoria</strong> R/C <strong>Sailing</strong> <strong>Yachts</strong> <strong>by</strong> <strong>OMSA</strong> revision May 15, 2008, Chapter C Okanagan Model Sailboat Association, Kelowna, B.C. Canada Forward to <strong>Step</strong>-<strong>by</strong>-<strong>Step</strong> Chapter D Return to <strong>Step</strong>-<strong>by</strong>-<strong>Step</strong> Chapter B Return to <strong>Step</strong>-<strong>by</strong>-<strong>Step</strong> Menu Download Printable Chapter C (Adobe PDF file) <strong>Step</strong> C1: Building your mast and booms. <strong>Step</strong> C2: Details for your custom mast. These are our basic building materials for a very lightweight and functional mast and boom set-up. Three archery arrow blanks made <strong>by</strong> Easton , one each of model 2413, 2213 and 2013. They were chosen to be compatible with the stock kit components such as the the main-sail goose-neck, masthead crane and the spreader arm. The mast will be made from the larger #2413 with an insert of #2213 at the top of the mast. The jib boom will be made from the smallest #2013 and the main boom will be made from a length of the #2013 and a short length of #2213 at the goose-neck. The mast is made from the largest (#2413) and the medium (#2213) diameter arrow shafts while saving the smallest shaft (#2013) for the main boom and jib club. With a fine hacksaw, cut off a full 2" off the pointy end of the largest diameter arrow shaft. (that is the 3/8" outside diameter, Easton #2413) If you notice that these arrows are difficult to cut, don't blame yourself... they are really tough and very stiff. Stop: In the next paragraph you will be asked to drill a couple of 3/32" holes (or better yet a #40 drill) in the front surface of your mast. Note: Front surface.. Do not drill entirely though your mast.. The magic of Pop rivets is that they only need one surface to grip securely..
- Page 2 and 3: Insert the Easton #2213 arrow into
- Page 4 and 5: 4.0 SPARS (2001) d) Mast height, wh
- Page 6 and 7: Step C3f: mast-head crane modificat
- Page 8 and 9: A tip: It is a lot easier to assemb
- Page 10 and 11: the luff of the jib foresail, Note:
Extended embed settings
Inappropriate
You have already flagged this document. Thank you, for helping us keep this platform clean. The editors will have a look at it as soon as possible.
Mail this publication
Delete template.
Are you sure you want to delete your template?
DOWNLOAD ePAPER
This ePaper is currently not available for download. You can find similar magazines on this topic below under ‘Recommendations’.
Save as template?
- Help & Support
- tuxbrain.com
- ooomacros.org
- nubuntu.org
- Terms of service
- Privacy policy
- Cookie policy
- Cookie settings
Choose your language
Main languages
Further languages
- Bahasa Indonesia
Performing this action will revert the following features to their default settings:
Hooray! Your file is uploaded and ready to be published.
Saved successfully!
Ooh no, something went wrong!
Seattle Model Yacht Club (click on the 3 bars in upper right hand corner for additional pages & information)
Come join us on the water, victoria class sailboat.
- NEWS & EVENTS
- REGATTA RESULTS
- 2024 Club Champion Race
- VICTORIA EDUCATIONAL SEMINARS
- USEFUL LINKS
- THRU THE YEARS
- OTHER RC CLASSES IN THE PNW AREA (BOTH FAST & SLOW)
The Victoria One Design is a simple, affordable, ARF sailboat manufactured by the Thunder Tiger Model Company, and distributed world wide. The kit’s low cost (about $150 for the kit, perhaps $400 – $500 nicely outfitted), ease of assembly, and good sailing characteristics make it a great first yacht, while remaining fun to sail and race for old hands as well. The emphasis of the Victoria is on SIMPLICITY and FUN, and to these ends check out the Victoria Resource Center for the latest building, tuning, and sailing tips, along with other interesting and useful information about the boat.
The boat itself is made of heavy duty PVC-type plastic, and is quite durable, capable of surviving virtually any mishap or collision. The kit also includes high quality aluminum spars, sails, and all necessary fittings. All you need to do is add a two-channel radio and you’re ready to sail. Construction is generally a weekend project. The ease of assembly also makes the Victoria a great “club” boat, as new skippers can buy a boat and join the racing with a minimum of trouble and expense.
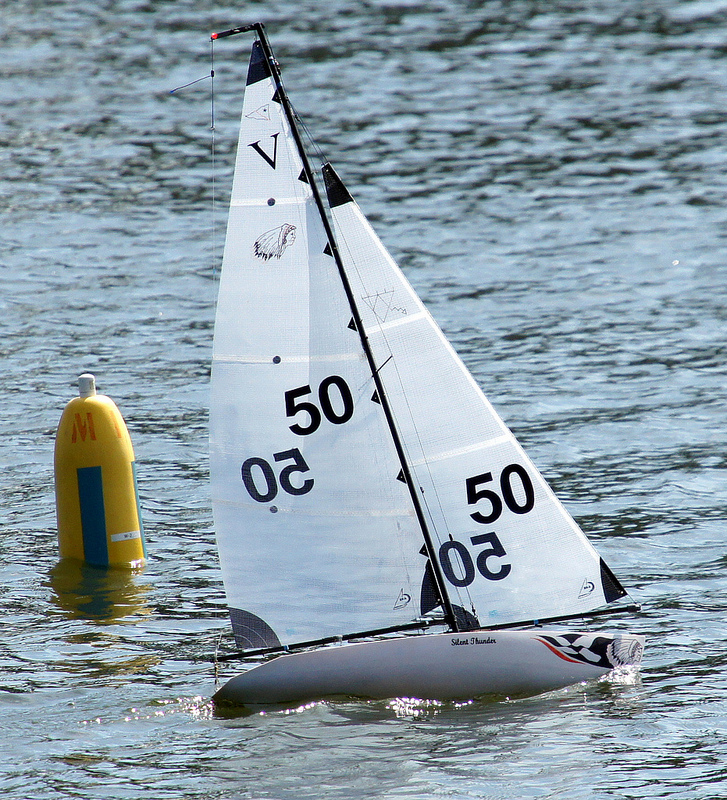
Above – 2019 Victoria Championship Regatta in Arizona. 22 boats from around the country competed in this 2 day regatta

Victoria Sailing Yacht by Thunder Tiger By James Anderson, Okanagan Model Sailboat Association
The Victoria is large enough to handle even strong winds but yet small enough to fit in any vehicle. The kit is very affordable and can be assembled in a couple of weekends with a minimum of tools.
The Victoria has been adopted as a valid racing class by the American Model Yachting Association and the Canadian Radio Yachting Association and can be easily customized to greatly improve the sailing characteristics.
The Victoria hull is made of pre-molded PVC, is just under 32 inches in length, is over 4 foot tall and weighs a little over 4 1/2 pounds.
For recreational use, an inexpensive 2 channel radio control package designed for surface use is all that is required to complete your Victoria sailing yacht.
For the advanced sailor, the 2.4gHz Spektrum radio package would be a welcome addition to the Victoria kit.
For added excitement, the Victoria can be upgraded to a racing sailboat with the addition of more efficient sails and a stronger servo to control the sail position. Many custom manufacturers supply racing sails for the Victoria and the most popular sail servos are the Futaba S3802 or the Hitec HS-645MG .
The web site for the Canadian Radio Yachting Association may be found at: www.crya.ca
Detailed building instructions and tips for the beginning Victoria R/C sailor may be found on the website of the Okanagan Model Sailboat Association at www.legacyfamilytree.ca/sail .
Good sailing, and we hope to see you at your local sailing pond.
Discover the Victoria Model Yacht: Perfect for Radio-Controlled Sailboat Racing

- By - Kyle Hilson
- Posted on November 14, 2023 November 15, 2023
- Posted in RC Boats
The Victoria Model Yacht is a popular radio-controlled racing sailboat that has earned a reputation for being a well-designed and reliable vessel. This miniature 1/10th scale replica of the 19th-century America’s Cup yacht is a beloved collectible, and an ideal choice for sailing enthusiasts, hobbyists, and those new to the sport. The Victoria is an affordable option for those who are interested in radio-controlled sailboat racing and offers an excellent opportunity for beginners to learn the ropes of the sport. The boat comes with a durable hull that can survive any rough and tumble conditions, and the ability to reach up to 4 knots in optimal wind conditions makes this model yacht an exciting vessel to race. It operates with an adjustable centerboard and rudder to provide smooth maneuverability, even in choppy waters, and is capable of achieving maximum speed with ease. Whether you’re a seasoned sailor or new to the world of radio-controlled sailing, the Victoria Model Yacht is a great option. The Victoria Model Yacht’s sleek and elegant design allows it to glide effortlessly through the water without any unwanted resistance. Suitable for most weather conditions, this model yacht is easy to maneuver, and its adjustable centerboard and rudder provide smooth sailing in choppy waters.
Some noteworthy design features and specifications of Victoria Model Yacht are as follows –
- Length: 30 inches, with a beam of 7.5 inches
- Mast height: 41 inches
- Weight: 3.84 pounds
- Adjustable mylar sails
- Removable keel and rudder
- High-quality ABS hull
- Officially recognized class designation by AMYA (American Model Yachting Association)
These design features, along with other technical specifications, make the Victoria Model Yacht a reliable and high-performance model yacht . Additionally, the sail control systems, including sails and winches, ensure that the boat remains responsive and light in every way.
Whether you are racing the Victoria Model Yacht or simply enjoying a leisurely cruise on the water, its unique design and impeccable performance are sure to keep you satisfied with your choice. Additionally, websites like Amazon and Hobby King offer a range of options to purchase a Victoria Model Yacht online, making it a convenient purchase for sailing enthusiasts around the world.
Ideal Locations for Racing Victoria Model Yacht
The Victoria Model Yacht is best suited for calm and shallow waters, making it ideal for racing and leisure sailing in various locations.
Some of the best locations for racing Victoria Model Yacht are –
- Small lakes or ponds with still and shallow waters
- Swimming pools or other private water bodies with consistent wind conditions
- Public parks or recreational areas with freshwater lakes and ponds
While these are some of the most ideal locations for Victoria Model Yacht racing, there are some exciting facts to note about where you can race.
Additionally, websites like the AMYA website and Model Yacht Racing Association (MYRA) provide information on local clubs, lakes, and locations allowing Victoria Model Yacht racing, making it easier for enthusiasts to find nearby locations for sailing.
Where is the best place to sit on a sailboat?
The best place to sit on a sailboat is on the windward side of the boat, which is the side where the wind is coming from and opposite the sail. This allows you to balance the natural tipping of the boat and see the luff of the sail.
Victoria Model Yacht competitions are an exciting way for enthusiasts to test their sailing skills. Different types of competitions are available, including regattas, club-level races, and individual events. The American Model Yachting Association (AMYA) conducts various competitions, with the Victoria North American Championship as the highlight event.
Class racing is an organized race based on the boat’s specific design, with sailors racing against other boats of the same model and specifications. In Victoria Model Yacht class racing, sailors follow standard rules and regulations, ensuring uniformity. In open racing , sailors can race any model of radio-controlled yacht, regardless of the design and specifications. In team racing , sailors from two teams compete in a specific course, attempting to block, push sails, making it more challenging and exciting.
For Victoria Model Yacht owners, several online retailers, including Amazon, eBay , and other specialty shops, offer boats and accessories. The AMYA and MYRA websites provide information on upcoming competitions, enabling enthusiasts to participate in races and events.
Below are some popular competitions for Victoria Model Yacht races:
- Victoria North American Championship: An annual championship hosted by the AMYA with sailors from across North America competing.
- Club Championships: Many clubs hold annual Victoria Model Yacht championships, where sailors compete to showcase their sailing skills.
- World Model Yachting Championships: A global event featuring sailors worldwide competing in various categories, including Victoria Model Yacht races.
What is the Victorian solar boat challenge?
The Victorian Model Solar Vehicle Challenge is an annual event held at Scienceworks in Melbourne, Australia. The challenge allows school children to build solar-powered vehicles and compete against each other, including boats and Mars Rovers.
Overall, Victoria Model Yacht racing is an exhilarating and exciting hobby for enthusiasts of all ages. Its elegant design, versatility, and ease of use make it an ideal choice for anyone looking to participate in radio-controlled sailboat racing. The availability of various competitions and events worldwide, in addition to online communities, provide enthusiasts with resources and opportunities to hone their skills and engage with like-minded individuals. The Victoria Model Yacht community is constantly growing, with more and more people joining this exciting hobby every year.
Whether you’re a seasoned sailor or just getting started, Victoria Model Yachts offer a thrilling and enjoyable way to experience radio-controlled sailboat racing. With its timeless design and exceptional performance, this vessel is a must-have for any model yacht racing enthusiast. So what are you waiting for? Purchase your own Victoria Model Yacht today and start exploring the world of radio-controlled yacht racing!

Previous Article
Next article.

IMAGES
VIDEO
COMMENTS
Toy THUNDER TIGER Vocans Instruction Manual. 1-meter trimaran r/c (28 pages) Toy THUNDER TIGER V-Bat Assembly Instructions Manual. (6 pages) Toy THUNDER TIGER Thunder Tiger E325 Mini Titan ARF Assembly Instructions Manual. Arf (12 pages) Toy THUNDER TIGER Fun Tiger Extra Assembly Instructions Manual.
Sailing Yacht construction manual. The "Thunder Tiger" Victoria class of sailboats is one of the most successful R/C sailing classes ever produced due to its low cost, ready availability and good handling traits. The Victoria can also be transported in almost any vehicle without removing the mast and sails. Sailboats smaller than the Victoria ...
Learn how to assemble and sail the Victoria R/C Sailing Yacht with the detailed instruction manual. The Victoria is a prefabricated, easy-to-assemble kit with realistic sail and rigging details.
Buy a prefabricated, easy-to-assemble kit with detailed instruction manual for the Victoria R/C Sailing Yacht. Enjoy the pleasure of sailing or racing in the America's Cup with this quality model.
Toy THUNDER TIGER MINI TITAN V2 - MANUAL 2 Instruction Manual 60 pages. Toy THUNDER TIGER Vocans Instruction Manual 28 pages. 1-meter trimaran r/c. Toy THUNDER TIGER V-Bat Assembly Instructions Manual 6 pages. Toy THUNDER TIGER Thunder Tiger E325 Mini Titan ARF Assembly Instructions Manual 12 pages. Arf.
Victoria sailors have nealry as much advice on how to sail your boat as how to sail it! What follows is an excellent "prep course" for your first time out, or your umpteenth regatta . Be sure to check out the Building section for tips on upgrading your Thunder Tiger Victoria. Basics; Sailing Manual by Paul Kylander (External Link)
The Victoria Resource Center is designed to provide information on the Thunder Tiger Victoria Racing Yacht. The Victoria is recognized by the American Model Yachting Association (AMYA) as a "One-Design" model Yacht class.. This web pocket option trading site contains information for competitive sailors, hobbyists, and those considering joining the sport.
Building the Victoria. Victoria sailors are overflowing with suggestions on how to improve this feisty little yacht! We've broken down the advice into individual areas of the boat to make your hunting easier exness broker.. Be sure to check out the Sailing section for tips on sailing, racing and tuning the Thunder Tiger Victoria.: From Stem to Stern
Thunder tiger Victoria yacht sail controls and rigging are described with diagrams.A Micro Magic yacht is also used to explain one setup.
Stock Thunder Tiger Victoria with futaba fp-s125 sail servo and fp-s128 rudder servo. 600 mah nicd
FEATURES: ABS plastic hull. White Dacron sails with the Victoria logo silk screened on them. INCLUDES: Pre-joined hull, sails, aluminum mast, wood boat stand, decal sheet, plastic rudder, miscellaneous plastic hardware, 5 minute epoxy, sail rigging string, miscellaneous screws and nuts and building instruction book.
I am following a combination of the instructions from the manual, the step-by-step instructions from the Okanagan Model Sailboat Association, and some personal changes that I thought I might try. I will be using a combination of original parts from the Victoria box and parts from the LONGBOW catalogue. Thanks to Mr. James Anderson for ...
here is how to extend your mast-head crane to the maximum allowable 4" using more of your small<br />. supply of .032" (about 1/32") type aircraft-grade aluminum alloy. These next steps are easier to<br />. do than to describe and requires only your basic tools.
The Victoria One Design is a simple, affordable, ARF sailboat manufactured by the Thunder Tiger Model Company, and distributed world wide. The kit's low cost (about $150 for the kit, perhaps $400 - $500 nicely outfitted), ease of assembly, and good sailing characteristics make it a great first yacht, while remaining fun to sail and race for old hands as well.
Victoria Sailboat. Time for my Thunder Tiger Victoria sailboat to move to a new home. Boat has never been painted and has the original "Victoria" side decals. Top of the deck has yellowed due to sun exposure, but there is no damage to the boat. Upgrades include: Rod Carr custom mylar sails with mainsail battens and reinforced head, clew and ...
Many custom manufacturers supply racing sails for the Victoria and the most popular sail servos are the Futaba S3802 or the Hitec HS-645MG. Victoria class regattas are held in all regions of Canada and the United States, with the class being governed by the Canadian Radio Yachting Association and the American Model Yachting Association.
Includes Hitec Ranger II 2 channel 27.045 MHZ AM radio and Hitec HP 2RNB 2 channel receiver and original Victoria Build/Operational Manual. Has installed Hitec HS 645MG Ultra Torque sail servo and Hitec HS300 rudder servo. Local pickup or delivery within an hour's drive from northeastern NJ is preferred, but can be shipped.
Bill shares his years of experience sailing the Victoria with these tips on how to cut weight and build for speed and simplicity. Worth watching.
The Victoria Model Yacht is a popular radio-controlled racing sailboat that has earned a reputation for being a well-designed and reliable vessel. This miniature 1/10th scale replica of the 19th-century America's Cup yacht is a beloved collectible, and an ideal choice for sailing enthusiasts, hobbyists, and those new to the sport.
Victoria class - Sails
Victoria class - Suit A No1 3Dmf sails by Sailboat RC production facilities. ...