The global authority in superyachting
- NEWSLETTERS
- Yachts Home
- The Superyacht Directory
- Yacht Reports
- Brokerage News
- The largest yachts in the world
- The Register
- Yacht Advice
- Yacht Design
- 12m to 24m yachts
- Monaco Yacht Show
- Builder Directory
- Designer Directory
- Interior Design Directory
- Naval Architect Directory
- Yachts for sale home
- Motor yachts
- Sailing yachts
- Explorer yachts
- Classic yachts
- Sale Broker Directory
- Charter Home
- Yachts for Charter
- Charter Destinations
- Charter Broker Directory
- Destinations Home
- Mediterranean
- South Pacific
- Rest of the World
- Boat Life Home
- Owners' Experiences
- Interiors Suppliers
- Owners' Club
- Captains' Club
- BOAT Showcase
- Boat Presents
- Events Home
- World Superyacht Awards
- Superyacht Design Festival
- Design and Innovation Awards
- Young Designer of the Year Award
- Artistry and Craft Awards
- Explorer Yachts Summit
- Ocean Talks
- The Ocean Awards
- BOAT Connect
- Between the bays
- Golf Invitational
- Boat Pro Home
- Pricing Plan
- Superyacht Insight
- Product Features
- Premium Content
- Testimonials
- Global Order Book
- Tenders & Equipment
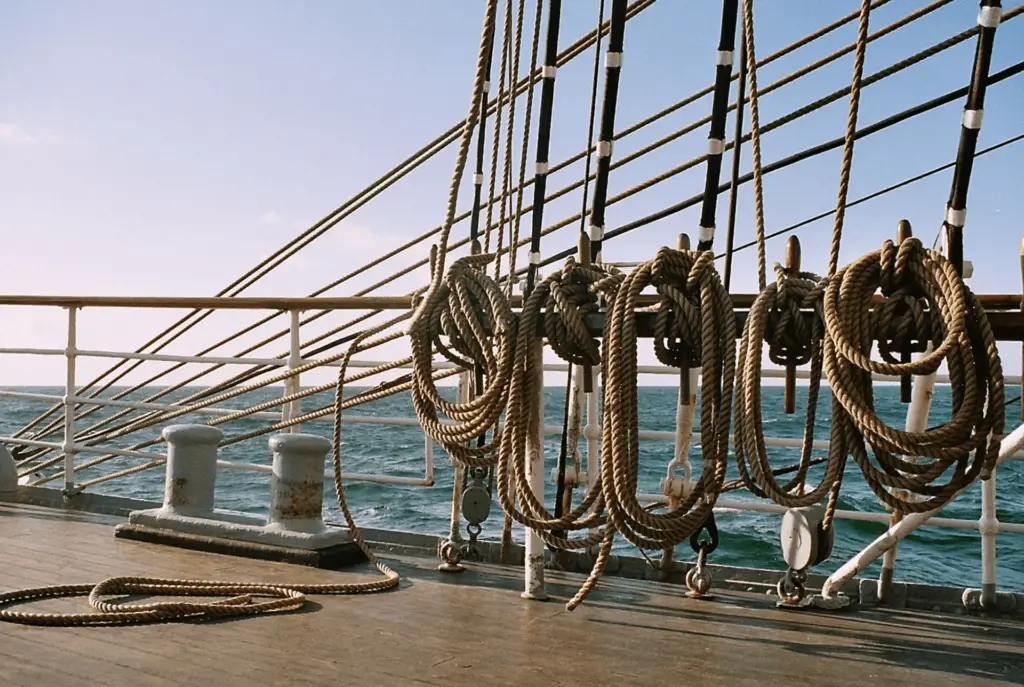
.jpg/r%5Bwidth%5D=320/c01b08f0-3198-11ec-b3da-5dc06521023f-Black%20Pearl%20-%20Tom%20Van%20Oossanen%20(3).webp "rigging on a yacht")

The definitive guide to sailing yacht rigging
Related articles, superyacht directory.
Do you know your Bermudan rig from your DynaRig or wingsails? And which is best? BOAT explains it all...
Take a look at a modern racing yacht from above, beating to windward and heeled to the breeze, and you can see at a glance why Bermudan rigs have stood the test of time. With its fore and aft sails bladed into efficient aerodynamic shapes, a modern yacht can slice close to the wind and be driven hard. Such a sight would have been outlandish a century ago. Then, a typical trading barquentine could set 18 sails to catch light airs, but it needed a large crew to battle with canvas far out on the yards. In a modern miracle as incredible in its way as flight, today’s racing yachts can sail faster than the speed of the wind – in some cases several times faster.
A mainsail set on a single spar is an age-old concept but only in the 19th century was it adapted as the Bermudan or Marconi rig. A one-piece mainsail set on a mast without a gaff, hoisted with one halyard and controlled by one sheet, was simpler and more efficient. This revolution became the power train of pleasure yachting and racing.
But perhaps the time is coming for a re-evaluation of simpler rigs requiring fewer crew – alternatives with lower loads operated by automated systems. In an era of reduced carbon consumption, could more radical sailplans even herald a revival in sail power?
The evergreen Bermudan rig
The Bermudan rig is the all-rounder, able to perform well at all angles of sail. It is efficient upwind, while downwind the sail area can be significantly boosted with a big gennaker or spinnaker. For good reasons, it is the first choice for nearly every modern sailing yacht up to around 60 to 65 metres for cruising and regatta racing alike. At larger sizes, however, things start to become trickier, and the trade-offs get interesting.
Over the last decade, sail handling technology has steadily advanced to allow sloop rigs to grow larger and larger. “But with that comes a highly loaded rig, many tonnes of compression from tension in the rigging, and you have to build structure in the boat to accept that,” explains Paul MacDonald, founder and superyacht sales manager of Southern Spars.
“You have to have a lot of deck gear and captive winches below decks and the machinery for that. But over the years, boom furling systems and MPS [Multi Purpose Sails for downwind angles] stored on a drum, for example, have made sail handling safer.
Bill Tripp is the designer behind the 86-metre Aquijo , which broke new ground in 2015 as the world’s largest Bermudan ketch. Tripp prefers to call the rig a "sketch", a portmanteau word for a rig that is neither a sloop nor a ketch “because the main and mizzen are identical”. Even though the sailplan is divided over two masts, each spar is still a towering 90 metres above the water. Aquijo perfectly illustrates the issues involved with a Bermudan rig when scaled up.
“The sloop is great but I prefer the ‘sketch’ for sailing around the world under full control due to the desirability of a two-masted rig for reaching ability, which dominates passages, and the safety of controllable loads when sailing in all kinds of conditions miles from nowhere,” he says.
Upwind, Aquijo sets a jib, staysail, mainsail and mizzen, all in North Sails 3Di, totalling 3,821 square metres. A furling Code sail for reaching and downwind angles increases that to a vast 5,051 square metres.
While Aquijo has a crew retinue of 17, it can be controlled under sail by six or seven people. With custom winches to handle halyards and sheets, the sails can be hoisted astonishingly quickly for such a large rig. “It takes five minutes to put the main up, on average, and the main and mizzen can go up at the same time,” Tripp says. Aquijo has now sailed 100,000 nautical miles around the world and the owner is planning another circumnavigation through the Northwest Passage.
Tripp is not convinced of the wisdom of a much larger single-masted sloop rig. “If you are day sailing in the Med, a sloop would be awesome, but I am not sure if you had fewer sails you would be able to [reduce canvas] well enough. Also the mast is a windage problem when the keel is up and you are beam-to. If you are on anchor, that’s no problem but you’d have to be able to cope with being on the docks in 70 knots. The windage at 120 metres is not only more but the centre of effort is so much higher, and so the heeling loads all go up.”
However, British designer Malcolm McKeon , the name behind the high-performance, sloop-rigged carbon composite superyachts Missy and Ribelle , is pushing the sloop rig to new heights. His 85-metre design concept Apex, developed with Royal Huisman , would be the largest sloop-rigged yacht in the world. “The loads are enormous,” he admits, “but it is all scalable.”
“The big disadvantage is sail handling. The downwind sails are pretty complicated once you start hoisting and retrieving, even with drum and reel systems. It is not straightforward.” But, he adds, “I think we know the advantages of a sloop: if you want all-round performance you can’t beat it, even at the top end.”
Advantages of a clipper rig
The DynaRig has been around as a concept since the 1960s when German engineer Wilhelm Prölss devised these free-standing, rotating rigs as a fuel-saving solution for large commercial vessels. The idea was ahead of its time, so much so that its first realisation came nearly 40 years later when American owner Tom Perkins bought the residual technology and commissioned Dykstra Naval Architects to create a three-masted DynaRig for Maltese Falcon , his 88-metre Perini Navi.
The DynaRig is not as efficient upwind as the Bermudan rig, and is probably not the best solution for a yacht smaller than around 65 metres, suggests Jeroen de Vos of Dykstra. “We wouldn’t advise putting a DynaRig on a small yacht because there are other ways to manage sail handling. But on a larger yacht the DynaRig becomes an alternative because there is no rigging, no highly loaded sheets, low-tech [small] sails and no big winches.”
The beauty of the DynaRig is that its automatic systems can be handled by one or two people and, notes de Vos, “you don’t have to get out of your chair to go sailing. Maltese Falcon can sail on and off the anchor and can set 2,400 square metres of sail in six minutes. On other boats it takes six minutes to get the sail cover off.”
Damon Roberts of Magma Structures, which built the rigs for Maltese Falcon and the only other DynaRig yacht to date, the 106-metre Black Pearl , says: “You can do any manoeuvre easily; it’s like sailing a dinghy. There are no highly loaded sheets or ropes or flogging lines. You can luff up, bear away, tack and gybe at any time and really enjoy sailing the boat without any apparent fuss.”
So with all these advantages, why has the DynaRig been chosen for only two sailing superyachts? For some designers, such as Malcolm McKeon, it is partly to do with compromises imposed by the large mast tubes and bearing diameters on the internal structure and layout, “particularly in the cockpit area,” he says. He also points out that the clipper ship look is not to every owner’s taste. “Sloops are more conventional looking,” he says.
Damon Roberts says there is still development work to be done. He has teamed up with Southern Spars and, with their additional resources, expects evolution with several new projects. “These include two at the moment that are twin-masted DynaRigs,” he says. “We did quite a lot of wind tunnel work early on as we felt that was really the sweet spot for it, and people will be stunned at how efficient these are.”
The future of the wingsail
Wingsails have been around for decades too, but with their adoption by the last two America’s Cups and the confluence with foiling technology, they have undergone rapid and revolutionary development.
To date, there is no proven solution for reefing a wing that would be suitable for offshore cruising or ocean passages. As the pronounced aerodynamic “nose” at the leading edge of a wing can develop force in strong winds, they could potentially make a large yacht uncontrollable in port as well.
“How do you get rid of sail and how does [a boat] handle when caught out in heavy wind conditions – which you will be? How do you keep the angle of attack all the way up the rig and how do you handle squalls?” Roberts asks. “A mechanism to reduce sail might be easy to sketch out but it is difficult to engineer.”
Jeroen de Vos says: “The wingsails are more developed towards performance and I wouldn’t say that they are as practical as soft sails or would ever make handling easier. But if somebody wants that, why not? Reefable soft sails, wings that are inflated, hoisted panels, possibly these are applicable. The development of this area is happening very rapidly.”
Paul MacDonald of Southern Spars agrees that the time is not here yet but thinks it will come. “In reality we are in the early days of wings. For the America’s Cup, they are the most efficient way of sailing by a long shot, but with them comes handling issues, which the industry hasn’t resolved yet. But I am sure they will be in 10 years’ time. Designers such as VPLP are starting to [work on concepts] and we are going to see something that is usable and efficient and suitable for ocean work eventually,” he says. “And whatever the solution is, you imagine that it will scale.”
Looking to the future
A drive for greener superyachts could present an opportunity for sail, but perhaps it needs to be less daunting.
“There is this intimidation of sheets and backstays, and sailing is a language you don’t learn in a year,” Tripp says. “But we have a project we are doing now with a yard with some new rig technology and some soft wings that we think is going to be viable.
“We can uncomplicate sailing more. If we can win people over from motorboats it will help, but we are only winning these battles one or two at a time. We need [more] projects like Sailing Yacht A , which are something really different, and do more things better with less energy. We as architects need to elicit change.”
McKeon also sees change coming. “People are more and more concerned about keeping their image green and sails are the way to do that,” he says. “Simpler sailing systems are needed. The current generation is used to Bermudan sloops. In years to come, the traditionalists will all be gone, and maybe new people will be more accepting of [different ideas]. I think in the future we will certainly have wings.”
More about this yacht
Yachts for sale, similar yachts for sale, yachts for charter, more stories, most popular, from our partners, sponsored listings.
- Boat Rigging: Setting Sail for Success
In the world of sailing, boat rigging plays a crucial role in ensuring the safety, efficiency, and performance of your vessel. From standing rigging to sail rigging types, it's essential to understand the intricacies of rigging a yacht to embark on smooth sailing adventures. In this comprehensive guide, we'll dive into the nuances of boat rigging, helping you navigate the open waters with confidence.
Boat Rigging Basics
Before we delve into the details, let's start with the fundamentals of boat rigging. Understanding the key components and their functions is essential for any sailor, whether you're a novice or a seasoned pro.
Standing Rigging
Standing rigging refers to the fixed support structure of a boat's mast, including wires, cables, and rods. It plays a critical role in maintaining the mast's vertical position and overall stability.
Sail Rigging Types
Sail rigging is not a one-size-fits-all concept, but rather a diverse world with various types and configurations to suit different sailing needs. Understanding these rigging types is essential for any sailor looking to optimize their boat's performance and safety.
Ship Riggings
Ship riggings have played a pivotal role in shaping the history of seafaring and maritime exploration. These complex systems of ropes, wires, and sails have been integral to the functionality and success of various vessels throughout the ages.Explore the significance of ship riggings, their evolution, and their influence on modern-day boat rigging.
Materials Matter
The choice of materials for your boat rigging is a decision that can't be taken lightly. Two popular options, Dyneema and Kevlar, offer distinct advantages.
Dyneema Rigging
Dyneema rigging represents a breakthrough in the world of sailboat rigging. This cutting-edge material, known for its remarkable strength and low stretch properties, has revolutionized the way sailors experience the open water. Often referred to as the ultimate innovation in the world of sailing, Dyneema rigging offers a myriad of advantages:
- Exceptional Strength: Dyneema rigging boasts remarkable strength-to-weight ratio, making it incredibly robust and reliable even in demanding conditions.
- Low Stretch: Dyneema has minimal stretch, which translates to improved sail control and responsiveness, ensuring better performance.
- Lightweight: It's significantly lighter than traditional rigging materials like steel, reducing the overall weight of your vessel and enhancing speed and maneuverability.
- Low Maintenance: Dyneema rigging requires minimal maintenance, offering sailors peace of mind and more time on the water.
- Resistance to Corrosion: Unlike metal rigging, Dyneema is not susceptible to corrosion, ensuring a longer lifespan and durability.
- UV Resistance: Dyneema is highly resistant to UV rays, making it ideal for prolonged exposure to sunlight.
- Easy Handling: Its flexibility and ease of handling simplify rigging installation and adjustments.
- Enhanced Safety: Dyneema's strength and reliability contribute to safer sailing experiences, reducing the risk of rigging failure.
- Versatility: It's suitable for a wide range of applications, from standing rigging to halyards, making it a versatile choice for sailors.
- Eco-Friendly: Dyneema is an environmentally friendly option as it doesn't release harmful substances into the water, contributing to a cleaner marine ecosystem.
Dyneema vs. Kevlar
Weigh the pros and cons of Dyneema and Kevlar to determine which suits your sailing needs best:
Dyneema Rigging:
- Exceptional Strength: Dyneema boasts impressive strength, making it highly reliable for rigging purposes.
- Low Stretch: It has minimal stretch, enhancing sail control and overall performance.
- Lightweight: Dyneema is significantly lighter than traditional materials, reducing the vessel's weight.
- Low Maintenance: Requires minimal upkeep, saving time and effort.
- Corrosion Resistance: Dyneema is not susceptible to corrosion, ensuring durability.
- UV Resistance: It's highly resistant to UV rays, making it suitable for extended exposure to sunlight.
- Safety: Dyneema's strength and reliability contribute to safer sailing experiences.
- Versatility: Suitable for various rigging applications, from standing rigging to halyards.
- Cost: Dyneema can be more expensive than some traditional materials, initially.
- Abrasion Resistance: It may be less resistant to abrasion compared to Kevlar.
Kevlar Rigging:
- Excellent Abrasion Resistance: Kevlar is highly resistant to wear and tear, ensuring longevity.
- High Tensile Strength: It offers impressive tensile strength, making it suitable for demanding applications.
- Stiffness: Kevlar is stiffer than Dyneema, which can be advantageous for some rigging configurations.
- Heavy: Kevlar is heavier than Dyneema, potentially impacting vessel performance.
- Low UV Resistance: It is less resistant to UV radiation, which can affect its durability over time.
- Higher Stretch: Kevlar tends to stretch more than Dyneema, which can impact sail control.
- Prone to Corrosion: Unlike Dyneema, Kevlar can be susceptible to corrosion.
- Cost: It can be expensive, and the initial investment may be higher than other materials.
Choosing between Dyneema and Kevlar depends on your specific sailing needs and priorities. Dyneema is favored for its strength, low stretch, and light weight, while Kevlar excels in abrasion resistance and tensile strength. Consider these factors when making your rigging material selection.
Stainless Steel Yacht Rigging
When it comes to yacht rigging, durability is paramount, and stainless steel rigging wires stand out as a top choice. Their robust nature, coupled with an unmistakable touch of elegance, makes them an ideal option for discerning sailors. Stainless steel yacht rigging is highly resistant to corrosion, even in the harsh marine environment. This resistance not only ensures a longer lifespan but also reduces maintenance efforts, allowing you to spend more time on the water. Additionally, the sleek appearance of stainless steel adds a touch of sophistication to your vessel. Whether you're cruising the open seas or participating in regattas, stainless steel yacht rigging combines style and substance to offer a premium sailing experience.
Spectra Standing Rigging
Spectra standing rigging is a game-changer for sailors seeking top-tier performance and durability. This advanced material, known for its incredible strength and low stretch properties, has revolutionized the way we approach standing rigging. Spectra rigging offers advantages that are hard to beat – it enhances the stability and safety of your vessel while providing exceptional responsiveness. The minimal stretch ensures precise sail control, making it the go-to choice for those who demand the utmost from their rigging. If you're looking to take your sailing experience to the next level, Spectra standing rigging is a choice that can't be ignored.
Read our top notch articles on topics such as sailing, sailing tips and destinations in our Magazine.
Rigging a Yacht: A Step-By-Step Guide
Now that you've grasped the basics and material options, let's dive into the practical aspect of rigging a yacht. Follow these steps to ensure a smooth and safe sailing experience.
Planning and Preparation
Rigging a yacht is a meticulous process that requires careful planning and thorough preparation. Before embarking on your sailing adventure, it's crucial to ensure that every aspect of your yacht's rigging is in top-notch condition. The advantages of this step-by-step guide are manifold. It guarantees the safety of both the vessel and its passengers, reduces the risk of mid-sail complications, and ultimately enhances your overall sailing experience. By meticulously inspecting your rigging and addressing any issues during the planning and preparation phase, you can set sail with confidence, knowing that your yacht is ready to navigate the open waters seamlessly.
Inspecting Your Rigging
Rigging a yacht is a meticulous process that demands careful attention to detail. One crucial aspect is inspecting your rigging. This step ensures the safety and efficiency of your sailing adventure. Regular inspections , even before you set sail, can identify potential issues and help prevent mishaps on the water . Inspecting your rigging is not only a safety measure but also a way to guarantee that your yacht performs at its best, allowing you to enjoy smooth and stress-free sailing experiences.
Rigging Replacement
When it comes to maintaining your yacht's rigging, the necessity of rigging replacement cannot be overstated. Whether due to wear and tear or a desire to upgrade to modern materials, knowing when and how to replace your rigging is crucial.
Specialized Rigs for Small Sailboats
For small sailboat enthusiasts , specialized rigs can enhance your sailing experience. Explore the options available for these nimble vessels.
Ship Rigging Terms
Sailboat rigging comes with its unique terminology. Get acquainted with the essential terms:
- Mast: The vertical spar or structure that supports sails and rigging.
- Boom: A horizontal spar that extends from the mast to support the bottom of a sail.
- Shroud: Rigging wires that support the mast from the sides.
- Stay: Rigging wires that support the mast from the front or back.
- Halyard: Lines used to raise and lower sails.
- Sheet: Lines used to control the angle of the sails with respect to the wind.
- Jib: A triangular foresail set in front of the mast.
- Tack: The lower forward corner of a sail.
- Clew: The lower after corner of a sail.
- Topping Lift: A line that supports the boom when the sail is not in use.
Understanding these ship rigging terms is essential for efficient and safe sailing, allowing you to communicate effectively with your crew and navigate the open waters with confidence.
Sailboat Stays and Shrouds
Sailboat rigging comprises various components, and among the most critical are sailboat stays and shrouds. Stays are the fixed support cables or wires that keep the mast upright, while shrouds add lateral support, preventing the mast from swaying. These components work together to maintain the mast's stability and ensure safe and efficient sailing. The proper tension and alignment of stays and shrouds are crucial for the overall performance and safety of a sailboat. Regular inspections and maintenance of these rigging elements are essential to prevent wear and tear, making sure they remain reliable on your sailing adventures. Understanding the role of sailboat stays and shrouds is fundamental for any sailor, whether you're navigating coastal waters or crossing the open sea.
In conclusion, boat rigging is a multifaceted subject that greatly influences your sailing experience. Understanding the fundamentals, material choices, and the process of rigging a yacht is essential for a successful voyage.
So what are you waiting for? Take a look at our range of charter boats and head to some of our favourite
sailing destinations .
- BOAT OF THE YEAR
- Newsletters
- Sailboat Reviews
- Boating Safety
- Sailing Totem
- Charter Resources
- Destinations
- Galley Recipes
- Living Aboard
- Sails and Rigging
- Maintenance
Understanding Running Rigging
- By Ralph Naranjo
- Updated: January 22, 2020

Regardless of whether you sail a modern, fractional-rigged sloop or a wishbone-rigged staysail schooner, it’s the running rigging that sets, trims, reefs and furls the sails. In the bad old days, decks were full of wobbly, sheaved high-friction blocks and essentially one kind of cordage. Today, running rigging has attained full-system status, with its primary goal being friction abatement.
Various types of synthetic- fiber cordage, with specific strength, stretch and creep characteristics, run through ultraslippery blocks and fairleads. Each line is aimed at the exact spot a team of ergonomics experts determined it should go. Even the halyard hardware that attaches the line to the head of a sail has been computer-modeled and scrutinized with finite element analysis. Soft shackles and strops, made from Dyneema fiber rope, are showing up in high-load locations. In short, we are in the midst of a running-rigging revolution, and much of the new stuff offers real value to the cruising sailor.
What’s My Line?
Just as pistons and cylinders play a primary role in a diesel auxiliary, rope and blocks are the guts of every sail-handling system. A few decades ago, Dacron (polyester cordage) ruled the roost. It remains a key player, but stronger, lighter, and less-stretchy options are gaining ground. Racers have embraced Dyneema, Vectran, Torlon, Zylon and a growing list of other odd-sounding esoteric fibers. The old enemy stretch has been tamed, but the big remaining question is whether a running-rigging makeover is worth the expense. It takes a little cost-benefit analysis to answer that question.
There’s consensus among sailors, riggers and yacht designers that there are cost-effective crossover points, where performance and value intersect. Take, for example, a mainsail halyard upgrade. Polyester has proved to be too stretchy, but PBO (Zylon) cored rope, sometimes called liquid crystal, is way too costly. But for cruisers, a midrange medium-tech upgrade makes a lot of sense. The line of choice is often a double braid with a high-modulus Dyneema core and a conventional polyester cover. This midrange combo results in a halyard with much lower stretch and good handling characteristics, plus it retains a chafe- and ultraviolet-resistant cover.
Going higher-tech in fiber selection for sheets on a cruising boat might not be as desirable. This is because a good-quality double-braid polyester remains a sensible solution, at least on cruising boats under 40 or so feet. Its stretchy nature might even add a little shock-absorber effect, lessening the fatigue cycle on mast, boom and line. However, higher-modulus (less-stretchy) line is a superior halyard material, and it also makes sense for use in running backstays, topping lifts, tack and head pennants, and boom-vang tackles.

When choosing the right high-modulus line, make sure it’s rated for tight turns around small-radius blocks and masthead sheaves. In the early days of synthetic fibers, many ultra-low-stretch lines stiffened with time, making line handling more like wrapping a tree branch around a winch drum. Today, Samson, Yale, New England Ropes and others have tamed this problem, and offer a wide range of products that meet the needs of cruisers and racers. Do some research, talk with a local rigger, and pick the right rope for your boat and your specific sailing requirements.
Around the Blocks
Every ball- and roller-bearing block spins like a roulette wheel when there’s no load on the sheave. But when you add hundreds, even thousands, of pounds of tension to a halyard or sheet, it’s only the better-built blocks that hold friction at bay. Usually these blocks have well-engineered frames and bearing races that resist deformation under heavy loads.
Ironically, cruisers don’t need the highest-tech line, but we certainly do benefit from the best-built blocks. These not only run smoothly under load, but they also continue to do so despite the test of time.
Over the years, as ingested salt spray is baked into grit by the unrelenting sun, bearing abrasion becomes a big problem. Keep in mind that if you can see the high-molecular-weight Delrin, Torlon or other plastic bearings, so can the sun, and this means that UV degradation will become an issue.
It’s also important to recognize that choosing the smallest, lightest block for a given line size makes little sense. A better approach is to pick a one-size-larger block that’s still appropriate for the given line diameter. It will deliver a higher safe working load, and therefore, the normal load will be a smaller percentage of the SWL. Such blocks will also have a larger bearing surface and will operate with less friction. Add to this the fact that lower loading also equates to longer hardware life, and you have another good reason to opt for a size uptick.
Power to the Winches
I think that the hand-crank winch is one of sailing’s most elegant inventions. And the good news is this piece of hardware continues to evolve. New designs come packed with better bearings, improved self-tailers and multiple gear ratios, making them even better muscle-power multipliers.

Modern winches are more ergonomic, and there’s even a model that lets you trim in and ease out via opposite rotations of the winch handle. The shorthanded cruiser has more trimming tools from which to choose—even a push-button electric winch that eliminates the old question: “Where’s the winch handle?”
However, when it comes to power winching, it’s important to rethink the way you handle a sheet or halyard. With the old hand-cranking approach, arm and shoulder strength provided both torque and feedback. Unfortunately, this feedback loop is absent when using an electric winch. As the tension increases, the button doesn’t get any harder to push. Therefore, we need to look more closely at the luff and head of the sail to make sure the halyard or sheet is not being overtensioned.
In the early days of power winches, I watched the crew of a 60-foot sloop set sail with the aid of electric winches. As the mainsail was being unfurled, the furling line hung up, causing the tension on the outhaul to reach full force in the matter of a second or two. A loud bang announced the separation of the clew from the mainsail. It was an attention-grabbing demonstration of the brute force delivered by a power winch—and a costly lesson in how high-modulus, low-stretch materials endure minimal elongation prior to failure. The takeaway from this episode was that careful attention must be paid to the line being tensioned and what’s happening to the sail. Beware of dodgers and Biminis that hide the sails from view and leave the person operating a power winch without any direct visual feedback.
Clutch Plays
Some see the self-tailing winch as the ultimate answer to handling a line under load. But there are other opinions that continue to hold sway. The oldest belongs to traditionalists who swear by horn cleats, just the way Nat Herreshoff intended. It’s a functional approach, especially if the deck is festooned with non-self-tailing winches that remain in good working order.
But we are in a rope-clutch revolution that’s realigned deck layouts and changed the approach to line handling. These lever-operated, clamplike devices allow one winch to cope with several lines, but not all at once. With badgerlike jaws, rope clutches lock lines in place, immobilizing the line under full load. Some clutches allow a sailor to release the fully tensioned line, but lines under load behave more sedately if, prior to releasing, they are wrapped on the winch and re-tensioned prior to releasing the clutch. The line is then eased from the winch drum.
There’s a fine art to making the right rope-clutch commitment. The “too much of a good thing” rule once again prevails, and surrounding a winch with four or five clutched lines can cause more problems than it solves. This is especially true if two or more heavily loaded lines are involved in the same sail-handling evolution. I’ve sailed on boats where a main halyard and mainsheet are clutched off at the same winch. The assumption is that once the sail is set, the halyard will remain locked in the clutch and the winch can be used to handle the sheet. All is copacetic up until it’s time to reef, and the mainsheet and halyard have to be handled with only one winch. Add darkness, a significant seaway and a crew just rousted from a deep sleep, and the value of an extra winch, rather than too many rope clutches, becomes very clear.
Furling systems are center stage aboard modern cruising sailboats. They make sail handling easier and safer because the majority of maneuvers can take place in the cockpit.
Headstay-mounted headsail furlers adorn almost every sailboat seen at in-water boat shows. They come in two distinct generic designs. Both types are comprised of a slotted alloy extrusion that fits over the headstay. A jib or genoa is initially hoisted via a rope halyard, then torque to wind in the sail is provided by a drum affixed to the bottom end of the foil. The difference between the two systems is that one relies on a mast-mounted sheave that leads a jib halyard to a sliding swivel that rides up and down the foil. The other system, usually found on smaller boats, has a sheave assembly affixed to the top foil section and the halyard(s) is not run to the mast. Owners with the latter system often continually fight the stretchiness of the small-diameter polyester line used for the halyard. Switching to a higher-modulus (less-stretchy) line lessens the stretch and is worth the investment.

Both systems rely on a spooled line to deliver the furling and reefing torque. This “in-haul” line endures years of UV and chafe damage, but at some point, failure becomes inevitable. It’s more likely to occur when the sail is reefed and the inhaul line is under significant load. For some reason, such failures seem to occur on a dark, rainy night at about 0300. And when a reefing line parts, the deeply reefed jib becomes a full genoa flogging like a flag in the breeze. Even worse, the line to haul it in is no longer usable. That’s why it makes sense to check for chafe and grow skeptical of a furling line that has been exposed to sunlight for more than a decade.
Endless or continuous line furlers are designed to tame large drifter/reachers and nylon asymmetric spinnakers. There are bottom-up and top-down versions, and each is designated by where the sail first begins to furl. Bottom-up furlers are used for light air, lightweight genoa-like sails (codes and reaching sails). Instead of furling with a fishing-reel-like drum arrangement, these endless line furlers rely on a continuous loop. Line tension turns into torque at the disk-shaped drum that holds only a partial turn of line. The twin leads of the elongated loop can be led aft to the cockpit via multiple sets of double blocks mounted on lifeline stanchions.
Asymmetric spinnakers utilize a top-down furling rotation that is telegraphed from the drum to the head of the sail using a torsion line. The splices on these endless-loop furling lines should be regularly checked, and so should the points where the torsion rope enters the hardware.
Cordage—like the hardware that leads and locks running rigging in place—has been vastly improved, and it makes sense for sailors to tap into what it has to offer. This can be done in a full-scale makeover or in a bit-at-a-time tuneup. With the latter, start with halyards, add some new blocks, and check or replace the mast sheaves. If winches and clutches are part of the redo, make sure the deck structure can handle the load, or have some extra reinforcement added.
Whatever the scale of the rigging refit, keep in mind that on a cruising boat, saving ounces isn’t the issue. Our goal is to add efficiency and reliability, and that involves picking hardware and cordage with the right specs, and using them in a layout that keeps the rigging running as friction-free as possible.
Technical expert Ralph Naranjo is a veteran circumnavigator and ocean racer, and author of The Art of Seamanship .
- More: hardware , How To , print 2020 winter , rigging
- More How To

How To Prioritize Your Sailboat’s Spring Checklist

How to Protect Your Spars from Corrosion

Sailing Totem Refit Series: The Forward Head Makeover

Fatty Goodlander: Dealing with Chafe While Cruising

TradeWinds Debuts 59-foot TWe6 Smart Electric Yacht

Good Bread for Good Health

Center of Effort
- Digital Edition
- Customer Service
- Privacy Policy
- Email Newsletters
- Cruising World
- Sailing World
- Salt Water Sportsman
- Sport Fishing
- Wakeboarding
Boat Rigging: Everything You Need to Know
What is a boat rigging?
Boat rigging is the arrangement of ropes , wires, and hardware on a boat that enables it to be controlled and maneuvered.
Table of Contents
How much is a boat rigging?
The price of boat rigging can vary depending on several factors, such as the size and type of boat, the complexity of the rigging system, and the materials used.
Typically, a basic rigging package for a sailboat of 20 feet can range from around $1,000 to $3,000. This may include essentials like shrouds, stays, halyards, and sheets.
What are the parts of a boat rigging?
- First, there are the control lines, which are used to control the sails , rudders, and other equipment on the boat.
These lines are typically made of strong, durable materials like nylon or polyester, and they are connected to winches or cleats to provide the necessary tension.
- Another important component of boat rigging is the standing rigging , which includes the mast, shrouds, and stays that support the mast and keep it stable.
These are typically made of stainless steel wire, and they are crucial for maintaining the integrity and stability of the mast.
- Lastly, there are the running rigging lines, which are used to control the sails.
These lines are attached to the sail and can be adjusted to change the shape and angle of the sail, allowing the boat to harness the wind and move forward.
What are the three types of rigging?
There are three main types of rigging that you may come across when it comes to boats: the Bermuda rig, the gaff rig, and the junk rig.
- The Bermuda rig is perhaps the most common and widely used rigging type.
It consists of a triangular mainsail and one or more headsails, also known as jibs or genoas. The Bermuda rig is known for its versatility and ability to sail close to the wind, making it ideal for racing and cruising boats.
- The gaff rig is a more traditional rigging style that features a four-sided mainsail with a gaff, and a horizontal spar, at the top.
The gaff rig is often found on classic and traditional sailing boats and is known for its aesthetic appeal and nostalgic charm.
- The junk rig is a unique rigging type that originated in Asia.
It features multiple sails mounted on a free-standing mast, with each sail able to be set or furled independently.
The junk rig is known for its simplicity and ease of handling, making it popular among cruisers and those looking for a more relaxed sailing experience.
- Line or Rope of Your Boats (explained)
- Single Handed vs Double Handed Sailing
- Sailboat Specifications 101: Explained For Beginners
- Running Rigging vs. Standing Rigging vs. Jury Rigging
What is included in standing rigging?
The primary component of standing rigging is the mast itself. This vertical structure serves as the backbone of the rigging system and supports the sails.
Attached to the mast are the shrouds and stays. Shrouds are the horizontal wires or ropes that extend from the mast to the sides of the boat.
They provide lateral support to the mast, preventing it from swaying or bending under the force of the wind.
Stays, on the other hand, are the vertical wires or ropes that connect the mast to the bow or stern of the boat.
They provide fore and aft support to the mast, preventing it from tilting forward or backward.
In addition to the mast, shrouds, and stays, standing rigging may also include other components such as turnbuckles, tangs, and chainplates.
Turnbuckles are used to adjust the tension in the rigging, ensuring that it remains taut and secure.
Tangs are metal fittings that attach the rigging wires to the mast or deck.
Chainplates are metal plates that are bolted to the boat’s structure and provide a strong anchor point for the rigging wires.
What is the life expectancy of standing rigging?
The life expectancy of standing rigging can vary depending on a few factors such as the type of wire used, the sailing conditions , and the level of maintenance.
Generally, experts recommend replacing standing rigging every 10-15 years or sooner if there are signs of wear or damage.
What is the difference between standing and running rigging?
- Standing rigging refers to the fixed, non-adjustable components that provide stability and support to the mast.
This includes the mast itself, as well as the shrouds and stays that connect the mast to the boat’s structure. Standing rigging is responsible for keeping the mast in place and preventing excessive movement or swaying.
- On the other hand, running rigging refers to the movable, adjustable components that control the sails and allow for sail shape adjustments.
This includes lines like halyards, sheets, and control lines that are used to hoist, trim, and adjust the sails.
Running rigging is what allows the sailor to control the position and movement of the sails to harness the wind and propel the boat forward.
- In simple terms, standing rigging keeps the mast upright and stable, while running rigging controls the position and shape of the sails.
What are the basic rigging tips?
To help you navigate the waters with confidence, here are some basic rigging tips:
1. Double-check your knots
Before setting sail, take a few extra moments to inspect your knots and ensure they are secure.
A loose or improperly tied knot can lead to disastrous consequences while out on the water.
2. Use the proper tension
Finding the right tension for your rigging lines is crucial for optimal performance.
Too much tension can cause unnecessary strain on your boat’s components, while too little tension can result in a sloppy and inefficient sail shape.
3. Regularly inspect your rigging
Make it a habit to inspect your rigging lines and hardware for any signs of wear or damage.
Look for fraying, rust, or weak spots and replace or repair as needed. Regular maintenance is key to a safe and successful boating experience.
4. Learn from others
Don’t be afraid to seek advice and guidance from experienced sailors or rigging professionals.
They can offer valuable tips and techniques that can improve your skills and ensure a safe rigging process.
5. Practice makes perfect
Rigging is a skill that takes time and practice to master.
Take the opportunity to practice different techniques and experiment with adjustments to find what works best for you and your boat.
Common Boat Rigging Problems and Solutions
Line chafing.
Over time, the friction from rubbing against surfaces can wear down your rigging lines, leading to weak spots or even breaks.
To prevent this, regularly inspect your lines and invest in chafe guards or tape to protect them from rubbing against sharp edges.
Tangled or twisted lines
It can be frustrating when you’re trying to quickly adjust your sails or control lines, only to find them tangled up.
To avoid this, practice proper line management and coiling techniques. Take the time to neatly coil your lines when not in use and avoid leaving them in a messy heap.
Improper tension
Proper tension is essential for optimal performance.
Too much tension can put excessive strain on your rigging and cause damage, while too little tension can result in sloppy sail shape.
Take the time to properly tension your lines according to the manufacturer’s recommendations and make adjustments as needed.
Corrosion and rust
Standing rigging, especially in saltwater environments, is prone to corrosion and rust .
Regularly inspect your rigging for any signs of rust or corrosion and replace any damaged components promptly.
Applying a protective coating or lubricant can also help prevent future corrosion.
- Remember, regular inspections, proper tensioning, and maintenance are key to keeping your rigging in top shape.
No products in the cart.
Sailing Ellidah is supported by our readers. Buying through our links may earn us an affiliate commission at no extra cost to you.
The Running Rigging On A Sailboat Explained
The running rigging on a sailboat consists of all the lines used to hoist, lower, and control the sails and sailing equipment. These lines usually have different colors and patterns to easily identify their function and location on the vessel.
Looking at the spaghetti of lines with different colors and patterns might get your head spinning. But don’t worry, it is actually pretty simple. Each line on a sailboat has a function, and you’ll often find labels describing them in the cockpit and on the mast.
In this guide, I’ll walk you through the functions of every component of the running rigging. We’ll also look at the hardware we use to operate it and get up to speed on some of the terminology.
The difference between standing rigging and running rigging
Sometimes things can get confusing as some of our nautical terms are used for multiple items depending on the context. Let me clarify just briefly:
The rig or rigging on a sailboat is a common term for two parts, the standing , and the running rigging.
- The standing rigging consists of wires supporting the mast on a sailboat and reinforcing the spars from the force of the sails when sailing. Check out my guide on standing rigging here!
- The running rigging consists of the halyards, sheets, and lines we use to hoist, lower, operate and control the sails on a sailboat which we will explore in this guide.
The components of the running rigging
Knowing the running rigging is an essential part of sailing, whether you are sailing a cruising boat or crewing on a large yacht. Different types of sailing vessels have different amounts of running rigging.
For example, a sloop rig has fewer lines than a ketch, which has multiple masts and requires a separate halyard, outhaul, and sheet for its mizzen sail. Similarly, a cutter rig needs another halyard and extra sheets for its additional headsail.
You can dive deeper and read more about Sloop rigs, Ketch Rigs, Cutter rigs, and many others here .
Take a look at this sailboat rigging diagram:
Lines are a type of rope with a smooth surface that works well on winches found on sailboats. They come in various styles and sizes and have different stretch capabilities.
Dyneema and other synthetic fibers have ultra-high tensile strength and low stretch. These high-performance lines last a long time, and I highly recommend them as a cruiser using them for my halyards.
A halyard is a line used to raise and lower the sail. It runs from the head of the sail to the masthead through a block and continues down to the deck. Running the halyard back to the cockpit is common, but many prefer to leave it on the mast.
Fun fact: Old traditional sailboats sometimes used a stainless steel wire attached to the head of the sail instead of a line!
Jib, Genoa, and Staysail Halyards
The halyard for the headsail is run through a block in front of the masthead. If your boat has a staysail, it needs a separate halyard. These lines are primarily untouched on vessels with a furling system except when you pack the sail away or back up. Commonly referred to as the jib halyard.
Spinnaker Halyard
A spinnaker halyard is basically the same as the main halyard but used to hoist and lower the spinnaker, gennaker, or parasailor.
The spinnaker halyard is also excellent for climbing up the front of the mast, hoisting the dinghy on deck, lifting the outboard, and many other things.
A sheet is a line you use to control and trim a sail to the angle of the wind . The mainsheet controls the angle of the mainsail and is attached between the boom and the mainsheet traveler . The two headsail sheets are connected to the sail’s clew (lower aft corner) and run back to each side of the cockpit.
These are control lines used to adjust the angle and tension of the sail. It is also the line used to unfurl a headsail on a furling system. Depending on what sail you are referring to, this can be the Genoa sheet , the Jib sheet , the Gennaker sheet , etc.
The outhaul is a line attached to the clew of the mainsail and used to adjust the foot tension. It works runs from the mainsail clew to the end of the boom and back to the mast. In many cases, back to the cockpit. On a boat with in-mast furling , this is the line you use to pull the sail out of the mast.
Topping lift
The topping lift is a line attached to the boom’s end and runs through the masthead and down to the deck or cockpit. It lifts and holds the boom and functions well as a spare main halyard. Some types of sailboat rigging don’t use a topping lift for their boom but a boom vang instead. Others have both!
Topping lifts can also be used to lift other spars.
A downhaul is a line used to lower with and typically used to haul the mainsail down when reefing and lowering the spinnaker and whisker poles. The downhaul can also control the tack of an asymmetrical spinnaker, gennaker, or parasailor.
Tweaker and Barber Haul
A tweaker is a line, often elastic, attached to the sheet of a headsail and used to fine-tune the tension on the sheet.
Barber haul
A barber haul is a line attached to a headsail’s sheet to adjust the sheeting angle to the wind. It is often used to pull the clew further toward the center or outboard than the cars allow.
Boom Preventer
A boom preventer is a line attached to the boom’s end when sailing off the wind. Its function is to hold the spar in place and prevent it from swinging wildly.
If the boat were to get an accidental gybe, it could cause serious damage to the rigging or even harm people on board. It is important for the rigger to be cautious when setting up the boom preventer.
Running Backstay
Running backstays is similar to a normal backstay but uses a line instead of a hydraulic tensioner. Some rigs have additional check stays or runners as well.
Bonus tip: Reefing
The term reefing is used when reducing the effective sailing area exposed to the wind of a given sail. Headsails are usually reefed by partially furling them in, and they often have marks for what we refer to as 1st, 2nd, and 3rd reefs.
The mainsail is reefed similarly with an in-mast furling or in-boom furling system.
On a traditional mast, we use a system called slab reefing. The system has reefing lines running through the boom to reinforced points on the luff and leech, allowing you to pull the sail down to the boom and effectively reduce the sail area.
Having at least two reefing points in the mainsail is normal, but most cruising sailboats have 3. The 3rd is used for the heaviest conditions, giving you only a tiny bit of sail area exposed to the wind.
You want to reef your sails before the wind increases to a point where your boat gets overpowered.
It is essential to practice your reefing technique . You will find yourself in situations with rapidly increasing winds where you need to reduce your sails quickly.
Rule of thumb: If you think setting a reef might be a good idea, do it.
Shaking a reef is the term used when we sail with a reefed sail and want to increase the sail area back to full.
Hardware used for sail handling and the running rigging
Furling system.
Most sailboats have their headsail on a furling system. A furling system is a tube that runs along the forestay from the bottom furler drum to the masthead swivel.
This system allows you to roll the headsail around the forestay, making furling the sail in and out accessible. It is also convenient when reefing the sail when the wind picks up, as you can easily do this from the safety of the cockpit. These furling systems come in manual versions and electric versions.
In-mast furling
In-mast furling is a system that rolls the mainsail in and out of the mast. To unfurl the mainsail, we use the outhaul .
In-boom furling
In-boom furling is a system that rolls the mainsail in and out of the boom. This system has been costly and has mostly been seen on big yachts earlier. They are becoming more affordable and common on smaller boats, though. To unfurl this setup, we use the main halyard.
A Stack pack is also called a Lazy Bag or Lazy Pack. It is a bag with a zip attached to the boom where the mainsail is stored when unused. It protects the mainsail from UV rays from the sun and weather elements. It is a very nice and tidy way to store the mainsail and reefing lines if you don’t have in-mast or in-boom furling.
Lazy Jacks is a system of lines running from the stack pack to the mast. The Lazy Jacks guide the mainsail up and down from the Stack Pack and prevent it from falling down on the deck. It is also possible to rig Lazy Jacks without a Stack Pack.
A block is a pulley with a sheave wheel. Blocks are used to change the direction of a pull on a line or rope and give a mechanical advantage. They have many uses, especially onboard sailboats.
A winch is a metal drum that gives you a mechanical advantage to control and tighten lines. These can be operated by turning a rope around it and pulling manually or by a winch handle to get more force. Most modern winches are self-tailing, which means they lock the line on so you can winch the line without holding on to it. Some boats even have electrical winches operated by a button.
Mainsheet Traveler
The mainsheet traveler is a horizontal track that the mainsheet is attached to through a series of blocks. The traveler enables you to adjust and lock the boom at an angle and also plays a critical part in trimming the mainsail.
Most cruising sailboats have their traveler attached to the top of the coachroof in front of the spray hood. A racing boat typically has the traveler in the cockpit near the helm to give the helmsman better control over the mainsheet.
The cars are basically a pulley or block attached to a track on the port and starboard deck that your headsail sheets run through. Cars are used to control the angle of the sheet between the clew and the deck. The cars are handy when you trim the sail to set the right balance of tension between the foot and leech, depending on your point of sail.
The jammer is used to lock a line in place. Most sailboats use these for locking the halyards, mainsheet, outhaul, reef lines, traveler lines, boom vang lines, etc. You can pull or winch a line through a closed jammer, but it won’t run away if you let go of it unless you open the lock.
As I explained earlier, it is normal to have most or all of the lines led back to the cockpit, and they are usually run through a series of jammers.
The jammers are often labeled with the name of the line it locks, which makes it easier to remember which line goes where.
Spinnaker Pole
A spinnaker pole is a spar used to wing out a headsail when sailing off the wind, particularly the spinnaker. The spinnaker pole should have the same length as the distance between the mast and the forestay measured along the deck. We use a fore and aft guy and the pole’s topping lift to rig a pole correctly.
The rigging varies depending on the layout of the boat, but it usually looks like this:
- One line runs from the bow to the end of the pole.
- An aft line runs from near the stern to the end of the pole.
- A topping lift is used to raise and lower the pole.
Whisker Pole
A whisker pole is similar to the spinnaker pole and is rigged similarly. It is typically built lighter and attached to a track on the mast. These can be found in fixed lengths or adjustable lengths. Ideally, the length should be the same as the foot of the headsail you intend to pole out.
Boom Vang/Rod Kicker
The Boom Vang has a few different names. Rod-kicker, kicking strap, or kicker. It is used to tension the boom downwards. When you are sailing downwind and have the boom far out, the mainsheet won’t pull the boom down as much as inboard, and you can then use the vang to adjust the twist and shape of the mainsail.
Mooring line
A mooring line is a traditional rope lead through a fairlead to the vessel’s cleat and a mooring buoy, key, or pontoon.
Final words
Congratulations! By now, you should have a much better understanding of how the running rig on a sailboat functions. We’ve covered the different lines, their purpose, and the hardware used to operate them. I hope you’ve enjoyed this guide and learned something new.
Now it’s time to take what you’ve learned and put it into practice by getting out on the water, setting sail, and getting hands-on experience with the lines.
Or you can continue to my following guide and learn more about the different types of sails .
Sharing is caring!
Skipper, Electrician and ROV Pilot
Robin is the founder and owner of Sailing Ellidah and has been living on his sailboat since 2019. He is currently on a journey to sail around the world and is passionate about writing his story and helpful content to inspire others who share his interest in sailing.
Leave a Reply Cancel reply
Your email address will not be published. Required fields are marked *
How to tune your rig for optimal performance
Optimizing the performance of your boat's rigging system is crucial for an enjoyable and safe sailing experience. This guide provides step-by-step instructions for tuning your rig and maintaining your sails.
How to Tune Your Rig for Optimal Performance
Sailing is an art that requires constant learning and adaptation. One of the most important aspects of sailing is ensuring that your boat’s rigging and sails are in top condition. In this article, we will discuss how to tune your rig for optimal performance, ensuring that you and your family can enjoy smooth sailing on your adventures.
Table of Contents
Understanding the basics of rigging, the importance of rig tuning, step-by-step guide to rig tuning, sail improvements for better performance, maintaining your rig and sails.
Before we dive into the process of rig tuning, it’s essential to understand the basics of rigging. The rigging system on a sailboat consists of various components, including the mast, boom, shrouds, stays, and sails. These components work together to provide stability, support, and propulsion for your boat.
Mast and Boom
The mast is the vertical pole that supports the sails, while the boom is the horizontal pole attached to the mast’s base. The mast and boom are critical components of your rigging system, as they provide the framework for your sails.
Shrouds and Stays
Shrouds and stays are the wires or ropes that connect the mast to the boat’s hull. They provide lateral and fore-and-aft support for the mast, ensuring that it remains stable and upright. Shrouds are typically attached to the sides of the boat, while stays are connected to the bow and stern.
Sails are the primary means of propulsion for a sailboat. They work by capturing the wind’s energy and converting it into forward motion. There are various types of sails, including mainsails, jibs, and spinnakers, each with its own unique characteristics and uses.
Rig tuning is the process of adjusting your boat’s rigging system to achieve optimal performance. Proper rig tuning can significantly impact your boat’s speed, handling, and overall sailing experience. Some of the benefits of rig tuning include:
- Improved boat speed and pointing ability
- Enhanced sail shape and efficiency
- Reduced wear and tear on rigging components
- Increased safety and stability
By regularly tuning your rig, you can ensure that your boat is always performing at its best, allowing you and your family to enjoy your sailing adventures to the fullest.
Rig tuning can be a complex process, but with the right knowledge and tools, it’s something that any sailor can learn to do. Here’s a step-by-step guide to help you tune your rig for optimal performance:
Step 1: Inspect Your Rigging
Before making any adjustments, it’s essential to inspect your rigging for signs of wear, damage, or corrosion. Check all components, including the mast, boom, shrouds, stays, and sails, for any issues that may affect your boat’s performance.
Step 2: Set Your Mast Rake
Mast rake refers to the angle of the mast relative to the boat’s centerline. Adjusting the mast rake can have a significant impact on your boat’s balance and performance. To set your mast rake, follow these steps:
- Attach a weight to your main halyard and let it hang freely over the side of the boat.
- Measure the distance from the halyard to the boat’s centerline at the chainplates.
- Adjust the forestay and backstay until the desired rake is achieved.
Step 3: Adjust Your Shrouds and Stays
Next, you’ll need to adjust your shrouds and stays to ensure proper mast alignment and tension. Follow these steps:
- Loosen all shrouds and stays.
- Tighten the upper shrouds until the mast is straight from side to side.
- Tighten the lower shrouds to remove any side-to-side play in the mast.
- Adjust the forestay and backstay to achieve the desired mast bend.
Step 4: Check Your Rig Tension
Proper rig tension is crucial for maintaining sail shape and boat performance. To check your rig tension, follow these steps:
- Attach a tension gauge to your shrouds and stays.
- Measure the tension in each wire, adjusting as necessary to achieve the desired tension.
- Ensure that the tension is even on both sides of the boat.
Step 5: Fine-Tune Your Rig
Once your rig is properly tensioned and aligned, you can make any final adjustments to optimize performance. This may include adjusting your sail controls, such as the outhaul, cunningham, and vang, to fine-tune sail shape and efficiency.
In addition to rig tuning, there are several sail improvements that you can make to enhance your boat’s performance. Some of these improvements include:
- Upgrading to high-quality sails made from durable, lightweight materials
- Regularly cleaning and inspecting your sails for signs of wear or damage
- Using sail battens to improve sail shape and efficiency
- Installing a roller furling system for easier sail handling and storage
By investing in these sail improvements, you can ensure that your boat is always performing at its best, allowing you to enjoy your sailing adventures to the fullest.
Regular maintenance is essential for keeping your rig and sails in top condition. Some maintenance tasks to consider include:
- Inspecting your rigging for signs of wear, damage, or corrosion
- Lubricating moving parts, such as sheaves and blocks, to reduce friction and wear
- Replacing worn or damaged components, such as shrouds, stays, and sails
- Regularly cleaning your sails to remove dirt, salt, and other contaminants
By staying on top of these maintenance tasks, you can prolong the life of your rig and sails, ensuring that your boat is always ready for your next adventure.
Tuning your rig for optimal performance is an essential skill for any sailor. By following the steps outlined in this article, you can ensure that your boat is always performing at its best, allowing you and your family to enjoy your sailing adventures to the fullest. Remember to regularly inspect and maintain your rig and sails, and don’t be afraid to make improvements and adjustments as needed. With the right knowledge and tools, you can transform your boat into a high-performance sailing machine that’s ready to take on the open sea.
Guide to Understanding Sail Rig Types (with Pictures)
There are a lot of different sail rig types and it can be difficult to remember what's what. So I've come up with a system. Let me explain it in this article.
What are the different types of sail rig? The sail rig is determined by the number of masts and the layout and shape of sails. Most modern ships are fore-and-aft rigged, while old ships are square-rigged. Rigs with one mast are sloops and cutters. Ketches, yawls, brigs, and schooners have two masts. Barques have three masts. Rigs can contain up to seven masts.
'Yeah, that's a gaff brig, and that a Bermuda cutter' - If you don't know what this means (neither did I) and want to know what to call a two-masted ship with a square-rigged mainsail, this article is definitely for you.

On this page:
More info on sail rig types, mast configurations and rig types, rigs with one mast, rigs with two masts, rigs with three masts, related questions.
This article is part 2 of my series on sails and rig types. Part 1 is all about the different types of sails. If you want to know everything there is to know about sails once and for all, I really recommend you read it. It gives a good overview of sail types and is easy to understand.

The Ultimate Guide to Sail Types and Rigs (with Pictures)
First of all, what is a sail rig? A sail rig is the way in which the sails are attached to the mast(s). In other words, it's the setup or configuration of the sailboat. The rig consists of the sail and mast hardware. The sail rig and sail type are both part of the sail plan. We usually use the sail rig type to refer to the type of boat.
Let's start by taking a look at the most commonly used modern sail rigs. Don't worry if you don't exactly understand what's going on. At the end of this article, you'll understand everything about rig types.

The sail rig and sail plan are often used interchangeably. When we talk of the sail rig we usually mean the sail plan . Although they are not quite the same. A sail plan is the set of drawings by the naval architect that shows the different combinations of sails and how they are set up for different weather conditions. For example a light air sail plan, storm sail plan, and the working sail plan (which is used most of the time).
So let's take a look at the three things that make up the sail plan.
The 3 things that make up the sail plan
I want to do a quick recap of my previous article. A sail plan is made up of:
- Mast configuration - refers to the number of masts and where they are placed
- Sail type - refers to the sail shape and functionality
- Rig type - refers to the way these sails are set up on your boat
I'll explore the most common rig types in detail later in this post. I've also added pictures to learn to recognize them more easily. ( Click here to skip to the section with pictures ).
How to recognize the sail plan?
So how do you know what kind of boat you're dealing with? If you want to determine what the rig type of a boat is, you need to look at these three things:
- Check the number of masts, and how they are set up.
- You look at the type of sails used (the shape of the sails, how many there are, and what functionality they have).
- And you have to determine the rig type, which means the way the sails are set up.
Below I'll explain each of these factors in more detail.
The most common rig types on sailboats
To give you an idea of the most-used sail rigs, I'll quickly summarize some sail plans below and mention the three things that make up their sail plan.
- Bermuda sloop - one mast, one mainsail, one headsail, fore-and-aft rigged
- Gaff cutter - one mast, one mainsail, two staysails, fore-and-aft rigged
- Gaff schooner - two-masted (foremast), two mainsails, staysails, fore-and-aft rigged
- Gaff ketch - two-masted (mizzen), two mainsails, staysails, fore-and-aft rigged
- Full-rigged ship or tall ship - three or more masts, mainsail on each mast, staysails, square-rigged
The first word is the shape and rigging of the mainsail. So this is the way the sail is attached to the mast. I'll go into this later on. The second word refers to the mast setup and amount of sails used.
Most sailboats are Bermuda sloops. Gaff-rigged sails are mostly found on older, classic boats. Square-rigged sails are generally not used anymore.
But first I want to discuss the three factors that make up the sail plan in more detail.
Ways to rig sails
There are basically two ways to rig sails:
- From side to side, called Square-rigged sails - the classic pirate sails
- From front to back, called Fore-and-aft rigged sails - the modern sail rig
Almost all boats are fore-and-aft rigged nowadays.
Square sails are good for running downwind, but they're pretty useless when you're on an upwind tack. These sails were used on Viking longships, for example. Their boats were quicker downwind than the boats with fore-and-aft rigged sails, but they didn't handle as well.
The Arabs first used fore-and-aft rigged sails, making them quicker in difficult wind conditions.
Quick recap from part 1: the reason most boats are fore-and-aft rigged today is the increased maneuverability of this configuration. A square-rigged ship is only good for downwind runs, but a fore-and-aft rigged ship can sail close to the wind, using the lift to move forward.
The way the sails are attached to the mast determines the shape of the sail. The square-rigged sails are always attached the same way to the mast. The fore-and-aft rig, however, has a lot of variations.
The three main sail rigs are:
- Bermuda rig - most used - has a three-sided (triangular) mainsail
- Gaff rig - has a four-sided mainsail, the head of the mainsail is guided by a gaff
- Lateen rig - has a three-sided (triangular) mainsail on a long yard
The Bermuda is the most used, the gaff is a bit old-fashioned, and the lateen rig is outdated (about a thousand years). Lateen rigs were used by the Moors. The Bermuda rig is actually based on the Lateen rig (the Dutch got inspired by the Moors).

Other rig types that are not very common anymore are:
- Junk rig - has horizontal battens to control the sail
- Settee rig - Lateen with the front corner cut off
- Crabclaw rig
Mast configuration
Okay, we know the shape of the mainsail. Now it's time to take a look at the mast configuration. The first thing is the number of masts:
- one-masted boats
- two-masted boats
- three-masted boats
- four masts or up
- full or ship-rigged boats - also called 'ships' or 'tall ships'
I've briefly mentioned the one and two mast configurations in part 1 of this article. In this part, I'll also go over the three-masted configurations, and the tall ships as well.
A boat with one mast has a straightforward configuration because there's just one mast. You can choose to carry more sails or less, but that's about it.
A boat with two masts or more gets interesting. When you add a mast, it means you have to decide where to put the extra mast: in front, or in back of the mainmast. You can also choose whether or not the extra mast will carry an extra mainsail. The placement and size of the extra mast are important in determining what kind of boat we're dealing with. So you start by locating the largest mast, which is always the mainmast.
From front to back: the first mast is called the foremast. The middle mast is called the mainmast. And the rear mast is called the mizzenmast.

What is the mizzenmast? The mizzenmast is the aft-most (rear) mast on a sailboat with three or more masts or the mast behind the mainmast on a boat with two masts. The mizzenmast carries the mizzen sail. On a two-masted boat, the mizzenmast is always (slightly) smaller than the mainmast. What is the purpose of the mizzen sail? The mizzen sail provides more sail area and flexibility in sail plan. It can be used as a big wind rudder, helping the sailor to have more control over the stern of the ship. It pushes the stern away from the wind and forces the bow in the opposite way. This may help to bring the bow into the wind when at anchor.
I always look at the number of masts first, because this is the easiest to spot. So to make this stuff more easy to understand, I've divided up the rig types based on the number of masts below.
Why would you want more masts and sail anyways?
Good question. The biggest advantage of two masts compared to one (let's say a ketch compared to a sloop), is that it allows you to use multiple smaller sails to get the same sail area. It also allows for shorter masts.
This means you reduce the stress on the rigging and the masts, which makes the ketch rig safer and less prone to wear and tear. It also doesn't capsize as quickly. So there are a couple of real advantages of a ketch rig over a sloop rig.
In the case of one mast, we look at the number of sails it carries.
Boats with one mast can have either one sail, two sails, or three or more sails.
Most single-masted boats are sloops, which means one mast with two sails (mainsail + headsail). The extra sail increases maneuverability. The mainsail gives you control over the stern, while the headsail gives you control over the bow.
Sailor tip: you steer a boat using its sails, not using its rudder.
The one-masted rigs are:
- Cat - one mast, one sail
- Sloop - one mast, two sails
- Cutter - one mast, three or more sails

The cat is the simplest sail plan and has one mast with one sail. It's easy to handle alone, so it's very popular as a fishing boat. Most (very) small sailboats are catboats, like the Sunfish, and many Laser varieties. But it has a limited sail area and doesn't give you the control and options you have with more sails.
The most common sail plan is the sloop. It has one mast and two sails: the main and headsail. Most sloops have a Bermuda mainsail. It's one of the best racing rigs because it's able to sail very close to the wind (also called 'weatherly'). It's one of the fastest rig types for upwind sailing.
It's a simple sail plan that allows for high performance, and you can sail it short-handed. That's why most sailboats you see today are (Bermuda) sloops.
This rig is also called the Marconi rig, and it was developed by a Dutch Bermudian (or a Bermudian Dutchman) - someone from Holland who lived on Bermuda.
A cutter has three or more sails. Usually, the sail plan looks a lot like the sloop, but it has three headsails instead of one. Naval cutters can carry up to 6 sails.
Cutters have larger sail area, so they are better in light air. The partition of the sail area into more smaller sails give you more control in heavier winds as well. Cutters are considered better for bluewater sailing than sloops (although sloops will do fine also). But the additional sails just give you a bit more to play with.
Two-masted boats can have an extra mast in front or behind the mainmast. If the extra mast is behind (aft of) the mainmast, it's called a mizzenmast . If it's in front of the mainmast, it's called a foremast .
If you look at a boat with two masts and it has a foremast, it's most likely either a schooner or a brig. It's easy to recognize a foremast: the foremast is smaller than the aft mast.
If the aft mast is smaller than the front mast, it is a sail plan with a mizzenmast. That means the extra mast has been placed at the back of the boat. In this case, the front mast isn't the foremast, but the mainmast. Boats with two masts that have a mizzenmast are most likely a yawl or ketch.
The two-masted rigs are:
- Lugger - two masts (mizzen), with lugsail (a cross between gaff rig and lateen rig) on both masts
- Yawl - two masts (mizzen), fore-and-aft rigged on both masts. Main mast is much taller than mizzen. Mizzen without a mainsail.
- Ketch - two masts (mizzen), fore-and-aft rigged on both masts. Main mast with only slightly smaller mizzen. Mizzen has mainsail.
- Schooner - two masts (foremast), generally gaff rig on both masts. Main mast with only slightly smaller foremast. Sometimes build with three masts, up to seven in the age of sail.
- Bilander - two masts (foremast). Has a lateen-rigged mainsail and square-rigged sails on the foremast and topsails.
- Brig - two masts (foremast), partially square-rigged. The main mast carries small lateen-rigged sail.

The yawl has two masts that are fore-and-aft rigged and a mizzenmast. The mizzenmast is much shorter than the mainmast, and it doesn't carry a mainsail. The mizzenmast is located aft of the rudder and is mainly used to increase helm balance.
A ketch has two masts that are fore-and-aft rigged. The extra mast is a mizzenmast. It's nearly as tall as the mainmast and carries a mainsail. Usually, the mainsails of the ketch are gaff-rigged, but there are Bermuda-rigged ketches too. The mizzenmast is located in front of the rudder instead of aft, as on the yawl.
The function of the ketch's mizzen sail is different from that of the yawl. It's actually used to drive the boat forward, and the mizzen sail, together with the headsail, are sufficient to sail the ketch. The mizzen sail on a yawl can't really drive the boat forward.
Schooners have two masts that are fore-and-aft rigged. The extra mast is a foremast which is generally smaller than the mainmast, but it does carry a mainsail. Schooners are also built with a lot more masts, up to seven (not anymore). The schooner's mainsails are generally gaff-rigged.
The schooner is easy to sail but not very fast. It handles easier than a sloop, except for upwind, and it's only because of better technology that sloops are now more popular than the schooner.
The brig has two masts. The foremast is always square-rigged. The mainmast can be square-rigged or is partially square-rigged. Some brigs carry a lateen mainsail on the mainmast, with square-rigged topsails.
Some variations on the brig are:
Brigantine - two masts (foremast), partially square-rigged. Mainmast carries no square-rigged mainsail.
Hermaphrodite brig - also called half brig or schooner brig. Has two masts (foremast), partially square-rigged. Mainmast carries a gaff rig mainsail and topsail, making it half schooner.
Three-masted boats are mostly barques or schooners. Sometimes sail plans with two masts are used with more masts.
The three-masted rigs are:
- Barque - three masts, fore, and mainmast are square-rigged, the mizzenmast is usually gaff-rigged. All masts carry mainsail.
- Barquentine - three masts, foremast is square-rigged, the main and mizzenmast are fore-and-aft rigged. Also called the schooner barque.
- Polacca - three masts, foremast is square-rigged, the main and mizzenmast are lateen-rigged.
- Xebec - three masts, all masts are lateen-rigged.

A barque has three or four masts. The fore and mainmast are square-rigged, and the mizzen fore-and-aft, usually gaff-rigged. Carries a mainsail on each mast, but the mainsail shape differs per mast (square or gaff). Barques were built with up to five masts. Four-masted barques were quite common.
Barques were a good alternative to full-rigged ships because they require a lot fewer sailors. But they were also slower. Very popular rig for ocean crossings, so a great rig for merchants who travel long distances and don't want 30 - 50 sailors to run their ship.
Barquentine
The barquentine usually has three masts. The foremast is square-rigged and the main and mizzenmast fore-and-aft. The rear masts are usually gaff-rigged.
Faster than a barque or a schooner, but the performance is worse than both.
The polacca or polacre rig has three masts with a square-rigged foremast. The main and mizzenmast are lateen-rigged. Beautiful boat to see. Polacca literally means 'Polish' (it's Italian). It was a popular rig type in the Mediterranean in the 17th century. It looks like the xebec, which has three lateen-rigged masts.
Fun fact: polaccas were used by a Dutch sailor-turned-Turkish-pirate (called Murat Reis).
The xebec is a Mediterranean trading ship with three masts. All masts are lateen-rigged. I couldn't find any surviving xebecs, only models and paintings. So I guess this rig is outdated a long time.
A boat with three or more masts that all carry square-rigged sails is called a ship, a tall ship, or a full-rigged ship. So it's at this point that we start calling boats 'ships'. It has nothing to do with size but with the type of rigging.
More sails mean less stress on all of them. These ships use a lot of sails to distribute the forces, which reduces the stress on the rigging and the masts. Square sails mean double the sail area in comparison to triangular sails.
They are quite fast for their size, and they could outrun most sloops and schooners (schooners were relatively a lot heavier). The reason is that tall ships could be a lot longer than sloops, giving them a lot of extra hull speed. Sloops couldn't be as large because there weren't strong enough materials available. Try making a single triangular sail with a sail area of over 500 sq. ft. from linen.
So a lot of smaller sails made sense. You could have a large ship with a good maximum hull speed, without your sails ripping apart with every gust of wind.
But you need A LOT of sailors to sail a tall ship: about 30 sailors in total to ie. reef down sails and operate the ship. That's really a lot.
Tall ships are used nowadays for racing, with the popular tall ship races traveling the world. Every four years I go and check them out when they are at Harlingen (which is very close to where I live).
Check out the amazing ships in this video of the tall ship races last year near my hometown. (The event was organized by friends of mine).
What is the difference between a schooner and a sloop? A schooner has two masts, whereas the sloop only has one. The schooner carries more sails, with a mainsail on both masts. Also, sloops are usually Bermuda-rigged, whereas schooners are usually gaff-rigged. Most schooners also carry one or two additional headsails, in contrast to the single jib of the sloop.
What do you call a two-masted sailboat? A two-masted sailboat is most likely a yawl, ketch, schooner, or brig. To determine which one it is you have to locate the mainmast (the tallest). At the rear: schooner or brig. In front: yawl or ketch. Brigs have a square-rigged foremast, schooners don't. Ketches carry a mainsail on the rear mast; yawls don't.
What is a sloop rig? A sloop rig is a sailboat with one mast and two sails: a mainsail and headsail. It's a simple sail plan that handles well and offers good upwind performance. The sloop rig can be sailed shorthanded and is able to sail very close to the wind, making it very popular. Most recreational sailboats use a sloop rig.
What is the difference between a ketch and a yawl? The most important difference between a ketch and a yawl are the position and height of the mizzenmast. The mizzenmast on a yawl is located aft of the rudder, is shorter than the mainmast and doesn't carry a mainsail. On a ketch, it's nearly as long as the mainmast and carries a mainsail.

There are a wonderful lots of DIY changeability shows on the cable airwaves these days.
Rick the rigger
There are SO many errors on this site it really should be taken down.
First major mistake is to say you are no longer afraid of the sea.
One that truly gets up my nose is the term ‘fully’ rigged ship. It’s a FULL rigged ship!! Your mast names are the wrong way round and just because there may be 3 it doesn’t automatically mean the one in the middle is the main.
I could go on and totally destroy your over inflated but fragile ego but I won’t. All I will say is go learn a lot more before posting.
Shawn Buckles
Thanks for your feedback. If you like to point out anything more specific, please let me know and I will update the articles. I’ve changed fully-rigged to full-rigged ship - which is a typo on my part. I try to be as concise as I can, but, obviously, we all make mistakes every now and then. The great thing about the internet is that we can learn from each other and update our knowledge together.
If you want to write yourself and share your knowledge, please consider applying as a writer for my blog by clicking on the top banner.
Thanks, Shawn
Well, I feel that I’ve learned a bit from this. The information is clear and well laid out. Is it accurate? I can’t see anything at odds with the little I knew before, except that I understood a xebec has a square rigged centre mainmast, such as the Pelican ( https://www.adventureundersail.com/ )
Hi, Shawn, You forgot (failed) to mention another type of rig? The oldest type of rig known and still functions today JUNK RIG!
Why are so many of the comments here negative. I think it is wonderful to share knowledge and learn together. I knew a little about the subject (I’m an Aubrey-Maturin fan!) but still found this clarified some things for me. I can’t comment therefore on the accuracy of the article, but it seems clear to me that the spirit of the author is positive. We owe you some more bonhomme I suggest Shawn.
As they say in the Navy: “BZ” - for a good article.
Been reading S.M. Stirling and wanted to understand the ship types he references. Thank you, very helpful.
This site is an awesome starting point for anyone who would like to get an overview of the subject. I am gratefull to Shawn for sharing - Thanks & Kudos to you! If the negative reviewers want to get a deeper technical knowledge that is accurate to the n-th then go study the appropriate material. Contribute rather than destroy another’s good work. Well done Shawn. Great job!
Good stuff Shawn - very helpful. As a novice, it’s too confusing to figure out in bits and pieces. Thanks for laying it out.
First of all I have to say that Rick ‘the rigger’ is obviously the one with the “over inflated but fragile ego” and I laughed when you suggested he share his knowledge on your blog, well played!
As for the content it’s great, hope to read more soon!
Alec Lowenthal
Shawn, I have a painting of a Spanish vessel, two masted, with. Lateen sails on both masts and a jib. The mainsail is ahead of the main mast (fore) and the other is aft of the mizzen mast. Would this be what you call lugger rig? I have not seen a similar picture. Thanks, Alec.
Thank you for your article I found easy to read and understand, and more importantly remember, which emphasises the well written.. Pity about the negative comments, but love your proactive responses!
This vessel, “SEBASTIAN” out of Garrucha, Almería, España, was painted by Gustave Gillman in 1899.
Sorry, picture not accepted!
Thank you for a very informative article. I sail a bit and am always looking for more knowledge. I like the way you put forth your info and I feel if you can’t say anything positive, then that person should have their own blog or keep their opinions to their-self. I will be looking for more from you. I salute your way of dealing with negative comments.
Thank you for a great intro to sailing boats! I searched different sailboats because I use old sails tp make bags and wanted to learn the difference. Way more than I ever expected. Thanks for all the work put in to teach the rest of us.
Your description of a cutter is lacking, and your illustrations of “cutters” are actually cutter-rigged sloops. On a true cutter, the mast is moved further aft (with more than 40% of the ship forward of the mast). A sloop uses tension in the backstay to tension the luff of the foresail. The cutter can’t do this.
Also, a bermuda-rigged ketch will have a line running from the top of the mainmast to the top of the mizzenmast.
wow great guide to rig types! thanks
Interesting guide, however I am confused about the description of the brig. You say the main mast on a brig can have a lateen sail, but in your picture it looks like a gaff sail to me. How is it a lateen sail?
Hi Shawn, thank you for taking the time to share this information. It is clear and very helpful. I am new to sailing and thinking of buying my own blue water yacht. The information you have supplied is very useful. I still am seeking more information on performance and safety. Please keep up the good work. Best Regards
mickey fanelli
I’m starting to repair a model sailboat used in the lake I have three masts that have long been broken off and the sails need replacement. So my question is there a special relationship between the three masts I do have reminents of where the masts should go. they all broke off the boat along with the sails I can figure out where they go because of the old glue marks but it makes no sense. or does it really matter on a model thank you mickey
Cool, total novice here. I have learnt a lot. Thanks for sharing - the diagrams along with the text make it really easy to understand, especially for a beginner who hasn’t even stepped on a sailing boat.
Daryl Beatt
Thank you. Cleared up quite a few things for me. For example, I was familiar with the names “Xebecs” and “Polaccas” from recent reading about the Barbary War. I had gathered that the two Barbary types were better suited to sailing in the Med, but perhaps they were less able to be adaptable to military uses,(but one might assume that would be ok if one plans to board and fight, as opposed to fight a running gun duel). Specifically, the strangely one sided August 1, 1801 battle between the USS Enterprise under Lt. John Sterett and the Polacca cruiser Tripoli under Admiral Rais Mahomet Rous. On paper both ships seemed nearly equal in size, guns and crew, but pictures of the battle are confusing. While the Enterprise is usually rendered as the familiar schooner, the polacca Tripoli has been pictured in radically different ways. Thus the Wikipedia picture by Hoff in 1878 used to illustrate the Battle shows a Brig design for Tripoli, indicating 77 years later, polaccas were no longer common.
Lee Christiansen
I am curious as to what you would call a modern race boat with a fractional jib,not equipped for full masthead hoist? Thanks Lee
Thanks Guy: The information and pictures really eliminate a lot of the mystery of the terminology and the meanings. Also appreciate the insight of the handling idiosyncrasies “hand” (staff) requirements to manage a vessel for one that has not been on the water much. I long to spend significant time afloat, but have concern about the ability to handle a vessel due to advancing age. The Significant Other prefers to sit (in AC comfort)and be entertained by parties of cruise line employees. Thanks again for the information.
Gordon Smith
Your discussion made no mention of the galleon, a vessel with either square-rigged Fore and Main masts and a shorter lateen-rigged Mizzen, or, on larger galleons, square-rigged Fore and Main masts, with a lateen-rigged Mizzen and a lateen-rigged Bonaventure mast, both shorter than either the Fore or Main masts. Also, it was not uncommon for a galleon to hoist a square-rigged bowsprit topsail in addition to the usual square-rigged spritsail.
Emma Delaney
As a hobbyist, I was hesitant to invest in expensive CAD software, but CADHOBBY IntelliCAD has proven to be a cost-effective alternative that delivers the same quality and performance.
https://www.cadhobby.com/
Leave a comment
You may also like.
What's that sail for? Generally, I don't know. So I've come up with a system. I'll explain you everything there is to know about sails and rigs in this article.

17 Sailboat Types Explained: How To Recognize Them

Different Types of Sailing and Racing Explained

How Are Sail Numbers Assigned? (And how to pick yours)
Own your first boat within a year on any budget.
A sailboat doesn't have to be expensive if you know what you're doing. If you want to learn how to make your sailing dream reality within a year, leave your email and I'll send you free updates . I don't like spam - I will only send helpful content.
Ready to Own Your First Boat?
Just tell us the best email address to send your tips to:
Better Sailing

What is Sailboat Rigging?
The domain of rigging is an essential matter for the safety and good performance of your sailboat. Nowadays, the type of rigging is still evolving. Generally, rigging is depending on the type of sail used or the number of masts. As a basic rule, the replacement of the standing rig should be done every 10 years, except for multihulls or regattas, and rod or composite fiber rigging. A good set of rigging is of great importance in order to ensure navigation without causing any damage. A useful tip is to perform often thorough checks of the state of the rigging of your sailboat. Like this, you will prevent any possible damages from happening. So, let’s examine what exactly is sailboat rigging.
Standing and Running Rigging
Standing rigging supports your sailboat’s mast. The standing rigging consists of all the stainless steel wires that are used to support the mast. Moreover, standing rigging includes the rods, wires, and fixed lines that support the masts or bowsprit on a sailing vessel. In addition, all these reinforce the spars against wind loads transferred from the sails. On the other hand, running rigging is the rigging for controlling and shaping the sails on a sailboat. Running rigging consists of the main and jib sheet, the boom vang, the downhaul, and the jib halyard.
The subdivision of running rigging concerns the jeers, lifts, and halyards (halyards). This supporting equipment raises or lowers the sails and also controls the lower corners of the sails, i.e. the tacks and sheets. Over the centuries and up until nowadays, the history of sailboats rigging is still developing. What we’ve learned by now is that the combination of square and fore-and-aft sails in a full-rigged ship creates a highly complex, and mutually reliant set of components.
Wire Rigging
Wire rigging is the most common form of standing rigging on sailboats today. Furthermore, the style of the wire used is made of stainless steel, which is also a common wire style. What is advantageous with wire is that it’s quite affordable, especially when using swage fittings. The wire has also a long life expectancy, about 10 to 20 years, depending on use and the region you’re sailing to. However, wire rigging is more elastic than rod and synthetic rigging, thus it offers the lowest performance.
Rod Rigging
The rod rigging composition is of high-quality materials that provide low stretching. Moreover, it has a very long lifespan and great breaking strength, much more than that of its wire counterpart. Its life expectancy is attributed to the design, which is a mono strand, as well as to its composition that makes it very corrosion resistant.
Synthetic Rigging
Synthetic rigging is a new type of rigging and just like a rod, has minimum breaking strength. Nowadays, synthetic rigging offers low stretch performance features (that may vary depending on construction type), which are quite good for sailboats, among others. However, synthetic rigging will not last as long as the metal components. Most of the time, metal wire and rod are far better than synthetic rigging.
Based on the two rig types which are square-rigged and fore-and-aft, let’s divide the fore-and-aft rigs into three groups:
- Lateen Rig has a three-sided mainsail on a long yard.
- Bermuda rig which has a three-sided mainsail.
- Gaff rig is the head of the mainsail and has a four-sided mainsail.

Parts of a Sailboat Rigging and Terminology
Cruising sailboats will usually have their mast supported by 1 x 19 stainless steel wire. However, there are some racing sailboats that may choose rod rigging. Why? That’s because rod rigging has a stretch coefficient that is some 20% less than wire. The downside is that it’s more difficult to install and adjust, as well as less flexible with a shorter life span. So, let’s move on and see the parts of the sailboat’s rigging and their terminology:
- Forestay and Backstay : Forestay and backstay support the mast fore and aft. The forestay keeps the mast from falling backward. It attaches at the top of the mast. The backstay is important for the sail’s control because it directly affects the headsail and mainsail.
- Cap Shrouds and Lower Shrouds : These parts hold the mast steady athwartship. The shrouds are attached to the masthead and via chainplates to the hull. Moreover, forward and aft lower shrouds provide further support. The lower shrouds are always connected to the mast, just under the first spreader, and at the other end to the hull.
- Spreaders : In general, spreaders keep the shrouds away from the mast. What is of high importance, in terms of stability, is their length and fore-and-aft angle. The rigs of cruising boats may have up to three pairs of spreaders, depending on a number of factors such as the sailboat’s size and type. Keep in mind that the more spreaders a sailboat has then the lighter the mast section can be. Last but not least, the spreaders must be robust in order to withstand the compression loads of the shrouds.
- Masts and Booms : Masts are tall spars that carry the sails, navigate the sailboat, and control its position. Sailboat booms are horizontal spars to which the foot of a sail is bent. The booms attach to the lower part of the mast. There are some sailboats with unstayed masts, like the junk rig and catboat rigs. They have no standing rigging at all, and neither stays to support them. For example, a Bermuda rig has a single mast and just one headsail, thus a relatively simple rigging layout. On the other hand, schooners or ketches have a really complex rigging, i.e. with multi-spreader rigs. Apparently, the mast on a sailboat is an important component.
- Chainplates, Toggles, and Turnbuckles : These important components of sailboat rigging attach the shrouds to the hull. The chainplate is a metal plate that fastens to a strong point in the hull. Toggles are comprised of stainless steel fittings that absorb non-linear loads, located between the shrouds and the chainplate. Turnbuckles (or rigging screws) are also stainless steel materials that allow the shroud tension to adjust better.
- Parts of Running Rigging : As mentioned above, running rigging has to do about shaping, supporting, and stabilizing the sails on a sailing boat. Therefore, the necessary materials for running rigging are numerous and need further explanation. Some of these materials are: The topping lifts, the halyards, the outhauls and downhauls, the boom vangs, the sheets, and more.
Sailboat Rigging – Summary
So, what is sailboat rigging? Sailboat rigging concerns the wires, lines, and ropes that hold the rig and control the sails. To be more accurate, this means the tensioned stays and shrouds that support the mast. Rigging has to do about the booms, masts, yards, sails, stays, and cordage. Same way with cars, sailboats also have an engine, but in the form of sails. This is the standing and running rigging. When we refer to standing rigging this means that the stays and shrouds are supported by the mast. On the other hand, running rigging refers to rope halyards, sheets, and other control lines. Depending on the type of your sailboat, this sail-engine might be old, new, or maybe somewhere in between.

Peter is the editor of Better Sailing. He has sailed for countless hours and has maintained his own boats and sailboats for years. After years of trial and error, he decided to start this website to share the knowledge.
Related Posts

Sailing with Friends: Tie Knots, Navigate the Seas and Create Unforgettable Memories

Atlantic vs Pacific: Which is More Dangerous for Sailing?

Lagoon Catamaran Review: Are Lagoon Catamarans Good?

Best Inboard Boat Engine Brands
- Buyer's Guide
- Destinations
- Maintenance
- Sailing Info
Hit enter to search or ESC to close.

Beginner’s Guide: How To Rig A Sailboat – Step By Step Tutorial
Alex Morgan
Rigging a sailboat is a crucial process that ensures the proper setup and functioning of a sailboat’s various components. Understanding the process and components involved in rigging is essential for any sailor or boat enthusiast. In this article, we will provide a comprehensive guide on how to rig a sailboat.
Introduction to Rigging a Sailboat
Rigging a sailboat refers to the process of setting up the components that enable the sailboat to navigate through the water using wind power. This includes assembling and positioning various parts such as the mast, boom, standing rigging, running rigging, and sails.
Understanding the Components of a Sailboat Rigging
Before diving into the rigging process, it is important to have a good understanding of the key components involved. These components include:
The mast is the tall vertical spar that provides vertical support to the sails and holds them in place.
The boom is the horizontal spar that runs along the bottom edge of the sail and helps control the shape and position of the sail.
- Standing Rigging:
Standing rigging consists of the wires and cables that support and stabilize the mast, keeping it upright.
- Running Rigging:
Running rigging refers to the lines and ropes used to control the sails, such as halyards, sheets, and control lines.
Preparing to Rig a Sailboat
Before rigging a sailboat, there are a few important steps to take. These include:
- Checking the Weather Conditions:
It is crucial to assess the weather conditions before rigging a sailboat. Unfavorable weather, such as high winds or storms, can make rigging unsafe.
- Gathering the Necessary Tools and Equipment:
Make sure to have all the necessary tools and equipment readily available before starting the rigging process. This may include wrenches, hammers, tape, and other common tools.
- Inspecting the Rigging Components:
In the upcoming sections of this article, we will provide a step-by-step guide on how to rig a sailboat, as well as important safety considerations and tips to keep in mind. By following these guidelines, you will be able to rig your sailboat correctly and safely, allowing for a smooth and enjoyable sailing experience.
Key takeaway:
- Rigging a sailboat maximizes efficiency: Proper rigging allows for optimized sailing performance, ensuring the boat moves smoothly through the water.
- Understanding sailboat rigging components: Familiarity with the various parts of a sailboat rigging, such as the mast, boom, and standing and running riggings, is essential for effective rigging setup.
- Importance of safety in sailboat rigging: Ensuring safety is crucial during the rigging process, including wearing a personal flotation device, securing loose ends and lines, and being mindful of overhead power lines.
Get ready to set sail and dive into the fascinating world of sailboat rigging! We’ll embark on a journey to understand the various components that make up a sailboat’s rigging. From the majestic mast to the nimble boom , and the intricate standing rigging to the dynamic running rigging , we’ll explore the crucial elements that ensure smooth sailing. Not forgetting the magnificent sail, which catches the wind and propels us forward. So grab your sea legs and let’s uncover the secrets of sailboat rigging together.
Understanding the mast is crucial when rigging a sailboat. Here are the key components and steps to consider:
1. The mast supports the sails and rigging of the sailboat. It is made of aluminum or carbon fiber .
2. Before stepping the mast , ensure that the area is clear and the boat is stable. Have all necessary tools and equipment ready.
3. Inspect the mast for damage or wear. Check for corrosion , loose fittings , and cracks . Address any issues before proceeding.
4. To step the mast , carefully lift it into an upright position and insert the base into the mast step on the deck of the sailboat.
5. Secure the mast using the appropriate rigging and fasteners . Attach the standing rigging , such as shrouds and stays , to the mast and the boat’s hull .
Fact: The mast of a sailboat is designed to withstand wind resistance and the tension of the rigging for stability and safe sailing.
The boom is an essential part of sailboat rigging. It is a horizontal spar that stretches from the mast to the aft of the boat. Constructed with durable yet lightweight materials like aluminum or carbon fiber, the boom provides crucial support and has control over the shape and position of the sail. It is connected to the mast through a boom gooseneck , allowing it to pivot. One end of the boom is attached to the mainsail, while the other end is equipped with a boom vang or kicker, which manages the tension and angle of the boom. When the sail is raised, the boom is also lifted and positioned horizontally by using the topping lift or lazy jacks.
An incident serves as a warning that emphasizes the significance of properly securing the boom. In strong winds, an improperly fastened boom swung across the deck, resulting in damage to the boat and creating a safety hazard. This incident highlights the importance of correctly installing and securely fastening all rigging components, including the boom, to prevent accidents and damage.
3. Standing Rigging
When rigging a sailboat, the standing rigging plays a vital role in providing stability and support to the mast . It consists of several key components, including the mast itself, along with the shrouds , forestay , backstay , and intermediate shrouds .
The mast, a vertical pole , acts as the primary support structure for the sails and the standing rigging. Connected to the top of the mast are the shrouds , which are cables or wires that extend to the sides of the boat, providing essential lateral support .
The forestay is another vital piece of the standing rigging. It is a cable or wire that runs from the top of the mast to the bow of the boat, ensuring forward support . Similarly, the backstay , also a cable or wire, runs from the mast’s top to the stern of the boat, providing important backward support .
To further enhance the rig’s stability , intermediate shrouds are installed. These additional cables or wires are positioned between the main shrouds, as well as the forestay or backstay. They offer extra support , strengthening the standing rigging system.
Regular inspections of the standing rigging are essential to detect any signs of wear, such as fraying or corrosion . It is crucial to ensure that all connections within the rig are tight and secure, to uphold its integrity. Should any issues be identified, immediate attention must be given to prevent accidents or damage to the boat. Prioritizing safety is of utmost importance when rigging a sailboat, thereby necessitating proper maintenance of the standing rigging. This ensures a safe and enjoyable sailing experience.
Note: <p> tags have been kept intact.
4. Running Rigging
Running Rigging
When rigging a sailboat, the running rigging is essential for controlling the sails and adjusting their position. It is important to consider several aspects when dealing with the running rigging.
1. Choose the right rope: The running rigging typically consists of ropes with varying properties such as strength, stretch, and durability. Weather conditions and sailboat size should be considered when selecting the appropriate rope.
2. Inspect and maintain the running rigging: Regularly check for signs of wear, fraying, or damage. To ensure safety and efficiency, replace worn-out ropes.
3. Learn essential knot tying techniques: Having knowledge of knots like the bowline, cleat hitch, and reef knot is crucial for securing the running rigging and adjusting sails.
4. Understand different controls: The running rigging includes controls such as halyards, sheets, and control lines. Familiarize yourself with their functions and proper usage to effectively control sail position and tension.
5. Practice proper sail trimming: Adjusting the tension of the running rigging significantly affects sailboat performance. Mastering sail trimming techniques will help optimize sail shape and maximize speed.
By considering these factors and mastering running rigging techniques, you can enhance your sailing experience and ensure the safe operation of your sailboat.
The sail is the central component of sailboat rigging as it effectively harnesses the power of the wind to propel the boat.
When considering the sail, there are several key aspects to keep in mind:
– Material: Sails are typically constructed from durable and lightweight materials such as Dacron or polyester. These materials provide strength and resistance to various weather conditions.
– Shape: The shape of the sail plays a critical role in its overall performance. A well-shaped sail should have a smooth and aerodynamic profile, which allows for maximum efficiency in capturing wind power.
– Size: The size of the sail is determined by its sail area, which is measured in square feet or square meters. Larger sails have the ability to generate more power, but they require greater skill and experience to handle effectively.
– Reefing: Reefing is the process of reducing the sail’s size to adapt to strong winds. Sails equipped with reefing points allow sailors to decrease the sail area, providing better control in challenging weather conditions.
– Types: There are various types of sails, each specifically designed for different purposes. Common sail types include mainsails, jibs, genoas, spinnakers, and storm sails. Each type possesses its own unique characteristics and is utilized under specific wind conditions.
Understanding the sail and its characteristics is vital for sailors, as it directly influences the boat’s speed, maneuverability, and overall safety on the water.
Getting ready to rig a sailboat requires careful preparation and attention to detail. In this section, we’ll dive into the essential steps you need to take before setting sail. From checking the weather conditions to gathering the necessary tools and equipment, and inspecting the rigging components, we’ll ensure that you’re fully equipped to navigate the open waters with confidence. So, let’s get started on our journey to successfully rigging a sailboat!
1. Checking the Weather Conditions
Checking the weather conditions is crucial before rigging a sailboat for a safe and enjoyable sailing experience. Monitoring the wind speed is important in order to assess the ideal sailing conditions . By checking the wind speed forecast , you can determine if the wind is strong or light . Strong winds can make sailboat control difficult, while very light winds can result in slow progress.
Another important factor to consider is the wind direction . Assessing the wind direction is crucial for route planning and sail adjustment. Favorable wind direction helps propel the sailboat efficiently, making your sailing experience more enjoyable.
In addition to wind speed and direction, it is also important to consider weather patterns . Keep an eye out for impending storms or heavy rain. It is best to avoid sailing in severe weather conditions that may pose a safety risk. Safety should always be a top priority when venturing out on a sailboat.
Another aspect to consider is visibility . Ensure good visibility by checking for fog, haze, or any other conditions that may hinder navigation. Clear visibility is important for being aware of other boats and potential obstacles that may come your way.
Be aware of the local conditions . Take into account factors such as sea breezes, coastal influences, or tidal currents. These local factors greatly affect sailboat performance and safety. By considering all of these elements, you can have a successful and enjoyable sailing experience.
Here’s a true story to emphasize the importance of checking the weather conditions. One sunny afternoon, a group of friends decided to go sailing. Before heading out, they took the time to check the weather conditions. They noticed that the wind speed was expected to be around 10 knots, which was perfect for their sailboat. The wind direction was coming from the northwest, allowing for a pleasant upwind journey. With clear visibility and no approaching storms, they set out confidently, enjoying a smooth and exhilarating sail. This positive experience was made possible by their careful attention to checking the weather conditions beforehand.
2. Gathering the Necessary Tools and Equipment
To efficiently gather all of the necessary tools and equipment for rigging a sailboat, follow these simple steps:
- First and foremost, carefully inspect your toolbox to ensure that you have all of the basic tools such as wrenches, screwdrivers, and pliers.
- Make sure to check if you have a tape measure or ruler available as they are essential for precise measurements of ropes or cables.
- Don’t forget to include a sharp knife or rope cutter in your arsenal as they will come in handy for cutting ropes or cables to the desired lengths.
- Gather all the required rigging hardware including shackles, pulleys, cleats, and turnbuckles.
- It is always prudent to check for spare ropes or cables in case replacements are needed during the rigging process.
- If needed, consider having a sailing knife or marlinspike tool for splicing ropes or cables.
- For rigging a larger sailboat, it is crucial to have a mast crane or hoist to assist with stepping the mast.
- Ensure that you have a ladder or some other means of reaching higher parts of the sailboat, such as the top of the mast.
Once, during the preparation of rigging my sailboat, I had a moment of realization when I discovered that I had forgotten to bring a screwdriver . This unfortunate predicament occurred while I was in a remote location with no nearby stores. Being resourceful, I improvised by utilizing a multipurpose tool with a small knife blade, which served as a makeshift screwdriver. Although it was not the ideal solution, it allowed me to accomplish the task. Since that incident, I have learned the importance of double-checking my toolbox before commencing any rigging endeavor. This practice ensures that I have all of the necessary tools and equipment, preventing any unexpected surprises along the way.
3. Inspecting the Rigging Components
Inspecting the rigging components is essential for rigging a sailboat safely. Here is a step-by-step guide on inspecting the rigging components:
1. Visually inspect the mast, boom, and standing rigging for damage, such as corrosion, cracks, or loose fittings.
2. Check the tension of the standing rigging using a tension gauge. It should be within the recommended range from the manufacturer.
3. Examine the turnbuckles, clevis pins, and shackles for wear or deformation. Replace any damaged or worn-out hardware.
4. Inspect the running rigging, including halyards and sheets, for fraying, signs of wear, or weak spots. Replace any worn-out lines.
5. Check the sail for tears, wear, or missing hardware such as grommets or luff tape.
6. Pay attention to the connections between the standing rigging and the mast. Ensure secure connections without any loose or missing cotter pins or rigging screws.
7. Inspect all fittings, such as mast steps, spreader brackets, and tangs, to ensure they are securely fastened and in good condition.
8. Conduct a sea trial to assess the rigging’s performance and make necessary adjustments.
Regularly inspecting the rigging components is crucial for maintaining the sailboat’s rigging system’s integrity, ensuring safe sailing conditions, and preventing accidents or failures at sea.
Once, I went sailing on a friend’s boat without inspecting the rigging components beforehand. While at sea, a sudden gust of wind caused one of the shrouds to snap. Fortunately, no one was hurt, but we had to cut the sail loose and carefully return to the marina. This incident taught me the importance of inspecting the rigging components before sailing to avoid unforeseen dangers.
Step-by-Step Guide on How to Rig a Sailboat
Get ready to set sail with our step-by-step guide on rigging a sailboat ! We’ll take you through the process from start to finish, covering everything from stepping the mast to setting up the running rigging . Learn the essential techniques and tips for each sub-section, including attaching the standing rigging and installing the boom and sails . Whether you’re a seasoned sailor or a beginner, this guide will have you ready to navigate the open waters with confidence .
1. Stepping the Mast
To step the mast of a sailboat, follow these steps:
1. Prepare the mast: Position the mast near the base of the boat.
2. Attach the base plate: Securely fasten the base plate to the designated area on the boat.
3. Insert the mast step: Lower the mast step into the base plate and align it with the holes or slots.
4. Secure the mast step: Use fastening screws or bolts to fix the mast step in place.
5. Raise the mast: Lift the mast upright with the help of one or more crew members.
6. Align the mast: Adjust the mast so that it is straight and aligned with the boat’s centerline.
7. Attach the shrouds: Connect the shrouds to the upper section of the mast, ensuring proper tension.
8. Secure the forestay: Attach the forestay to the bow of the boat, ensuring it is securely fastened.
9. Final adjustments: Check the tension of the shrouds and forestay, making any necessary rigging adjustments.
Following these steps ensures that the mast is properly stepped and securely in place, allowing for a safe and efficient rigging process. Always prioritize safety precautions and follow manufacturer guidelines for your specific sailboat model.
2. Attaching the Standing Rigging
To attach the standing rigging on a sailboat, commence by preparing the essential tools and equipment, including wire cutters, crimping tools, and turnbuckles.
Next, carefully inspect the standing rigging components for any indications of wear or damage.
After inspection, fasten the bottom ends of the shrouds and stays to the chainplates on the deck.
Then, securely affix the top ends of the shrouds and stays to the mast using adjustable turnbuckles .
To ensure proper tension, adjust the turnbuckles accordingly until the mast is upright and centered.
Utilize a tension gauge to measure the tension in the standing rigging, aiming for around 15-20% of the breaking strength of the rigging wire.
Double-check all connections and fittings to verify their security and proper tightness.
It is crucial to regularly inspect the standing rigging for any signs of wear or fatigue and make any necessary adjustments or replacements.
By diligently following these steps, you can effectively attach the standing rigging on your sailboat, ensuring its stability and safety while on the water.
3. Installing the Boom and Sails
To successfully complete the installation of the boom and sails on a sailboat, follow these steps:
1. Begin by securely attaching the boom to the mast. Slide it into the gooseneck fitting and ensure it is firmly fastened using a boom vang or another appropriate mechanism.
2. Next, attach the main sail to the boom. Slide the luff of the sail into the mast track and securely fix it in place using sail slides or cars.
3. Connect the mainsheet to the boom. One end should be attached to the boom while the other end is connected to a block or cleat on the boat.
4. Proceed to attach the jib or genoa. Make sure to securely attach the hanks or furler line to the forestay to ensure stability.
5. Connect the jib sheets. One end of each jib sheet should be attached to the clew of the jib or genoa, while the other end is connected to a block or winch on the boat.
6. Before setting sail, it is essential to thoroughly inspect all lines and connections. Ensure that they are properly tensioned and that all connections are securely fastened.
During my own experience of installing the boom and sails on my sailboat, I unexpectedly encountered a strong gust of wind. As a result, the boom began swinging uncontrollably, requiring me to quickly secure it to prevent any damage. This particular incident served as a vital reminder of the significance of properly attaching and securing the boom, as well as the importance of being prepared for unforeseen weather conditions while rigging a sailboat.
4. Setting Up the Running Rigging
Setting up the running rigging on a sailboat involves several important steps. First, attach the halyard securely to the head of the sail. Then, connect the sheets to the clew of the sail. If necessary, make sure to secure the reefing lines . Attach the outhaul line to the clew of the sail and connect the downhaul line to the tack of the sail. It is crucial to ensure that all lines are properly cleated and organized. Take a moment to double-check the tension and alignment of each line. If you are using a roller furling system, carefully wrap the line around the furling drum and securely fasten it. Perform a thorough visual inspection of the running rigging to check for any signs of wear or damage. Properly setting up the running rigging is essential for safe and efficient sailing. It allows for precise control of the sail’s position and shape, ultimately optimizing the boat’s performance on the water.
Safety Considerations and Tips
When it comes to rigging a sailboat, safety should always be our top priority. In this section, we’ll explore essential safety considerations and share some valuable tips to ensure smooth sailing. From the importance of wearing a personal flotation device to securing loose ends and lines, and being cautious around overhead power lines, we’ll equip you with the knowledge and awareness needed for a safe and enjoyable sailing experience. So, let’s set sail and dive into the world of safety on the water!
1. Always Wear a Personal Flotation Device
When rigging a sailboat, it is crucial to prioritize safety and always wear a personal flotation device ( PFD ). Follow these steps to properly use a PFD:
- Select the appropriate Coast Guard-approved PFD that fits your size and weight.
- Put on the PFD correctly by placing your arms through the armholes and securing all the straps for a snug fit .
- Adjust the PFD for comfort , ensuring it is neither too tight nor too loose, allowing freedom of movement and adequate buoyancy .
- Regularly inspect the PFD for any signs of wear or damage, such as tears or broken straps, and replace any damaged PFDs immediately .
- Always wear your PFD when on or near the water, even if you are a strong swimmer .
By always wearing a personal flotation device and following these steps, you will ensure your safety and reduce the risk of accidents while rigging a sailboat. Remember, prioritize safety when enjoying water activities.
2. Secure Loose Ends and Lines
Inspect lines and ropes for frayed or damaged areas. Secure loose ends and lines with knots or appropriate cleats or clamps. Ensure all lines are properly tensioned to prevent loosening during sailing. Double-check all connections and attachments for security. Use additional safety measures like extra knots or stopper knots to prevent line slippage.
To ensure a safe sailing experience , it is crucial to secure loose ends and lines properly . Neglecting this important step can lead to accidents or damage to the sailboat. By inspecting, securing, and tensioning lines , you can have peace of mind knowing that everything is in place. Replace or repair any compromised lines or ropes promptly. Securing loose ends and lines allows for worry-free sailing trips .
3. Be Mindful of Overhead Power Lines
When rigging a sailboat, it is crucial to be mindful of overhead power lines for safety. It is important to survey the area for power lines before rigging the sailboat. Maintain a safe distance of at least 10 feet from power lines. It is crucial to avoid hoisting tall masts or long antenna systems near power lines to prevent contact. Lower the mast and tall structures when passing under a power line to minimize the risk of contact. It is also essential to be cautious in areas where power lines run over the water and steer clear to prevent accidents.
A true story emphasizes the importance of being mindful of overhead power lines. In this case, a group of sailors disregarded safety precautions and their sailboat’s mast made contact with a low-hanging power line, resulting in a dangerous electrical shock. Fortunately, no serious injuries occurred, but it serves as a stark reminder of the need to be aware of power lines while rigging a sailboat.
Some Facts About How To Rig A Sailboat:
- ✅ Small sailboat rigging projects can improve sailing performance and save money. (Source: stingysailor.com)
- ✅ Rigging guides are available for small sailboats, providing instructions and tips for rigging. (Source: westcoastsailing.net)
- ✅ Running rigging includes lines used to control and trim the sails, such as halyards and sheets. (Source: sailingellidah.com)
- ✅ Hardware used in sailboat rigging includes winches, blocks, and furling systems. (Source: sailingellidah.com)
- ✅ A step-by-step guide can help beginners rig a small sailboat for sailing. (Source: tripsavvy.com)
Frequently Asked Questions
1. how do i rig a small sailboat.
To rig a small sailboat, follow these steps: – Install or check the rudder, ensuring it is firmly attached. – Attach or check the tiller, the long steering arm mounted to the rudder. – Attach the jib halyard by connecting the halyard shackle to the head of the sail and the grommet in the tack to the bottom of the forestay. – Hank on the jib by attaching the hanks of the sail to the forestay one at a time. – Run the jib sheets by tying or shackling them to the clew of the sail and running them back to the cockpit. – Attach the mainsail by spreading it out and attaching the halyard shackle to the head of the sail. – Secure the tack, clew, and foot of the mainsail to the boom using various lines and mechanisms. – Insert the mainsail slugs into the mast groove, gradually raising the mainsail as the slugs are inserted. – Cleat the main halyard and lower the centerboard into the water. – Raise the jib by pulling down on the jib halyard and cleating it on the other side of the mast. – Tighten the mainsheet and one jibsheet to adjust the sails and start moving forward.
2. What are the different types of sailboat rigs?
Sailboat rigs can be classified into three main types: – Sloop rig: This rig has a single mast with a mainsail and a headsail, typically a jib or genoa. – Cutter rig: This rig has two headsails, a smaller jib or staysail closer to the mast, and a larger headsail, usually a genoa, forward of it, alongside a mainsail. – Ketch rig: This rig has two masts, with the main mast taller than the mizzen mast. It usually has a mainsail, headsail, and a mizzen sail. Each rig has distinct characteristics and is suitable for different sailing conditions and preferences.
3. What are the essential parts of a sailboat?
The essential parts of a sailboat include: – Mast: The tall vertical spar that supports the sails. – Boom: The horizontal spar connected to the mast, which extends outward and supports the foot of the mainsail. – Rudder: The underwater appendage that steers the boat. – Centerboard or keel: A retractable or fixed fin-like structure that provides stability and prevents sideways drift. – Sails: The fabric structures that capture the wind’s energy to propel the boat. – Running rigging: The lines or ropes used to control the sails and sailing equipment. – Standing rigging: The wires and cables that support the mast and reinforce the spars. These are the basic components necessary for the functioning of a sailboat.
4. What is a spinnaker halyard?
A spinnaker halyard is a line used to hoist and control a spinnaker sail. The spinnaker is a large, lightweight sail that is used for downwind sailing or reaching in moderate to strong winds. The halyard attaches to the head of the spinnaker and is used to raise it to the top of the mast. Once hoisted, the spinnaker halyard can be adjusted to control the tension and shape of the sail.
5. Why is it important to maintain and replace worn running rigging?
It is important to maintain and replace worn running rigging for several reasons: – Safety: Worn or damaged rigging can compromise the integrity and stability of the boat, posing a safety risk to both crew and vessel. – Performance: Worn rigging can affect the efficiency and performance of the sails, diminishing the boat’s speed and maneuverability. – Reliability: Aging or worn rigging is more prone to failure, which can lead to unexpected problems and breakdowns. Regular inspection and replacement of worn running rigging is essential to ensure the safe and efficient operation of a sailboat.
6. Where can I find sailboat rigging books or guides?
There are several sources where you can find sailboat rigging books or guides: – Online: Websites such as West Coast Sailing and Stingy Sailor offer downloadable rigging guides for different sailboat models. – Bookstores: Many bookstores carry a wide selection of boating and sailing books, including those specifically focused on sailboat rigging. – Sailing schools and clubs: Local sailing schools or yacht clubs often have resources available for learning about sailboat rigging. – Manufacturers: Some sailboat manufacturers, like Hobie Cat and RS Sailing, provide rigging guides for their specific sailboat models. Consulting these resources can provide valuable information and instructions for rigging your sailboat properly.
About the author

Leave a Reply Cancel reply
Your email address will not be published. Required fields are marked *
Save my name, email, and website in this browser for the next time I comment.
Latest posts

The history of sailing – from ancient times to modern adventures
History of Sailing Sailing is a time-honored tradition that has evolved over millennia, from its humble beginnings as a means of transportation to a beloved modern-day recreational activity. The history of sailing is a fascinating journey that spans cultures and centuries, rich in innovation and adventure. In this article, we’ll explore the remarkable evolution of…

Sailing Solo: Adventures and Challenges of Single-Handed Sailing
Solo Sailing Sailing has always been a pursuit of freedom, adventure, and self-discovery. While sailing with a crew is a fantastic experience, there’s a unique allure to sailing solo – just you, the wind, and the open sea. Single-handed sailing, as it’s often called, is a journey of self-reliance, resilience, and the ultimate test of…

Sustainable Sailing: Eco-Friendly Practices on the boat
Eco Friendly Sailing Sailing is an exhilarating and timeless way to explore the beauty of the open water, but it’s important to remember that our oceans and environment need our protection. Sustainable sailing, which involves eco-friendly practices and mindful decision-making, allows sailors to enjoy their adventures while minimizing their impact on the environment. In this…
Running Rigging
Jib Tack, Jib Halyabds, and Jib Sheets.
The jib tack requires to be of great strength, and is made indifferently, accordingly to the judgment of the person who has the fitting out of the yacht, of rope, chain, or flexible wire rope. Rope does very well in vessels under 40 tons, but wire is to be preferred, and it is found to stand better than chain. The jib tack t is fast to the traveller a (Fig. 15), and leads down through a sheave hole * at the bowsprit end (inside the cranse iron) a block is shackled to the end of the tack through which the outhaul is rove. The standing part of the outhaul is put over one of the bitts with a running eye; the hauling part leads on board by the side of the bowsprit. A single rope inhaul is generally fast to the traveller.
The score in the end of the bowsprit has necessarily to be very large, and frequently it is made wider than it need be; at any rate the sheave hole is a source of weakness, and generally if the end of the bowsprit comes off it is close outside the sheave hole, the enormous lateral strain brought on the part by the weather shroud (%) causing the wood to give way. To avoid such accidents as these one or two yachts have the sheave outside the iron, as shown by to. The tack n passes between the ears or "lugs" on the cranse iron at o and p. To o the topmast stay is fitted, and the bobstay block at p. Of course if the score and sheave were put at m, the other score and sheave * would be dispensed with. Generally when the end comes off at the sheave 8 the bowsprit immediately afterwards breaks close off at the stem, unless some one is very smart at letting the jib sheets fly, or in putting the helm down. With the sheave hole at m no such accident would happen.
Jib halyards are, as a rule, made of chain, as it runs better and does not stretch, and the fall stows in a smaller compass when the jib is set; in fact, the fall is generally run through one of the chain pipes

into the forecastle, where it helps a trifle as ballast.* However, several large vessels, such as Livonia, Modwena, and Arrow, have had Manilla rope. The jib halyards are rove through an iron (single) block (which is hooked or shackled to the head cringle of the jib), and then each part leads through an iron (single) block on either side of the masthead (see Fig. 5). The hauling part usually leads down the port side of the mast; the purchase is shackled to the part that leads through the block on the starboard side. In vessels above 40 tons a flexible wire runner is invariably used in addition to the purchase; one end of the runner is shackled to an eye bolt on deck, and the other, after leading through a block on the end of the jib halyard, is shackled to the npper block of the purchase. The purchase consists of a double and single block, or two double; in the former case the single block is below, with the standing part of the tackle fast to it; but where two blocks are used, the standing part of the tackle is made fast to the upper block. As a great deal of "beef" is required to properly set up a jib, it is usual to have a lead of some kind for the " fall" * of the purchase on deck, such as a snatch block. It is, of course, necessary to have a " straight" luff to a jib, but very frequently the purchase is used a little too freely; the result is that the forestay is slacked, and perhaps a link gives way in the halyards; or the luff rope of the jib is stranded (generally near the head or tack, where it has been opened for the splice), and sometimes the bobstay-fall is burst. (We once saw the latter mishap occur on board the Oimara during the match at Southsea.) These mishaps can be generally averted by "easing" the vessel whilst the jib is being set up, choosing the time whilst she is in stays or before the wind, and watching to see that the forestay is not slackened.
Jib sheets in vessels under 80 tons are usually single, but in vessels larger than 80 tons they are double. In the latter case there are two blocks, which are put on the clew cringle; a sheet is rove through each block, and the two parts through the jib sheet holes in the wash strake of the bulwarks; one part of the sheet is then made fast and the other hauled upon.
Fobs Halyards, Fobe Tacks, and Fobb Shebts.
The fore halyards are usually fitted as follows: The standing part is hooked or shackled to an eye bolt under the yoke on the port side, then through a single block hooked to the head of the sail, and up through another single block hung to an eye bolt under the yoke on the starboard side. The downhaul is bent to the head cringle or to the hook of the
* The "fell" of a tackle is the pert that is taken hold of to haul upon.
block. No purchase is necessary, as the sail is set on a stay; but in yachts above 10 tons the luff of the sail is brought taut by a tackle hooked to the tack; the tack leads through the stem head. The tackle oonsists of a single and double block, or two doubles according to the size of the yacht. In yachts of 40 tons and upwards the tack is usually made of flexible wire rope.
Fore sheets in yachts under 15 tons are usually made up of two single blocks. The standing part is made fast to the upper block (hooked and moused or shackled to the clew of the sail). In larger vessels a double, or single, or two double blocks are used, the hauling part or fall always leading from the upper block. In very large vessels, such as 100-ton cutters or yawls, or 140-ton schooners , "runners" are used in addition to tackles. These are called the standing parts of the sheets: one end is hooked on the tackle by an eye; the other end is passed through a bullseye of lignum vitss on the clew of the sail, and is then belayed to a cavel. The sail is then Bheeted home with the tackle.
Main and Peak Halyards, Main Tack, Main Sheet, and Main
The main or throat halyards are generally rove through a treble block at the masthead, and a double block on the jaws of the gaff. The hauling part of the main halyards leads down the starboard side of the mast, and is belayed to the mast bitts. The main purchase is fast to the standing part, and usually consists of a oouple of double blocks, and the lower one is generally hooked to an eye bolt in the deck on the starboard side. In vessels under 15 tons it is unusual to have a main purchase, and when there is no purchase the upper main halyard block is a double one, and the lower a single. However, racing 10-tonners have a main purchase, and many 5-tonners have one. The principal object in having a main purchase in a small craft is that the mainsail can be set better, as in starting with "all canvas down" the last two or three pulls become very heavy, especially if the hands on the peak have been a little too quick; and a much tauter luff can be got by the purchasfl^than by the main tack tackle. Of course the latter is dispensed with in small vessels where the purchase is used, and the tack made fast by a lacing round the goose-neck of the boom. By doing away with the tack tackle at least 6in. greater length of luff can be had in a 5-tonner, and this may be of some advantage. The sail cannot be triced up, of course, without casting off the main tack lacing; but some yacht sailers oonsider this an advantage, as no doubt sailing a vessel in a strong wind with the main tack triced up very badly stretches the sail, looks very ugly.
The peak halyards in almost all vessels under 140 tons are rove through two single blocks on the gaff and three on the masthead, as shown in Plate I. and Fig. 5. Some vessels above 140 tons have three blocks on the gaff, and in such cases the middle block on the masthead is usually a double one. The standing part of the peak halyards to which the purchase is fast leads through the upper block and down on the port side.
The usual practice in racing vessels is to have a wire leather-covered span (copper wire is best) with an iron-bound bullseye for each block on the gaff to work upon, and this plan no doubt causes a more equal distribution of the strain on the gaff. The binding of the bullseye

has an eye to take the hook of the block. In Fig. 16 a is a portion of the gaff, b is the span; c c are the eyes of the span and thumb cleats on the gaff to prevent the eyes slipping, d is the bullseye with one of the peak halyard blocks hooked to it.
The main tack generally is a gun tackle purchase, but in vessels above 60 tons a double and single or two double blocks are used. In addition, some large cutters have a runner rove through the tack cringle, one end being fast to the goose-neck of the boom, and the other to the tackle. In laced mainsails the tack is secured by a lacing to the goose-neck.
The main boom is usually fitted to the spider hoop round the mast by a universal joint usually termed the main boom goose-neck.
The main sheet should be made of left-handed, slack-laid, six-stranded Manilla rope. The blocks required are a three-fold on the boom, a two-fold on the buffer or hone, as the case may be, and a single block on each quarter for the lead. Yachts of less than 15 tons have a double block on the boom, and single on the buffer.
Many American yachts have a horse in length about one-third the width of the counter for the mainsheet block to travel on. For small vessels, at any rate, this plan is a good one, as the boom can be kept down so much better on a wind, as less sheet will be out than there would be without the horse. A stout ring of indiarubber should be on either end of the horse, to relieve the shock as the boom goes over.
The mainsail outhaul is made np of a horse on the boom, a shackle as traveller, a wire or chain runner outhaul (attached to the shackle, and rove through a sheave hole at the boom end), and a tackle. (See Fig. 17.) In small vessels the latter consists of one block only; in large vessels of two single, or a double and single, or two double blocks.
The old-fashioned plan of outhaul, and one still very much in use, consists of an iron traveller (a large leather-covered ring) on the boom end, a chain or rope through a sheave hole and a tackle. This latter plan is perhaps the stronger of the two; but an objection to it is that the traveller very frequently gets jammed and the reef cleats have to be farther forward than desirable, to allow the traveller to work.

Sometimes, instead of a sheave hole, the sheave for the outhaul is fitted right at the extreme end of the boom, on to which an iron cap is fitted for the purpose.
Topsail Halyards, Sheets, and Tacks.
The topsail halyards in vessels under 10 tons consist of a single rope rove through a sheave hole under the eyes of the topmast rigging.
Yachts of 10 tons and over have a block which hooks to a strop or sling on the yard, or if the topsail be a jib-headed one, to the head cringle. The standing part of the halyard has a running eye, which is put over the topmast, and rests on the eyes of the rigging; the halyard is rove through the block (which has to be hooked to the yard), and through the sheave hole at the topmast head. It is best to have a couple of thumb cleats on the yard where it has to be slung; there is then no danger of the strop slipping, or of the yard being wrongly slung.
When the topsail yard is of great length, as in most yachts of 40 tons and upwards, an upper halyard is provided (called also sometimes a tripping line or trip halyard, becausfe the rope is of use in tripping the yard in hoisting or lowering). This is simply a single rope bent to the upper part of the yard, and rove through a sheave hole in the pole, above the eyes of the topmast rigging. The upper halyards are mainly useful in hoisting and for lowering to get the yard peaked; however, for very long yards, if bent sufficiently near the upper end, they may in a small degree help to keep the peak of the sail from* sagging to leeward, or prevent the yard bending.
The topsail sheet is always a single * Manilla rope, as tarred hemp rope would stain the mainsail in wet weather. It leads through a cheek block on the gaff end, then through a block shackled to an eye bolt under the jaws of the gaff; but in most racing vessels nowadays a pendant or whip is used for this block, as shown in Plate I. The pendant should go round the mast with a running eye. By this arrangement the strain is taken off the jaws of the gaff and consequently off the main halyards. A common plan of fitting this block and whip is shown in Pig. 18. The hauling part of the sheet is generally put round one of the winches on the mast to " sheet home " the topsail.
The topsail tack is usually a strong piece of Manilla with a thimble spliced in it, to which the tack tackle is hooked.
Jib-topsail halyards and main-topmast-staysail halyards are usually single ropes rove through a tail block on topmast head; but one or two large vessels have a lower block, with a spring hook, which is hooked to the head of the sail. In such cases, the standing part of the halyards is fitted on the topmast head with a running eye or bight.

• The Oimara, cutter, had doable topsail sheets rove in this way : one end of the sheet was made fast to the gaff end; the other end of the sheet was rove through a single block on the clew of the sail; then through the oheek block at the end of the gaff, through a block at the jaws of the gaff, and round the winch.
Spinnaerb Halyards, Outhaul, &c.
Spinnaker halyards are invariably single, and rove through a tail block at the topmast bead.
The spinnaker boom is usually fitted with a movable goose-neck at its inner end. The goose-neck consists of a universal joint and round-neck pin, and sockets. (Square iron was formerly used for the neck, but there was always a difficulty in getting the neck shipped in the boom, and round iron was consequently introduced.) The pin is generally put into its socket on the mast, and then the boom end is brought to the neck.
At the outer end of the boom are a couple of good-sized thumb cleats, against which the running eye of the after and fore guy are put. The fore guy (when one is used) is a single rope; the after guy has a pendant or whip with a block at the end, through which a rope is rove. The standing part of this rope is made fast to a cavel-pin on the quarter, and so is the hauling part when belayed. The after guy thus forms a single whip-purchase (see Plate I.). The outhaul is rove through a tail block* at the outer end of the spinnaker boom, and sometimes a snatch block is provided for a lead at the inner end on th§ mast. The topping lift consists of two single, a double and single, or two double blocks, according to the size of the yacht.
The upper block of the topping lift is a rope strop tail block, with a running eye to go round the masthead. The lower block is iron bound, and hooks to an eye strop on the boom.
Formerly a bobstay was used ; but, if the boom is not allowed to lift, it will bend like a bow; in fact, the bobstay was found to be a fruitful cause of a boom breaking, if there was any wind at all, and so bobstays were discarded. The danger of a boom breaking through its buckling up can be greatly lessened by having one hand to attend to the topping lift; as the boom rears and bends haul on the lift, and the bend will practically be "lifted" out.
Small yachts seldom have a fore guy to spinnaker boom, but bend a rope to the tack of the sail (just as the outhaul is bent) leading to the bowsprit end; this rope serves as a fore guy, or brace, to haul the boom forward; and when the spinnaker requires to be shifted to the bowsprit, the boom outhaul is slackened up and the tack hauled out to bowsprit end. Thus double outhauls are bent to the spinnaker tack cringle, and one
• Formerly a hole vu out in the boom end, and a sheaye fitted for the outhaul to run through; this plan is now abandoned, as, unless the boom happens to oome with one partionlar side uppermost, an unfair lead may result rove through the sheave hole or block at the spinnaker boom end, and the other through a block at bowsprit end. But generally the large spinnaker (set as such) has too much hoist for the jib spinnaker, and a shift has to be made for the bowsprit spinnaker, which is hoisted by the jib topsail halyards if that sail be not already set; even in such case no fore guy is used in small vessels, but to ease the boom forward one hand slackens up the topping lift a little, and another the after guy, and, if there be any wind at all, the boom will readily go forward. In a five-tonner the after guy is a single rope without purchase, and the topping lift is also a single rope, rove through a block under the lower cap.
A schooner has a main and fore spinnaker fitted in the manner just described, and the usual bowsprit spinnaker as well, which is usually hoisted by the jib topsail halyards.
As spinnaker booms are now carried so very long, they will not go under the forestay; consequently, when the spinnaker has to be shifted, the boom must be unshipped. To shift the boom, the usual practice is to top it up, lift it away from the goose-neck, and then launch the inner end aft till the outer end will clear the forestay, or leech of foresail if that sail be set. If the boom is not over long, the inner end can be lowered down the fore hatch or over the side of the vessel until the other end will clear the forestay (see als<J page 79).
When spinnakers were first introduced no goose-neck was used, the heel of the boom being lashed against the mast. A practice then sometimes was to have a sheave hole at either end of the boom, with a rope three times the length of the boom rove through each sheave hole. One end of this rope served as the outhaul, the other for the lashing round the mast. To shift over, the boom was launched across to the other rail, and what had been the inboard end became the outboard end. Of course the guys had to be shifted from one end to the other. As spinnaker booms are now of such enormous length, it would be almost impossible, and highly dangerous, to work them in this way, although it might do for a five-tonner.
Spinnaker booms when first fitted with the goose-neck were no longer than the length from deck to hounds, so that they could be worked under the forestay without being unshipped. However, it would appear that the advantages of a longer boom are greater than the inconvenience of having to. unship it for shifting, and now, generally, a spinnaker boom when shifted and topped up and down the mast, reaches above the upper cap.
The following plan was worked during the summer of 1876 in the Lily, 10-tonner, but we have never met with it elsewhere. The arrangement was thus described: Take a yacht of say 65 tons, and suppose her 70ft. long and 15ft. beam, with a mast measuring 60ft. from deck to cap, from which if 9ft. is subtracted for masthead, and 4ft. more allowed for the angle made by the forestay, a spinnaker boom, to swing over clear, cannot exceed 43ft. (as the goose-neck is 3ft. from deck), which of course is much too little to balance the mainboom and sail. It is proposed to have a boom of 42ft., and another smaller one of 21ft. made a little heavier than the long one, and fitted with two irons 7ft. apart; the longer one to be made in the usual manner, with bolts in both ends, for the goose-neck; but the sheaves in the ends to be, one vertical, and the other horizontal. It will then make a very snug storm boom for the balloon jib when shipped singly, whilst the smaller one, by leading a tack rope (or outhaul) through the block on the outer iron will do very well for the staysail. See Fig. 19: in case No. 1, the boom is on end and ready for letting fall to starboard; and in Ho. 2 dipped and falling to port. A A (No. 1) represents the 42ft. boom, and B B the 21-footer; the dotted line b b the arc the boom would travel if not let run down; and the dotted line c c the actual line it travels when housed. C in the small diagram represents the outer iron or cap on the end of the small

boom (which can be made square or round; in the diagram it is made square, to prevent twisting), and a a bolt to which the standing part of the heel rope is made fast by clip hooks; the rope passes through the horizontal sheave at h, and back to the block on the cap at/. The fall can be belayed to a cleat on the small boom, or would greatly ease the strain on the gooseneck if made fast on the rail or to the rigging. When gybing it would only be necessary to top the boom by the lift, let go the heel rope, and let it run down; then swing over, lower away, and haul out the boom when squared. It would be better to hook on the Burton purchase to the cap at e, both as an extra support and to make sure of the boom whilst swinging. This plan would not only obviate the danger and trouble of dipping the boom, but give a 57ft. spar, besides giving greater strength, the boom being double where the most strain comes; and the extra weight is a positive advantage, as helping to balance the main boom. Of course this plan would allow of almost any length of spars, as a 40ft. lower boom would give a 74ft. spar, and still leave 8ft. between the irons; and in these days of excessive spars and canvas no doubt it would be attempted to balance a ringtail, but the lengths given seem a good comparative length for any class.
A more simple plan for " telescoping " a spinnaker boom is shown by
Fig. 20, a is the inner part of the boom; c is a brass cylinder with an
angular slot in it at 8. This cylinder is fixed tightly to the outer part of the boom by the screw bolts i i. The two parts of the boom meet inside the cylinder at the ticked line t. When the two parts "of the boom are to be used together, the ring m is put on the cylinder. The inboard part of the boom is then put into the cylinder, and the whole is firmly screwed up by the thumb-screw x. Both parts of the boom have their ends " socketed " so as to take a goose-neck, and thus either part can be used alone.
Was this article helpful?
Recommended Programs

Myboatplans 518 Boat Plans
Related Posts
- Standing Rigging - Boat Sailing Guide
- Plan Drawing Fregatt - Rigging
- How Are Catamaran Masts Fixed Down
- Rigging a singlehanded dinghy
- Rigging a twohanded dinghy
- Rig Construction - Ship Design
Readers' Questions
What is yacht running rigging?
Yacht running rigging is the ropes and cables used to control the movement of the sails and spars of a sailing yacht. It generally consists of halyards, sheets, guys, and sometimes vangs, used to raise, lower, and angle the sails.
Yachting Monthly
- Digital edition

Boat rigging: a guide to going composite
- Sam Fortescue
- July 1, 2021
Considering changing you boat rigging to composite but confused by the options? Sam Fortescue takes a look at the pros and cons of various solutions

‘Like the shift from wooden spars to alloy spars after the Second World War, we are moving to carbon spars and composite boat rigging for cruising boats,’ says well-known surveyor Kim Skov-Nielsen. ‘We are living on the cusp of a major shift to all-composite rigs.’
Four broad options for modern boat rigging run from ultra-high molecular weight polyethylene (HMPE) to aramid, PBO (poly-benzoxazole) and finally full carbon.
Compared to steel, all these options offer much lighter weight, which makes for less pitching and rolling in a sea. Greater rig stiffness improves sail trim and transfers forces more efficiently – particularly in lighter winds. And synthetic fibres resist the invisible fatigue that undoes stainless steel systems.
For budget-conscious boaters looking to save weight aloft, carbon rigging is a much cheaper way to do it than carbon spars
On the other hand, the cost can be two to four times that of wire boat rigging, and repairs are tricky outside major sailing centres. Some of the fibres degrade rapidly with exposure to UV or moisture, so damage to the sheathing will shorten the lifespan of the stay.
Carbon in particular is also susceptible to impacts from the side. Every sailor will weigh up the options differently, but here are your choices:
HMPE (Dyneema/Spectra)
Dyneema and Spectra has extraordinary tenacity and a very low weight, but many riggers are wary of using it on cruisers because they consider it too elastic.
However, US specialist Colligo Marine says it is just a question of picking the right grade of Dyneema and sizing it correctly. ‘Many people have mistakenly sized Dyneema for break strength and ended up with a very stretchy rig,’ says John Franta of Colligo Marine. ‘Stretch is a function of cross-sectional area, so all you need to do is pick the right diameter for your application.’
That means you’re going to end up with a bigger Dyneema line than your original wire, causing marginally more windage, albeit at a fraction of the weight. For example, the 8mm wire that is standard on many 40ft cruisers would have to be replaced with 11mm Dyneema in a Colligo Dux system, but this should creep less than 3mm per year.
Colligo’s aluminium chainplate eye can be tensioned with a lashing on sub-30ft boats
The variety of HMPE you use is vital, too, as the strands within the line align themselves with the load.
‘A 50ft-long backstay made from normal Dyneema can grow 4-6 inches in length,’ says Franta. That’s why Colligo only uses heat-stretched Dyneema SK75, where the fibres are already very tightly aligned, instead of higher-tech grades like SK99 and DM20.
A typical HMPE stay is spliced around a lightweight aluminium thimble, which fits easily to traditional fork at the deck end. You’ll need a special Colligo stemball fitting aloft or a CheekyTang, spliced into a loop at the top end of the shroud, then bolted through the mast.
Chafe and UV are the chief enemies of Dyneema rigs. ‘It is easier to cut and has a low melting point of 100°, so a fast-moving sheet could cut through it in seconds,’ warns Marlow sales director Paul Honess. Colligo is PVC shrink-wrapped for this reason and should last eight to 12 years without mishap.
Aromatic polyamides (Kevlar is a Dupont trademark) have low creep and high tenacity, but they also resist abrasion well – important when pitching and rolling across the Atlantic, for example.
Article continues below…
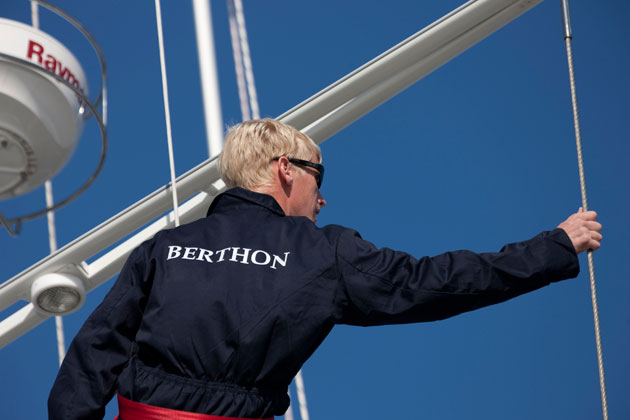
Improving performance through tuning standing rigging
To tune or not to tune? Would you drive your car with wheels misaligned? Run a marathon with your shoelaces…

How to check your rigging – video guide
A screwdriver, a straight edge and a good set of eyes are all that’s required for a basic rig check.…
Aramids are five times stronger than steel rope weight-for-weight, but that multiple falls if the fibres become wet and UV light causes them rapid damage, so cables have to be well sealed and protected.
Aramid stays
OYS has been designing Kevlar backstays with stainless steel terminations for years, and recommends a maximum working load of 40% of the cable’s breaking strain to minimise creep, so aramid stays are a little fatter than rod equivalents.
For example, an 8.5mm cable can take loads of 3000kg and yet weighs just 60g per metre. Compare that to Nitronic, where 7.5mm rod offering the same working load weighs 350g per metre. ‘You size it for stretch, and then you end up with a much higher safety factor,’ says Robbie Sargent of OYS. ‘It’s flexible and you can coil it up, plus it’s relatively price competitive and looks smart. Aramid is to all intents and purposes a cruising product.’
Black sheathing is standard, but lighter custom colours can reduce the cable’s resistance to UV. OYS does not recommend aramid shrouds on a monohull. ‘Rod and wire is pretty bullet-proof in terms of chafe and physical damage,’ says Sargent. ‘Composite rigging is a lot more fragile. A mid-sized Oyster or Swan has full battens – can go that goes through the textile sheath very quickly.’
The material works well in fore- and backstays, runners and inner fore-stays, or as lateral rigging on a multihull, he adds.
Dutch-based Aramid Rigging uses an advanced endless winding machine for made-to-measure stays. The bundle of fibres is in turn wrapped in heat shrink to keep out water, then an outer protective braid with a UV-resistant coating. The metal thimbles at each end are then sealed inside a polyurethane moulding, eliminating one common point of failure for steel rigs.
Developed in the 1980s, polybenzoxazole or PBO was seen as a step up from aramid for rigging raceboats, with nearly twice the strength and modulus – stiffness. It weighs less than 20% of rigging wire, and manufacturers have developed an easy-to-fit cruising product.
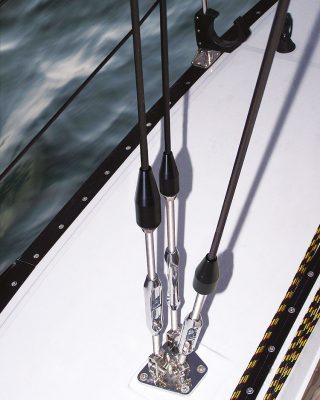
Powerlite PBO cables from Applied Fiber
Westmarine in the US worked with Applied Fiber to develop the Powerlite brand – fully compatible with normal terminations at the mast and deck, so it can be swapped for an existing wire or rod stay.
A sheath is extruded on to pre-tensioned bundles of PBO at the manufacturing stage, protecting the fibres from UV, water and abrasion. It can even be run through the spreaders like steel.
Allspars is the UK supplier for the Dutch EasyRigging system, but both manufacturers agree the rig should be replaced after eight years – sooner if the boats have been raced hard. Babystays, runners and removable forestays should be replaced after just four years. Some riggers, however, say that PBO has been eclipsed by carbon for performance, while Dyneema and aramid stays are cheaper and more robust. ‘PBO has proven unreliable, inexplicably brittle and very susceptible to UV damage,’ says surveyor Skov-Nielsen. ‘It doesn’t even get discussed these days when contemplating new rigging.’
The state of the art remains carbon, where Future Fibres dominates. Before you turn the page with a scoff, know that costs have plunged and manufacturing has improved – bringing carbon rigging within reach of cruising boats.
‘ECthree is entry-level for those that want to move away from rod rigging for better performance and more comfort at sea,’ says general manager James Austin. ‘We have a mission to democratise that and make it a more accessible product for someone in the 30-60ft category.’
ECthree is made of rods of pure carbon, bundled, sheathed and fitted with stainless steel terminations, making them easy to retrofit. It is similar to the peak performance ECsix product. ‘It is 20% lower in modulus but one fifth of the cost,’ says Austin. ‘We think that’s a good compromise.’
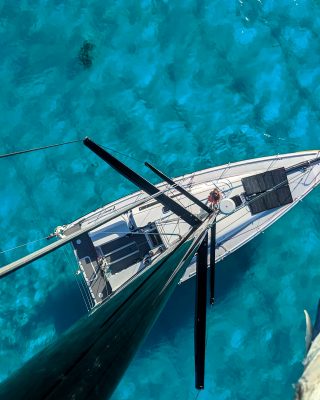
Moving from rod to carbon rigging on a 45ft yacht is ‘equivalent to having an extra person sitting on the rail’
Carbon boat rigging saves 65% of the weight of rod rigging. It is invulnerable to water or UV, so is ideal for use on a yacht. True, carbon doesn’t handle lateral forces as well as steel, but the construction allows the fibres to move and flex within the sheath.
The stainless-steel fittings are designed to be replaceable, but the cable should be inspected and serviced regularly – a service Future provides in the package.
‘It is unrealistic to think we can get to the same price as rod, but we would hope to be less than double,’ says Austin. ‘It’s undoubtedly a cost premium to have composite rigging, but you have to look at it over 15- to 20-year life-cycle of the boat.’ The lateral rigging on a Grand Soleil 46 refitted recently cost around £15,000.
LightSpeed, a smaller US manufacturer that is also trying to drive carbon rigging into the sub-80ft cruising bracket, uses the same Toray T700 as Future, with smart titanium terminals that fit most common types of standard rigging screw and mast fitting. ‘We are unique in building an integrated Technora blend into the hoop structure of the cable, which delivers unmatched cable chafe protection and durability without adding bulk of a cover,’ says technical specialist Mike Wasten.
Comparative boat rigging costs
- Wire and rod – rigging a Dehler 38 with standard 1×19 wire or Nitronic rod, would be an estimated £2,280 for wire and around £5,000 for rod.
- HMPE (Dyneema/ Spectra) – Cables to rig a Dehler 38 would cost £2,900-3,700.
- Aramid – costs of around £7,500 for the Dehler 38 are 40-60% more than rod rigging
- PBO – Powerlite claims its cables cost just 30% more than rod, quoting $8,525 (£6,210) for a Dehler 38 with running backstays.
- Carbon – $20,000 (£14,600) for a complete set of stays with runners to suit a Dehler 38.
Enjoyed reading this?
A subscription to Yachting Monthly magazine costs around 40% less than the cover price .
Print and digital editions are available through Magazines Direct – where you can also find the latest deals .
YM is packed with information to help you get the most from your time on the water.
- Take your seamanship to the next level with tips, advice and skills from our experts
- Impartial in-depth reviews of the latest yachts and equipment
- Cruising guides to help you reach those dream destinations
Follow us on Facebook , Twitter and Instagram.
Please verify you are a human
Access to this page has been denied because we believe you are using automation tools to browse the website.
This may happen as a result of the following:
- Javascript is disabled or blocked by an extension (ad blockers for example)
- Your browser does not support cookies
Please make sure that Javascript and cookies are enabled on your browser and that you are not blocking them from loading.
Reference ID: 38b5ce79-fd48-11ee-8dab-65aa5ffe0a53
Powered by PerimeterX , Inc.
Contact us at [email protected] or (440) 376 - 8040

Yacht Rigging & Sailing Services
Professional Yacht Rigging & Racing
Based in Bristol RI. Servicing the greater New England area.

Rig Inspections
Sound rigging is vital to safe passage. We offer onsite stem to stern mast head to butt inspection of your yacht's rigging. Inspections include an unbiased full report and any estimates that may follow.

Yacht Refits
Thinking about an overhaul or just purchased a new boat and want to customize? We assist owners customize their yachts to suit their specific sailing needs. We've refit offshore boats for distance racing, kitted out one design fleets, and optimized yachts for short-handed cruising.

Standing Rigging
Rusty, broken, or rotten rigging? We can service or replace wire, rod, or dyform rigging on your yacht. By using the highest quality products in the industry, we fabricate rigging for safety and performance.

Running Rigging
Line has a large effect on the ergonomics of your yacht's rigging. Expert splicing and product knowledge allow us to best serve your yacht's running rigging needs. Our variety of brands allows us to pick and choose the best options. We also specialize in grand prix racing and offshore running rigging packages.

Keeping your hardware in good condition helps ensure smooth operation and increase longevity. We can service or replace almost any piece of hardware on your yacht. Winches, traveler cars, hydraulics, furlers, and blocks to name a few common serviceable items.

Sailing Services
Racing has been a passion of mine since a very young age. To share it with others at the highest level is my goal in this business. If you're interested in learning more please reach out directly at [email protected] or (440) 376 - 8040.
Based in Bristol RI, we provide a fully mobile bespoke rigging service to the greater New England area. We specialize in many types of rigging providing comprehensive unbiased service tailored to your yacht. You can reach us through the website or directly at [email protected] or (440) 376-8040

33 Richmond St Bristol, Bristol County 02809 USA
(440) 376 - 8040
Thanks for submitting!
IMAGES
VIDEO
COMMENTS
PLEASE NOTE: THIS VIDEO HAS BEEN UPDATED WITH ENHANCED GRAPHICS AND IMPROVED SOUND. CHECK IT OUT HERE https://youtu.be/tRgWtPaCQQcA beginners guide to sailbo...
Credit: Bill Tripp Design. The Bermudan rig is the all-rounder, able to perform well at all angles of sail. It is efficient upwind, while downwind the sail area can be significantly boosted with a big gennaker or spinnaker. For good reasons, it is the first choice for nearly every modern sailing yacht up to around 60 to 65 metres for cruising ...
Some higher-end performance boats and larger cruising yachts are fitted with rod rigging, which has a high strength-to-weight ratio and low windage on account of the smaller diameters that can be used. There has also been a small but growing shift in the aftermarket toward high-modulus fiber standing rigging, notably Dynex Dux, which offers ...
A beginners guide to sailboat rigging, including standing rigging and running rigging. This animated tutorial is the first in a series and covers sails, line...
Rigging a yacht is a meticulous process that requires careful planning and thorough preparation. Before embarking on your sailing adventure, it's crucial to ensure that every aspect of your yacht's rigging is in top-notch condition. The advantages of this step-by-step guide are manifold. It guarantees the safety of both the vessel and its ...
Standing rigging keeps the mast in place, but it's the running rigging that handles all the action aboard a boat under sail. The many components in a modern running rigging system—sheets, outhauls, vang control, halyards—work in conjunction with wide range of blocks to keep friction to a minimum. Ralph Naranjo.
The difference between standing rigging and running rigging. Sometimes things can get confusing as some of our nautical terms are used for multiple items depending on the context. Let me clarify just briefly: The rig or rigging on a sailboat is a common term for two parts:. The standing rigging consists of wires supporting the mast on a sailboat and reinforcing the spars from the force of the ...
The price of boat rigging can vary depending on several factors, such as the size and type of boat, the complexity of the rigging system, and the materials used. Typically, a basic rigging package for a sailboat of 20 feet can range from around $1,000 to $3,000. This may include essentials like shrouds, stays, halyards, and sheets.
Sails and rigging are the engine room of any sailing boat from small dinghies up to giant superyachts. No matter how big or how new your boat, the sails and rigging need to be checked regularly and will need intermittent updating. Updating of rigging on a yacht in particular will often be a requirement for insurance purposes so any owner will ...
By Robin Iversen January 12, 2024. The running rigging on a sailboat consists of all the lines used to hoist, lower, and control the sails and sailing equipment. These lines usually have different colors and patterns to easily identify their function and location on the vessel. Looking at the spaghetti of lines with different colors and ...
Understanding the Basics of Rigging. Before we dive into the process of rig tuning, it's essential to understand the basics of rigging. The rigging system on a sailboat consists of various components, including the mast, boom, shrouds, stays, and sails. These components work together to provide stability, support, and propulsion for your boat.
Yacht rigging is a dark art and no one will ever convince me otherwise. I have yet to meet two riggers who agree on anything - and there is no manual to read up on. It is a world of angles, tension, loads, corrosion, metal fatigue and, most of all, opinions.
Yacht rigging: your essential pre-season rig check guide. Few things are more important during the spring fit-out than a thorough yacht rigging and spar inspection. Duncan Kent runs through the priorities. During the spring fit-out we often appear to lavish far more attention on the engine and electrical systems than we do on the rig, despite ...
Rigging comprises the system of ropes, cables and chains, which support and control a sailing ship or sail boat 's masts and sails. Standing rigging is the fixed rigging that supports masts including shrouds and stays. Running rigging is rigging which adjusts the position of the vessel's sails and spars including halyards, braces, sheets and vangs.
Boat rigging. Boats used in the sport of rowing may be adjusted in many different ways according to the needs of the crew, the type of racing, and anticipated rowing conditions. The primary objective of rigging a boat is to accommodate the different physiques and styles of rowing of the crew in such a way that the oars move in similar arcs ...
Gaff ketch - two-masted (mizzen), two mainsails, staysails, fore-and-aft rigged. Full-rigged ship or tall ship - three or more masts, mainsail on each mast, staysails, square-rigged. The first word is the shape and rigging of the mainsail. So this is the way the sail is attached to the mast.
The domain of rigging is an essential matter for the safety and good performance of your sailboat. Nowadays, the type of rigging is still evolving. Generally, rigging is depending on the type of sail used or the number of masts. As a basic rule, the replacement of the standing rig should be done every 10 years, except for multihulls or regattas, and rod or composite fiber rigging. A good set ...
5. Secure the mast using the appropriate rigging and fasteners. Attach the standing rigging, such as shrouds and stays, to the mast and the boat's hull. Fact: The mast of a sailboat is designed to withstand wind resistance and the tension of the rigging for stability and safe sailing. 2.
Yacht running rigging is the ropes and cables used to control the movement of the sails and spars of a sailing yacht. It generally consists of halyards, sheets, guys, and sometimes vangs, used to raise, lower, and angle the sails.
Comparative boat rigging costs. Wire and rod - rigging a Dehler 38 with standard 1×19 wire or Nitronic rod, would be an estimated £2,280 for wire and around £5,000 for rod. HMPE (Dyneema/Spectra) - Cables to rig a Dehler 38 would cost £2,900-3,700. Aramid - costs of around £7,500 for the Dehler 38 are 40-60% more than rod rigging.
Rigging is used on boats for a variety of purposes. Essentially, it's the process of getting the boat ready for the customer's intended use, whether it's for something as specific as bass fishing or for general pleasure. It's important for marine technicians to have a broad knowledge of rigging, as a key part of their role is to install ...
West Marine's selection of boat rigging hardware encompasses all the most respected brands, including FSE Robline, Loos, New England Ropes, Ronstan, Samson Rope, Alexander Roberts, Alps Wire Rope, C. Sherman Johnson, Schaefer, Suncor and Edson Marine to name a few. Of course, for hard or complicated jobs, experienced professionals at West ...
About Us. Based in Bristol RI, we provide a fully mobile bespoke rigging service to the greater New England area. We specialize in many types of rigging providing comprehensive unbiased service tailored to your yacht. You can reach us through the website or directly at [email protected] or (440) 376-8040.