Part of this, now, 37 page thread describes a neat device, "Claudio's gadget". There are several devices available to help you place the camber into your sail without inducing bad wrinkles into the seam (eg. sail board, sail blocks, the gadget). The gadget looks to me to be the simplest to construct. There are many pages discussing the gadget, but I think these are the relevant pages for a quick overview:
Photo series of gadget in use, page 33.
Written instructions, page 37.
Right and wrong way to use gadget, page 12.
Much of the discussion seems to be about calibrating the gadget to get exactly the draft you want. As a beginner, I am not as concerned about achieving that level of precision as a full out racing sailor. It looks to me as if you could get a decent sail w/o worrying about these concerns, important though they might be to an expert.
I plan to make the gadget and try it out with florist's wrap and with tyvek.
-----------
Update: Claudio's gadget works like a charm! Very easy to make and to use. All I did was rip a 1/4" strip off a piece of lath (previously planed smooth by John). I screwed the ripped piece back onto the remaining lathe with one small screw in the middle. For wedges I used pieces of pine wedges sold in a packet for leveling tables, window sashes, etc. Add 2 clamps and the gadget is finished :-).
Two tests with Tyvek showed that the gadget works great with one modification. Tyvek is "fused felt", with no weave. My Tyvek will not let me remove tape; the tape pulls the felt apart (there is no mechanical structure, ie warp and woof, holding the fibers together). Since the sail is taped to the gadget, then peeled off when done, this would be a problem. The problem would not arise with smooth mylar or with cloth, each of which will allow removal of tape w/o damage.
The simple solution I used was to pre-tape the first Tyvek sail panel with generic brand "magic" tape along the edge that would be stuck down to the gadget. By leaving a tail of magic tape extending past the Tyvek, I had a nice handle to peel the sail from the gadget. Magic tape is thinner than regular cellophane tape. This extra tape might make the seam stiffer than normal, I'll have to actually sail with the Tyvek sail and see if it poses a problem. Tyvek itself is stiffer than the tape, so perhaps nothing will happen.
The Sailsetc document (Sailmaking Notes, Tech TI 20) says to use "3-6mm arc per 1 meter of seam". This seemed pretty small on my tests. I tried using about 12mm and the seam looked flawless. The big advantage of the gadget, for me, is that it is easy to get a perfect seam on the first laydown of the 2nd panel onto the 1st panel. Since I can't pull up and reposition w/o damage, the gadget is the way to go for Tyvek, I'd say. | | | | | | |
The gadget, poster tape, clamps, wedges and shims.
Closeup of the wedge in place. You can mark lines on the wedge indicating the wedge's thickness at various points, allowing you to get symetrical placement. | | | . | | | Quick Reply | | The following errors occurred with your submission | | | | | | | Similar Threads | | Category | Thread | Thread Starter | Forum | Replies | Last Post | | | DaveyDave | Batteries and Chargers | 23 | Sep 13, 2010 06:38 PM | | Mini-HowTo | | 3dflyindan | Indoor Pattern/F3P | 2 | Mar 13, 2006 03:29 PM | | | chainick | The Builders Workshop | 7 | Feb 13, 2005 03:52 AM | | Question | | tibofo | Electric Power Systems | 1 | Dec 30, 2004 06:47 AM | | | DavidJ | Parkflyers | 9 | Feb 01, 2003 07:56 AM | - Electric Flight
- Advertising
- Our Sponsors
- Review Policies
- Terms of Service
- Privacy Policy
- Site History
- Mark Forums Read
- Member Search
- Upcoming Articles
- Do Not Sell My Data
- Manage Consent
- Back to Top
- Masting, rigging and sails
 - Remember me Not recommended on shared computers
Forgot your password? Your best sail cloth and techniqueBy steven sturgis March 11, 2015 in Masting, rigging and sails - Reply to this topic
- Start new topic
Recommended PostsSteven sturgis. Hi every one. I have been looking for the best sail cloth for my Flying Fish build. I would like to get a lot of suggestions that I can look at. Please include where the cloth can be bought. Do you change the color with dyes? do you age the cloth some how? How do you add detail to the sails? All sail makers are welcome to post their designs I know a lot of you don't put on sail because it covers the rigging so anyone that does would be a great asset to the topic. Looking forward to seeing your tricks and designs. sail techniques http://modelshipworl...-and-technique/ Link to commentShare on other sites.  Click on the Nautical Research Guild Home Page straight up to the top of the page, then, click on Ship Modeling Resources, then, click on Ship Modeling Database of Articles, Then click Rigging and Sails, then click the pdf "Making and forming sails for your model." I could have pasted the direct link, but thought it better for you to see everything that was available here on MSW. You can go to a Joanne's or any yard goods store and buy Egyptian cotton, almost silk like. Coffee and/or tea make good stains, very controllable. I'm certain there will be other suggestions to follow....  Thank you twintrow. I did look at that but some one needs to go back and up date the links. About 80% don't work any more. I was going for full rigged full sails. Can you do that in paper? 1/8 scale Im sure this is old hat to the expert modelers but passing on that knowledge is needed by the next generation of builders  I make sails for models in scale 1:75 with seams of the cloths sewing marked with single thread ( courtesy of Admiral ). For models in scale 1:100 I use computer printing of cloths lines and reef bands on thermal transferring paper for ironing on to sails fabric . Sails leech, head and foot ropes are fixed in its place with use of textile adhesive . Material for sails I prefer is old bed linen many, many times washed . Work step by step 1.Make paper stencil for each sail and check it’s dimensions on your model. 2.With soft pencil transfer all lines in to fabric – add stripe 5-7 mm around sail edges. 3.Make all necessary lines on fabric using sewing machine and thin thread with light brown or beige color. For sails with thermal transferring of line any sewing is not necessary. Cut of sail shape. 4. Fold the edges stripe to reverse side of sail and apply textile adhesive 5. Put sail on flat surface protected against glue adhesion ( wax paper ) and fix it with pins and nails for forming clews. Using textile adhesive attach thread around sail and form clews and cringles as necessary. After adhesive excess removal from sail surface and final ironing your sail is ready. Foto 1-10 Sail making Step by Step Foto 11 HMS Speedy - printed sails Foto 12 HMS Warrior - printed sails Foto 13 Patern for printing sails for S/S Savannah  - Mirabell61 , CaptainSteve , Landlubber Mike and 9 others
 I wouldn't use paper. If you don't want to use cloth, use silkspan from a hobby shop that deals with the RC guys/gals. It comes in various weights and you'd probably need to acquire small amounts of several sizes to find which one works best for you. Mark "The shipwright is slow, but the wood is patient." - me Current Build: Past Builds: La Belle Poule 1765 - French Frigate from ANCRE plans - ON HOLD Tri ton Cross-Section NRG Hallf Hull Planking Kit HMS Sphinx 1775 - Vanguard Models - 1:64 Non-Ship Model: On hold, maybe forever: CH-53 Sikorsky - 1:48 - Revell - Completed Licorne - 1755 from Hahn Plans (Scratch) Version 2.0 (Abandoned) Good stuff. I have seen some members using silkspan and modelspan. Any thought on this material. I'm not familiar with thermal transferring paper. can you elaborate. How do you use textile adhesive with out making a mess? Is it diluted in any way? The adhesive is not diluted , unwanted stains of adhesive on sails can be easily removed by scraping .  Thanks for outlining the step by step process you use. In my opinion, the thermal transfer is brilliant. I have been hesitating to start my sails for quite a while because I don't want to sew the seam lines (I think they would look too bulky) and I don't trust myself to be able to draw them evenly using pencil. You have certainly given me something to think about! I imagine transfer will be more durable than pencil - another plus for the technique. Current build -- MS Bluenose Future build - MS Flying Fish "A ship is safe in harbor, but that's not what ships are for." - William G. T. Shedd  Guest Tim I.Good stuff. I have seen some members using silkspan and modelspan. Any thought on this material. I'm not familiar with thermal transferring paper. can you elaborate. How do you use textile adhesive with out making a mess? Is it diluted in any way? Silk span is easy to work with. PVA glue works well and any glue that moves outside what you are trying to glue will dry clear. Also Rubber Cement works well, if applied sparingly. Here are some sails I have done using silk span. Nothing to write home about, but my first attempts at sail making. I use strips of silk span to simulate seams and sail detail and work them up in layers. You can also add bolt ropes and reef points to add more detail. I did not go into a lot of detail with these, rather kept them simple to work on my technique. Also if you use PVA a good idea is to press the sails between some parchment paper and heavy books while drying to prevent buckling or bubbling of the thin strips of silk span.  I hope this helps. I like the look of the silkspan and the layering of the cloth details. What weight silkspan do you use? Not quite sure on the weight. I just bought what my local hobby store has. This Silk Span in my pictures is the "SGM White". Hope this helps,  A question about silkspan. Can it achieve the draped and folded look of clewed up sails? Or will it be too stiff? I want to show my ship in the process of reducing to battle sail. Laissez le bon temps rouler ! Current Build: Le Soleil Royal Completed Build : Amerigo Vespucci Just saw this while looking for a source for Sig Silkspan, source of quote is the Stuntbarn an RC Forum: "Title: Silk Span Covering Post by: ericrule on October 22, 2012, 12:10:29 PM I just got off the telephone with Sig Mfg where they informed me that they will no longer have silk span available. At the present time they have only OO (Light) in stock and when that is gone they will no longer be able to obtain it. According to the person I spoke to the company that supplied the silk span is out of business and they can not find any other supplier. Mike is searching for a new source but it does not look like he is having any luck." So not sure if real or not....? But if true silkspan may not be around loong?? Just saw this while looking for a source for Sig Silkspan, source of quote is the Stuntbarn an RC Forum: "Title: Silk Span Covering Post by: ericrule on October 22, 2012, 12:10:29 PM I just got off the telephone with Sig Mfg where they informed me that they will no longer have silk span available. At the present time they have only OO (Light) in stock and when that is gone they will no longer be able to obtain it. According to the person I spoke to the company that supplied the silk span is out of business and they can not find any other supplier. Mike is searching for a new source but it does not look like he is having any luck." So not sure if real or not....? But if true silkspan may not be around loong?? Tom That is what my local hobby store told me as well. That is why I bought out everything they had, for stock. Oh noooooooooooooooooooooooooo !!!!! Say it ain't so. Thank you all this is good stuff. I hope I can still get silk span I would like to try it out.  Landlubber MikeIs there a difference between silk span and model span? I have a roll of model span, but haven't tried using it yet. Current Wooden builds: Amati/Victory Pegasus MS Charles W. Morgan Euromodel La Renommèe Plastic builds: SB2U-1 Vindicator 1/48 Five Star Yaeyama 1/700 Pit Road Asashio and Akashi 1/700 diorama Walrus 1/48 and Albatross 1/700 Special Hobby Buffalo 1/32 Eduard Sikorsky JRS-1 1/72 IJN Notoro 1/700 Akitsu Maru 1/700 Completed builds : Caldercraft Brig Badger Amati Hannah - Ship in Bottle Pit Road Hatsuzakura 1/700 Hasegawa Shimakaze 1:350 F4B-4 and P-6E 1/72 Accurate Miniatures F3F-1/F3F-2 1/48 Tamiya F4F-4 Wildcat built as FM-1 1/48 Special Hobby Buffalo 1/48 Citroen 2CV 1/24 - Airfix and Tamiya Entex Morgan 3-wheeler 1/16 Terminated build: HMS Lyme (based on Corel Unicorn) On the shelf: Euromodel Friedrich Wilhelm zu Pferde; Caldercraft Victory; too many plastic ship, plane and car kits Future potential scratch builds: HMS Lyme (from NMM plans); Le Gros Ventre (from Ancre monographs), Dutch ship from Ab Hoving book, HMS Sussex from McCardle book, Philadelphia gunboat (Smithsonian plans) I believe its just a different brand butt lets let the experts handle that question. For what it's worth I got a big roll of model span last year from CornwallModelBoats. Steven, if you're interested in furled sails, I shared my techniques that I used on my Badger in a separate thread: http://modelshipworld.com/index.php/topic/3944-landlubber-mikes-technique-for-furled-sails/  jablackwellThose looking for SilkSpan can still find it at the Guillow model airplane homepage. It can be found under the spare parts section. Each model plane has a spare parts assortment, and the wing covering is an option for most. U.S. Brig Syren - 1803 - Model Shipways - First PoB Build Sopwith Camel F.1 - 1916 - Model Airways - Not a Ship! , Completed Kate Cory - 1856 - Model Shipways - Second Build, completed Sultana - 1767 - Model Shipways - First shipbuild, completed  There's more on using SilkSpan for sails in a new booklet by SeaWatchBooks, or as a new chapter in a new edition of Swan IV. Be sure to sign up for an epic Nelson/Trafalgar project if you would like to see it made into a TV series http://trafalgar.tv  Jolley RogerFor what it's worth I got a big roll of model span last year from CornwallModelBoats. Steven, if you're interested in furled sails, I shared my techniques that I used on my Badger in a separate thread: http://modelshipworld.com/index.php/topic/3944-landlubber-mikes-technique-for-furled-sails/ Can you recall under what product name CMB was selling the model span? I've been unable to find it on their site. Samuel Pepys notes in his diary on 19 July 1667: "the Dutch fleets being in so many places, that Sir W. Batten at table cried, By God , says he, I think the Devil shits Dutchmen." I can't find it on the website either. I'm fairly certain it was under building materials or something and listed as Modelspan. I looked at the packaging, and it had the Mantua name/emblem on it, but I don't see it under the Mantua fittings. Maybe email them and ask? Thanks Mike, i'll send them a mail. I am a passionate advocate of including sails on models so I am pleased you are making the decision to include them on your model. I had a look at your Victory build log, those sails looks fantastic! I think I will follow your method when I get to that part on my build.  Richard GriffithBluejacket Shipcrafters ran out of silkspan recently but they substituted model span which to me is the same material. I used it to added furled sails to Le Superbe. I am a very happy customer of BJ, not an employee. - Canute , MrBlueJacket and Landlubber Mike
I'm just using old worn bed sheets for my 1/100 scale HMS Victory. Check out my build log which is really not much at all about building the kit and mostly focussing on how I am making the sails. I bet if you searched through all my comments on MSW you would find 1/2 of all my posts are having to do with sails or rigging. I am a passionate advocate of including sails on models so I am pleased you are making the decision to include them on your model. I don't think the thickness of the material is that big a deal as long as the texture of the weave is fine enough not to draw attention to itself. Many very convincing ship model sails have actually been carved out of wood. My build log goes into a lot of detail on these points but I will just set them out here again: Don't use pure white sails, this will look too stark and in fact actual sails were cream colored or very light grey.(staining with coffee is super easy and very effective) Don't sew the boltropes on, no matter how fine a thread you use, it will look out of scale. Just glue them on. Do include sail construction details like reef bands and reinforcing patches, these give a good texture and are realistic. Look at all the photos you can find of reproduction ships that resemble your ship and try to duplicate that look. JCFrankie, thanks so much for your detailed log on your sail techniques. I went with furled sails on my Badger, but was planning on doing a mixture of furled and unfurled on my Pegasus and future builds. Your results are fantastic, and I will certainly bookmark your log for when I get to that point! I experimented with tissue and a few other materials as well, but ended up with cloth as well. Once again, a big thank you! Hi I am making sails for a large pond yacht which will of course become very wet , if I chose a material that becomes too wet and heavy that will cause problems, what is the best material to use for a large expanse of sail. My pond yacht is 5ft long not inc bow sprit. Join the conversationYou can post now and register later. If you have an account, sign in now to post with your account. × Pasted as rich text. Paste as plain text instead Only 75 emoji are allowed. × Your link has been automatically embedded. Display as a link instead × Your previous content has been restored. Clear editor × You cannot paste images directly. Upload or insert images from URL. - Insert image from URL
- Submit Reply
Recently Browsing 0 members- No registered users viewing this page.
Modelshipworld - Advancing Ship Modeling through Research SSL SecuredYour security is important for us so this Website is SSL-Secured NRG Mailing AddressNautical Research Guild 237 South Lincoln Street Westmont IL, 60559-1917 Model Ship World ® and the MSW logo are Registered Trademarks, and belong to the Nautical Research Guild (United States Patent and Trademark Office: No. 6,929,264 & No. 6,929,274, registered Dec. 20, 2022)Helpful links. - Articles Database
- NRG Home Page
- NRG Online Store
- Important: Our Guidelines
- Terms of Use
- Buildlog Index
About the NRGIf you enjoy building ship models that are historically accurate as well as beautiful, then The Nautical Research Guild (NRG) is just right for you. The Guild is a non-profit educational organization whose mission is to “Advance Ship Modeling Through Research”. We provide support to our members in their efforts to raise the quality of their model ships. The Nautical Research Guild has published our world-renowned quarterly magazine, The Nautical Research Journal, since 1955. The pages of the Journal are full of articles by accomplished ship modelers who show you how they create those exquisite details on their models, and by maritime historians who show you the correct details to build. The Journal is available in both print and digital editions. Go to the NRG web site (www.thenrg.org) to download a complimentary digital copy of the Journal. The NRG also publishes plan sets, books and compilations of back issues of the Journal and the former Ships in Scale and Model Ship Builder magazines. Our Emblem ® Nautical Research Guild ® and the NRG logo are Registered Trademarks, and belong to the Nautical Research Guild (United States Patent and Trademark Office: No. 6,999,236 & No. 6,999,237, registered March 14, 2023)- Existing user? Sign In
- Latest Posts
- All unread content since my last vist
- Unread topics I have posted in
- Create New...
 Fast Shipping or local PickUpPotter solutions, the one stop model yacht shop. Sails, rigs, boat stands, accessories and fittings, including the new range of DF65 and DF95 complete packages. Email Address the history of the futureAt the age of fifteen David Potter started sailing model boats at the world famous Birkenhead Model Yacht Club. In 2012 he decided to turn his passionate hobby into a business and launched Potter Solutions. As a qualified engineer, with a good eye for detail, he produces a range of equipment for the majority of radio controlled model yacht classes. David has competed in this thrilling sport for over Thirty years at both national and international events and is fully aware of the need for products that can deliver in the field at a competitive price. Whatever your requirements, including information and advice, David is always available for a chat. featured products Complete DF95 Package Complete DF65 Package DF95 Alloy Boat Stand Pierre Gonnet Mast 11.1mmEverything in one place. 30 Years of experience in radio sailing means we know what’s required to produce competitive and reliable parts . Order before 3pm for UK next day delivery *Most products can be shipped same day. Some products like sails * are made to order unless they are from our standard range. Products that can be dispatched same day will be indicated on the product description.  Secure Ordering onlineYou can place an order online. Once we receive the order we calculate the shipping cost and send you information on how to make payment. Your personal information is protected and encrypted by Secure Socket Layer (SSL) technology. Our website is ecommerce PCI Compliant . Customer ServiceExcellent customer service is one of the key areas where we can truly make a difference, which is why we work hard to keep our customers happy and make it easy to do business with us. A quick response matters and we aim to reply promptly and professionally. some of our reviewsA history of trust and service. “Fast shipping and exactly the parts I needed to complete my new IOM. Highly recommended” “Bought a boat stand for my Marblehead. Arrived in a couple of days and very happy with the quality.” “Bought some new sails for my DF95. Potter’s service is excellent. The sails are top quality.” JavaScript seems to be disabled in your browser. You must have JavaScript enabled in your browser to utilize the functionality of this website.  Simply Designed Better - Products - by Category /
- Miscellaneous /
Making Model Yacht Sails - Larry Robinson's method of building in shape- Shopping Cart
- Shipping Info
- Terms & Conditions
- Suppliers and Stock
- Meet the Staff
- Environment
Quick OverviewProduct code. BK-38 Availability: In stock  Larry Robinson - Making Model Yacht Sails - how to build in their shape, a master class in sail making for modern rc model yachts. Around 700 copies sold by mid 2015 and still going strong. If you want to know how to make well shaped rc model yacht sails, and make them efficiently and consistently, this contains all you need to know. The method used by the top sail makers for putting the 3D shape into the sails, as well as the luff shaping, is described in some detail. The design and construction of the all important moulds themselves is also dealt with at some length. Packed with other hints and tips and very well illustrated. A thorough master class in sail making for modern model yachts. "Even those sail makers who have advanced to higher levels of their craft will find thought provoking ideas. Anyone thinking of testing the waters should be greatly helped and inspired by what they find here. In short it’s a master class in high precision sail making for R/C yachts." - Products - by Class
- Hull Appendages
- Boat Building Materials
- Mast & Boom Spars
- Booms & Boom Kits
- Standing Rigging
- Running Rigging
- Mast Fittings
- Goosenecks/Vangs
- Swing Rig Fittings
- Boom Fittings
- Rigging Fittings
- Other Hull Fittings
- Hull Appendage Fittings
- RC Installation
- Vintage Style
- Sail Identification
- Sail Making Materials
- Rig Storage
- Transmitter Cover
- Sailing Aids
- Countersunk Head
- Socket Head
- Hexagon Head
- Self-Tapping
- Int. One Metre Class
- Int. Marblehead Class
- Int. Ten Rater Class
- Int. A Class
- Six Metre Class
- 36" Restricted Class
- Other Classes
- Products - Spotlight
You are using an outdated browser. Upgrade your browser today or install Google Chrome Frame to better experience this site.  Sail Making for Model Yachtsby Thomas Darling This article by Thomas Darling appeared in Yachting magazine for February of 1925, and was later reprinted in his book Miniature Racing Yachts. All the cloth materials described here are extinct; the best approximation today is “down cambric,” used for down pillows and comforters; look for “long staple” cotton of 150 threads per inch or more. The making of sails is an art whether they are to be used on large vessels or on a miniature. A great many novices have an idea that any piece of cloth cut to fit spars is a sail. We shall see, as we proceed, that this is not true, as several very important factors must be taken into consideration before an efficient, good looking product can be had. One of the most important things to consider is the material out of which we are to make the sails. There are several kinds of cloth which will serve, such as Union silk. Balloon cloth, Lonsdale cambric, and the linen obtained by washing out tracing cloth. The first named material is a mixture of silk and cotton and is used by the English model makers extensively. Balloon cloth is a good material provided 1t can be obtained as it comes from the loom, as it will then be nearly impervious to moisture. This condition is said to be due to the peculiar qualities of the raw material which it is woven and to the sizing used in its manufacture. It can be obtained at model supply stores. Lonsdale cambric can be bought at any department store; only the best grades should be used. When washing out the tracing cloth use warm water. This will leave just enough sizing to allow creases for tablings or hems to be rubbed easily. It can be washed again when hemmed if too stiff, or when tinting for color. Let us refer to Fig. 1 and get acquainted with the names of the edges and corners of the sails in a Marconi or jibheaded rig. The for- ward edge of the mainsail that fits the mast is the luff. The opposite or after edge is the leech. The edge which runs along the boom is the foot. The corners marked A , B and C are the clew, head and tack respectively. The parts of the jib or staysail are named in the same manner, the luff running along the headstay. Referring to Fig. 2, we note that the edge of the mainsail which runs between the peak, B , and the throat, C , is called the head; the other edges being named as in the jib-headed rig. The topsail has a leech, a to b , a luff, b to c , and a foot, c to a . The edges of sails must be so shaped that when set the canvas will not hang as a plane surface, but will be concave when filled by the wind. In other words, the cloth takes the shape of a parabolic curve from luff to leech. This is the shape of a bird’s wing. The shaded portions of the sails in Figs. 1 and 2 show where the greatest bag or draft should come in sails of this type. Broken lines in Fig. 1 show proper curve when looking from top of sail toward foot, the draft being near the luff and fading out into a flat leech. I advise making a template for each sail for a model yacht. This enables the maker to check himself when laying out another suit. If the first does not fit as desired, the template can be changed accordingly. Templates can be made of heavy wrapping paper or bristol board. As the jib-headed rig is the most popular, let us consider its layout first, taking our measurements from Fig. 1. These dimensions are for a 40 in (overall length) craft. Draw the chord of the leech arc 49 in long. The ends of this line will give the location of the head and clew. As some allowance must be made for stretching, allow 3/8 in on foot, and 1/2 in on luff. Draw chords or straight lines between the head, tack and clew. The curve that is to be laid out on each edge is called a roach, and these roaches are what give the sail the desired shape. It is assumed that the spars are straight. If the mast, boom, or club has a buckle, you must allow an extra curve for it. Measure up one-third way along luff, and lay off 3/32 in from straight line. Measure out one-third way along foot and lay off 1/16 in from chord. Divide leech chord into halves and measure out 2 in for roach. Sweep a fair curve from clew to head, giving slightly more curve at top half of leech. Now sweep luff curve in, and repeat the operation for the foot roach. Use a spline or batten for this purpose. Lay out batten pockets. These should be 1/4 in wide, and three times the distance of the roach from the leech chord. When laying out the template for the jib make the luff straight, allow the slightest roach along foot, and shape the leech as shown in Fig. 1, 3/16 in being allowed for stretch on foot. Spread the sail cloth on an even floor or table top so that the weave lies naturally without creases or wrinkles, securing so that it cannot shift. Place and secure template for mainsail, with leech chord parallel to the selvage, but far enough away to allow 3/8 in for hem or tabling. Ordinary straight steel pins are best for this job as they make a very small hole in the sail cloth. Outline the template, using a very sharp-pointed soft lead pencil. Mark the place for the batten pockets, at leech and the inboard end. Now measure out beyond template for the hem allowances, 1/2 in on luff and foot, and 3/8 in on the leech. Remove the template and cut to these marks, using a sharp pair of scissors. When turning the “tablings,” as the sailmaker terms the hems, it will be best to do it the way he would go about it. Turn the leech tabling over roughly, for its full length. Place the point of the scissors at the head mark using the right hand, and with the left bring the crease on the leech mark. Now hold this much of the tabling by spreading the thumb and index finger along sail as shown and rub tabling with scissors, creasing to the leech pencil line. The scissors are held in the right hand and the fingers spread as in Fig. 3. After you get started in this manner drive a pin in where the index finger would be and take a slight strain with the left hand, rubbing the crease with the scissors held in the right hand. This method will insure against distorting the natural shape of the edges, or stretching. Rub the tabling, singly, completely around the sail, and then place the raw edge in the crease which will give a double tabling when rubbed down. The tablings will now be 1/4 in wide on the luff, and foot, and 3/16″ on the leech. Tack the batten pockets in place. Do likewise with any reinforcing or corner pieces that may be thought necessary for more realistic appearance. The stitching down of the tablings is very important. Watch the tension of the thread, both top and bottom, so that drawing or puckering of the edges will not take place. Try it out first on a waste piece of sail cloth folded as is the tabling on the sail. Run a row of stitching around the edge of tabling, as shown at “ a ,” Fig. 4. Fold the corners at clew, tack and head so that no raw edges will show when sewing is finished. Starting 3″ above clew on edge of leech run another row of stitching around the sail as at “ b ” and “ c ,” Fig. 4; ending 2 in below head on leech. One row on leech is enough, as it must be free and smooth for a proper set. More stitching would tend to draw or harden it. Sew batten pockets and corner pieces carefully, leaving a proper amount of slack in pockets so that they will not pucker the leech. Proceed the same way when cutting Proceed the same way when cutting out the jib. Have the leech chord parallel to the selvage, allowing 1/4 in for tabling on the leech. Cut 1/2 in outside of template for tablings on the luff and foot. Rub them up as on the mainsail. The stitching should be laid out as in the mainsail, two rows on luff and foot and one on leech. Let the edge row run around head and clew for 2 in as on leech of main. Battens are not needed on this sail. If the instructions are followed carefully, a well setting sail with good draft and strong edges can be made. There are other methods of reinforcing edges. One is to bind the edges of the sail with a tape which has been creased double. This is done on larger sails. One must be careful when laying the sail edge in the tape that a proper relation between the tension of the sail itself and the tape is maintained. The tape should be shorter in length than the foot of the sail. In other words, slack sail is allowed. When the sail is stretched out along the spars this slackness will work out and the sail will be smooth. Another way, and one that makes for strength and snappy appearance, is to place a fishing line inside the tablings. Work the line out to the edge crease and run a row of stitching as close as possible to the line. Bleached or white materials can be tinted by dipping them into coffee or tea. They will then resemble Sea Island cotton. Should you tint your sails and they become partly wet when sailing, wet them all over before drying. This will insure against unsightly stains and uneven fading, and the sails will hold their shape longer. If you are planning to lay out a sail plan similar to the one shown in Fig. 2, proceed as described for the jibheaded rig. Be careful to lay out the proper lengths for the two diagonals, 1 and 2, as these dimensions control the angle at which the boom and gaff swing. Make the head of the mainsail straight unless the gaff buckles, in which case you must allow for this condition. The luff of the topsail can have the slightest roach, but this sail should set rather flat. There are several methods of bending or securing sails to spars. The most common is to fasten each corner and roll a lacing or thread about the boom and gaff, having hoops or rings on the mast. The principle of this arrangement is wrong, as the sail should not be in a fixed position on the spars. It should be allowed to come and go as occasion requires. Fig. 5 shows a simple device which will allow the sail to be stretched out gradually and it can be completely slacked up when the boat is housed. The very smallest crochet rings are sewed to sail edges, as at R. Very small screweyes or staples are driven into spars, as at S. A thin wire is passed through these, being secured at gooseneck, and made taut at masthead and outer end of boom. Staples can be made by bending pins or using galvanized wire. A hole is bored in the end of the boom and an outhaul rigged with a bowser on under side of boom. Figs. 6 and 7 show an arrangement that is neat and efficient. A small aluminum tube, with an inside bore large enough to allow the passage of a bead, is cut lengthwise and spread. (Refer to Fig. 7, view A and C .) This makes a passage for the thread with which the beads are sewed to the sail edges, as shown in view B. The tubes are screw-fastened to the mast, boom, and jib- club. As the gauge of the tubing can be very light the weight will be negligible. Figs 8 and 9 show the jib and masthead rigging, using this device. The halyards, marked H in both figures, can be run down to the deck if desired. Bend your sail, hauling it out toward the ends of your spars gradually. Do not try to make it go out to the limit at first, for if you do, a poorly set leech will result. Pull out, exerting a fair strain each time the boat is sailed, and eventually it will be completely stretched. When through sailing slack your outhauls and halyards.  Supplier of Hunter Mylar Polyester Sail FilmInspect our site for your sail making needs, hunter mylar, 36 - 50 - 75 micron in 400mm and 600mm wide bonus 1 meter with every 10 meters ordered .   Catsails are specialist manufacturers of sails and accessories for performance radio controlled model yachts. Proprietor Nigel Brown has been sailmaking since 1980 and has worked in some of the top sail lofts across the World including building sails for 4 America’s Cup programmes. Years of sailmaking experience at the highest level combined with the best materials, high standards of workmanship and attention to detail have resulted in truly top quality products that are well proven on racecourses around the world. All mainsails and jibs are shaped using carefully milled moulds which ensures accurate repetition and consistency of shapes from one sail to the next. Nigel has been building sails for the International One Metre since 2005 with sail shapes and construction techniques being continually refined ever since. IOM sails are well proven on the race circuits having won races and regattas in Spain, Italy and Malta as well as in the UK. In 2012 the range was extended to include sails for the popular Micro Magic class that instantly received great acclaim. When the DragonForce 65 was launched in 2013 and the DragonFlite 95 in 2016 Catsails soon became one of the leading suppliers of after market sails for these popular boats and they are now shipped all around the world and have powered boats to national titles in a number of different countries. Catsails additionally make high performance sails for the RG65 class to fit both swing and conventional rigs. Catsails also make custom accessories that are designed to protect boats, rigs and foils whilst the boats are out of the water.  Save on Sail Bags and Lines!Lazy Jack, Boom Covers, Lines, Turtle Bags, Spinnaker Socks, Halyards, Sheets, and More!  Summer SavingsUp to 30% off new sails with the fastest delivery in North America! 4-6 Weeks From Design to Delivery. Limited availability.  Trusted by YouTube’s Largest Sailing ChannelsSailing for a living requires sails that work. These inspirational sailors put hours on their sails in remote locations and put their trust in Precision Sails. Custom Designed SailsDesigned for your boat, your sailing area, and the type of sailing you do. Over 15,000 Sailboat Rig Specs on file.  Any Sail That You NeedMainsails, Headsails, Asymmetrical Spinnakers, Symmetrical Spinnakers, Gennakers, Code Zeros – we have it all!  The Largest Sailcloth Selection in the IndustryWith the widest selection of sailcloth available in the industry there is always a cloth suited for you. Let us help narrow down your options.  Perfect Fit Guaranteed, Every TimeEvery step in our process is focused on ensuring the highest quality and satisfaction for our sailors. Smooth sailing is guaranteed with our innovative approach to production and our exceptional warranty coverage. Mon-Fri: 8:00am to 4:00pm PST [email protected] – This opens in your default email application 1-888-958-5638 – This opens in your default telephone application Educating & Consulting to Ensure You Get What You NeedSails are the main propulsion force for sailboats. Unfortunately, most sailors don’t replace their sails often enough. This can lead to the assumption that purchasing new sails can be overwhelming and confusing. Precision Sails takes a new approach to the sailing industry by helping you choose what sails and sailcloth is best for you, your sailboat, the type of sailing you want to do, and the area in which you are sailing. We offer industry-leading transparency into what sailcloth is available worldwide and the importance of sail design to your sail’s performance and lifespan. Our website is filled with educational resources related to cloth, design, and technical sailing knowledge. Our team of sail consultants is always available to walk you through the options and help you choose the sail that is right for you.  Perfect Sails Start With a Perfect DesignIn order for a sail to fit and perform it needs to be designed properly. While other lofts are contracting sail designs to third-party design services, Precision Sails is building its in-house design team in Victoria BC, Canada, to work directly with sailors to ensure your new sail fits perfectly and performs the way that you want it to. Using the most modern 3D sail design software our design team will customize a sail that not only fits your rig as she sits in the water today but ensure that your sail fits and performs for years to come.  100% Fit and Performance GuaranteeBuying a new sail is a big investment. Precision Sails offers its 100% Guarantee so all our sailors have the confidence that Precision Sails has your back. Accidents are rare, but they can happen. If your sail does not fit or perform to your satisfaction your sail will be redesigned and rebuilt. As experts in our craft and with the confidence we have from supporting thousands of sailors worldwide, our team is proud to boast the widest covering sail warranty in the industry.  Leading the Industry in Sailcloth OptionsSailcloth manufacturers offer many different types of sailcloth in multiple different quality levels. There is always sailcloth available that will meet your sailing needs as well as your budget. Precision Sails offers all sailors full transparency into what sailcloth is offered and from which manufacture. Our team is here to help select which cloth is best suited for your sailing needs.  Our PartnersPrecision Sails is proud to partner with these amazing sailors documenting their adventures. These sailors inspire new sailors and weekend warriors alike to learn how to sail, sail more often, and sail further than ever before. If you are looking for some inspiration to cut the lines and sail away make sure to help us support these creators by watching their episodes. Learn More About Our Partners  Find your SailYour perfect sail is out there and Precision Sails is ready to make it for you. Request a quote for a sail and we’ll be in touch shortly.  Types of SailsPrecision Sail Loft specializes in producing headsails, mainsails, spinnakers, gennakers, and code zeros. So no matter the type of sail you’re looking for, we can help. Our sails are trusted by cruisers and racers alike from around the globe. Review the sail options and craftsmanship available to customize your dream sail. 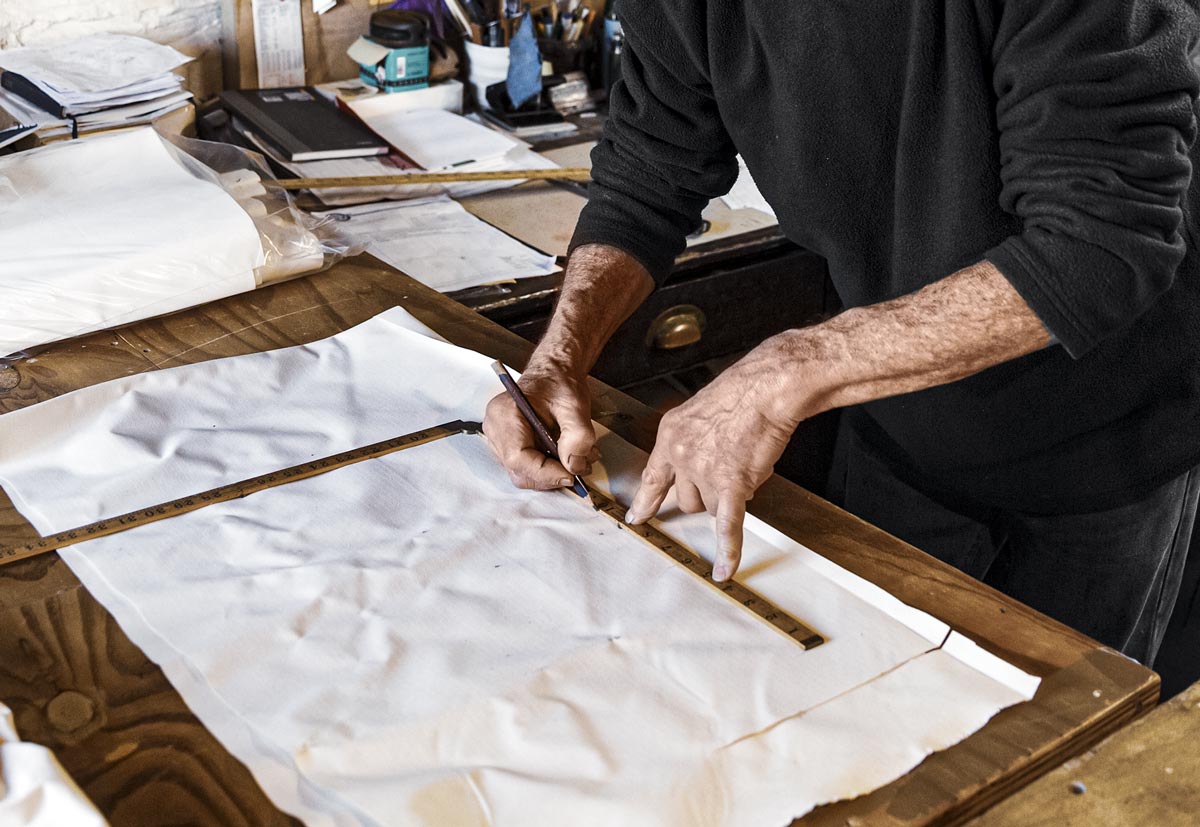 Build & ProcessEvery sail we craft is produced to the highest standards with the best hardware, craftsmanship, and skill-set in the industry. Pair that with Precision Sails’ approach to communication and your sailboat will be ready to set sail before you know it. What are Sailors Saying About Precision SailsPrecision Sails thrives on communication. At each step from design to delivery, we encourage you to collaborate one-on-one with our expert sail consultants in finding the perfect sail to suit your needs. Don’t just hear it from us. Check out some reviews posted on third-party review sites by our sailors! “ Thank you for getting the order for my mainsail and stack pack done in time for my summer trip to the San Juans! Really appreciate the effort to get this done. The mainsail fits perfectly, the stack pack works great, so I am an all-around happy customer and will be in touch whenever I need to replace my headsail and Genoa! Calling out Jeremy Roszmann, Trevor Parks, Marc Pettigrew, and Gary Boylan for great customer service. -Andy Koller “ The new sails look and work great! No issues with the install and went from being last place in the club races to 2nd place (and probably would have snagged first if I hadn’t gotten confused about the order of the marks in the race !) -Eric Van Hensbergen “ I have had two sails made by Precision Sails in the last 12 months. Both have exceeded my expectations. The fit to the boat and the performance of the sails are exceptional. The sail designer worked with me to make sure the resulting sail fit my objectives. Precision Sails has excellent documentation and videos to assure that your measurements are accurate. The sails are first rate and the price was very competitive. I am a very happy repeat customer. -Terry Noreault (Facebook) “ I am very happy with the new mainsail you made for my Corsair F24 MK1. I have just returned from a week-long trip with a group of sailors and the performance of my new Dacron main is much better than my old Mylar race sail. -Brent Nielsen “ I just received my asymmetrical spinnaker, with sock and turtle bag, along with a new 135 Genoa. The entire process was simple and both sales and the design team were in regular contact if there were any questions. The customer portal was easy to use and lets you keep track of where in the process your sails are. Great sails, great service -Graham Edwards (Facebook) “ Very responsive, excellent quality, very fair prices. When they were not happy with the graphic on the first sail Ron called to let me know and they sent me a second sail at no charge. Highly recommended! -Gerry Beltgens (facebook) “ We love the design, quality, construction, and performance of our new 95% furling jib from Precision Sails. The sail works well with our staysail and performs better than expected on all points of sail including poled out dead down wind. The new 95% jib does not get as overpowered as our old 135% Genoa and it is easier to tack with the staysail deployed. The design team made the process of getting accurate dimensions easy, took the time to understand our requirements, and was a pleasure to deal with. I will definitely do business with Precision again! -Charles Clark (Google) “ Quality throughout the whole process… starting with quotation, options and cloth alternatives. Quick delivery time and the product is very good quality. I am very pleased to carry my Precision sails on my boat. I recommend them 100%! -Marcos D. “ I just received the 2nd custom-made sail I’ve ordered through Precision Sails. The process for providing measurement information and custom images is very clearly laid out in the forms on their website, in addition to several instructional YouTube videos. The results turned out beautifully, just as I had pictured it for both sails! -Michael Shafer (Google) “ Just received my new mainsail from Precision Sail Loft and am over the moon about it. Darryl walked me through all my options and gave great advice. The measurement form is foolproof. They keep you updated with the status of your order every step of the way. I can recommend them highly enough. -Henry Gomez (Google) “ I was introduced to Precision Sails through Sailing Yacht Ruby Rose on You Tube. I decided to try the online experience myself. I provided the measurements and had good conversations with the sales team and with the sail designer. The new Genoa arrived in great condition and was a perfect fit! Couldn’t be happier!! -Brad Hamrlik (Google) Sailor ResourcesThe Precision Sails’ team has a wealth of knowledge on all things sailing. Tap into our range of useful resources and browse all topics ranging from the best cloth types to sail maintenance tips. Check out our Ask Precision Sails series where we answer questions provided by sailors like you!  How to Measure for a New MainsailIf you can read a tape measure you can measure your boat for a new Mainsail. Purchasing a new Mainsail for your sailboat is one of those investments that every sailor will be faced with eventually. Sails don’t last for ever, even if you treat them like gold. Once you have decided to invest in new sails you may get that feeling of being over whelmed by the choices and the details involved. When deciding on a loft to work with make sure you choose a loft that will offer a good consultation on the cloth and sail feature choices as well as a design consultation if you want one.  Jibs vs. GenoasGet to know the difference! Jibs and Genoas are triangular sails which are affixed to a stay in front of the mast. Typically they run from the head of the foremast to the bowsprit. Jibs and genoa’s are used in tandem with a mainsail to stabilize the vessel and are usually measured by their Luff Perpendicular percentage, that is, how much area within the fore-triangle they use. 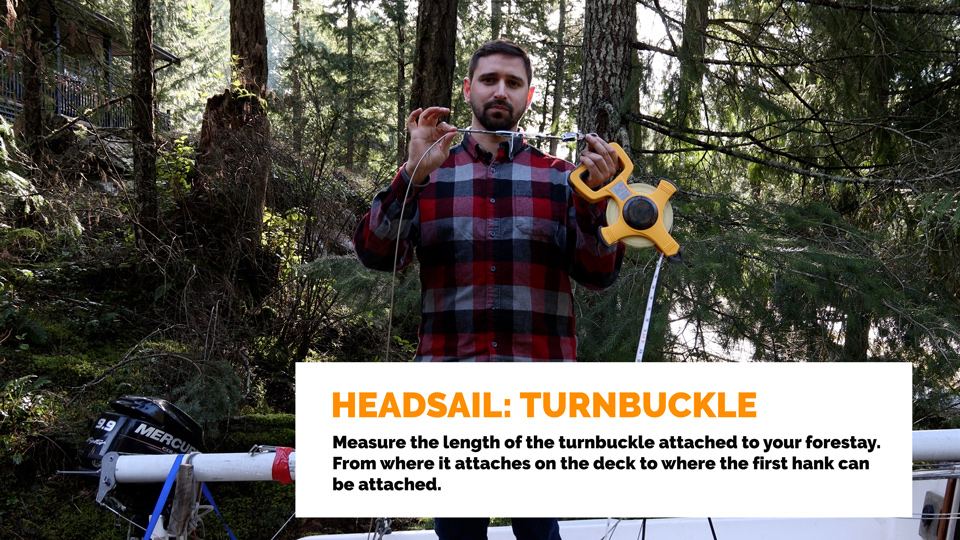 Taking Headsail Measurements with the Mast DownMeasuring your Headsail with your mast down is still possible. Step by Step How To Instructions and Videos on how to collect your boats measurements for a your new headsail. Watch Jeremy Roszmann, sail designer, walk us through how to collecte great measurements to build a headsail with. 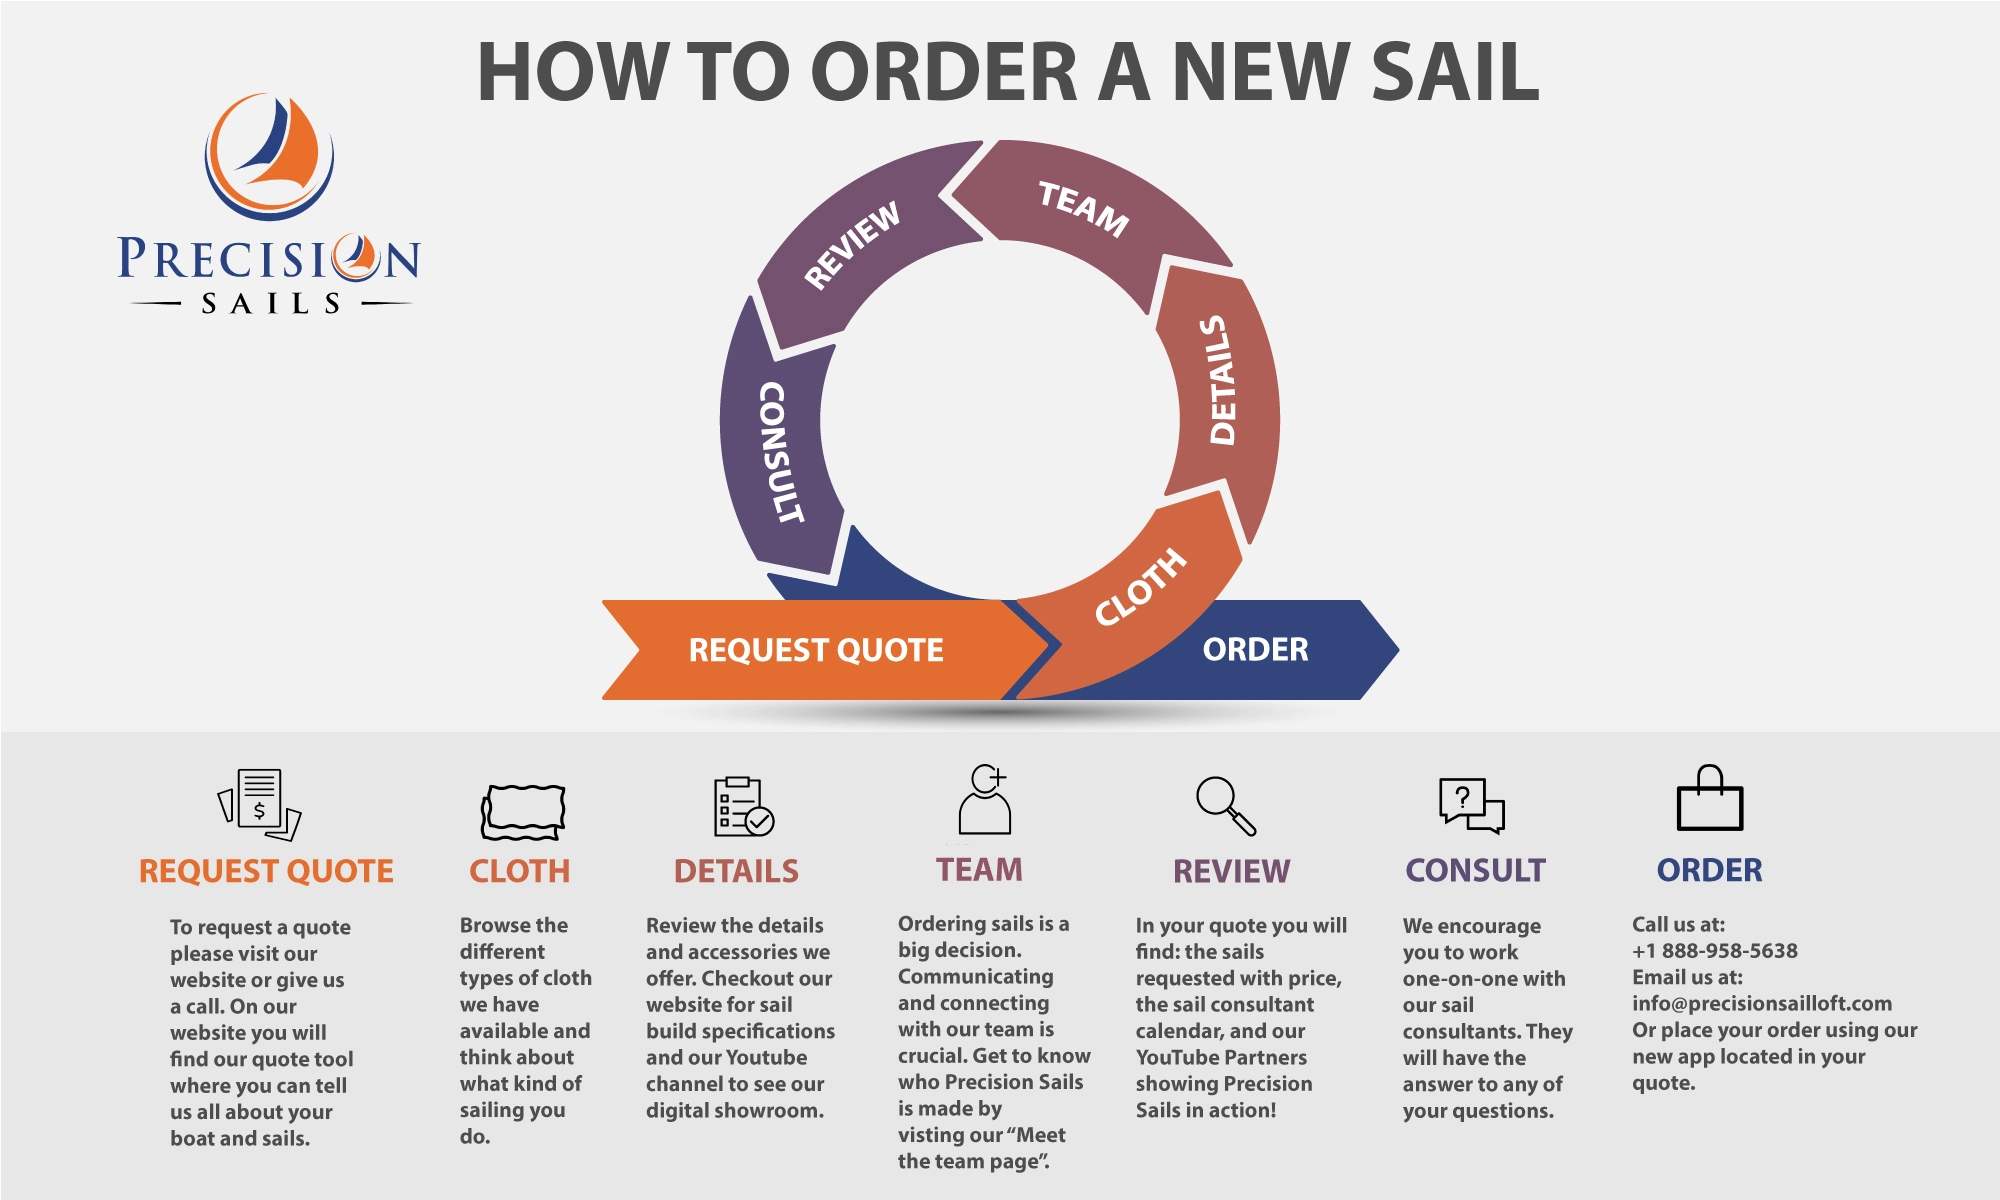 How To Measure for a New SpinnakerLearn how to measure your boat and rig for a new spinnaker with our simple form. Measuring your rig for a new spinnaker is easy. We need to know the location of your halyard, what your maximum hoist is, where the location you sheet to is located and what style. We also need to know if you have a bowsprit, plan to use a spinnaker sock, or other kind of furling system. Last but not least, you get to pick your colors!  Mainsails: Loose Foot VS Fixed FootIf you currently have a fixed footed mainsail read about the new modern design of a loose footed mainsail. Sail design has come a long way in the past several decades. A loose footed mainsail is becoming the norm for most sailors. It allows for creating a better shaped sail. This increasings sail performance, efficency, and power. Having a loose-footed sail means having a much more versatile sail as far as trimming is concerned. " * " indicates required fields Thanks for telling us a bit about yourself and your boat. Our team will send you a preliminary quote based on information we have gathered from sailors similar to you. We will give you a call in order to narrow down the options on your quote and improve the accuracy. If you want us to call you at a specific time, feel free to schedule a time on our calendar! Thanks for telling us a bit about yourself and your boat. Our team will reach out to offer some suggestions and get started on finding you the perfect sail! | 


IMAGES
COMMENTS
The more experienced the sail maker gets the better the sails work. This guide is intended to help newbies to cut heir own sails and build their own rigs. Sailmaking Tips: A piece of thin melamine board about 50x200cm is very helpful to loft the outline of the sails. Use packing paper to sketch the outlines according the class rules or a ...
The book 'Making Model Yacht Sails' by Larry Robinson is recommended reading for anyone wanting to learn how to make competitive rc yacht sails - it describes the mould method of shaping sails used by the top sailmakers and is a contemporary masterclass in its own right. It is stocked by SAILSetc,
Larry Robinson - Making Model Yacht Sails - how to build in their shape, a master class in sail making for modern rc model yachts. Around 700 copies sold by mid 2015 and still going strong. If you want to know how to make well shaped rc model yacht sails, and make them efficiently and consistently, this contains all you need to know. ...
Make sure to read the whole description. There's some useful stuff further down!Here's my method for creating sails for ship models using silkspan. Parts 1...
Install and rig the booms and gaffs. Make the sails based on the actual layout of my ship. De-rig the booms and gaffs, and remove them from the ship. Attach sails to the booms and gaffs as appropriate. Re-install the booms and gaffs, and their rigging. Add the additional rigging for each sail.
SAIL MAKING FOR MODEL YACHTS by Ben Morris (last edited 28/05/2024) Shape in Sails: Building Board: Making Seams: Set the Seam Curvature: Making a Sail: Sail Material: Diagonal Seams etc: Back to Intro page: Setting the Sails: The Claudio Tool: Measuring Procedures:
In this issue, I show my technology of making sails for scale sailboat models:I like three-dimensional (wind-filled) sails...With wrinkles in the corners of ...
Sail Making Articles. We have several articles related to sails and sailmaking. The first is a short discussion of theory: The Design of Model Yacht Sails by A.M.Ballantyne. We then move on to the most complete set of instructions on how to sew a set of sails from cotton: "Sails" by Walter K. Moss from The Modelmaker, 1940. The next article discusses the one thing that is possible on a ...
Making Model Yacht Sails - Part 1 is a series of articles that cover the aspects of sailmaking that govern the shape of your sail. The subject of load bearing fibers is discussed in Making Model Yacht Sails - Part 2, which tells you how to make 'string sails'; sails that are reinforced with small threads in a load path distribution. ...
The AMYA was established in 1970 as a not-for-profit organization dedicated to promoting racing, designing, building, and preservation of all model sailing yachts, and membership is open to all who are interested in these activities. Our quarterly magazine is the only publication devoted 100% to model yachting. It is a great benefit of AMYA ...
Camber Distribution. Controlling Camber when making model yacht sails. Shaping sail blocks precisely. Sail making choices. Boradseaming revisited. Cutting the luff. Taking and analyzing sail photographs. Comparing camber distribution. Phone Bob Wells evenings or weekends at 206-232-9036, Mercer Island, WA, USA.
"Making Model Yacht Sails" There's a 41 page book by Larry Robinson, Ragged Symmetry Publications. Robinson was the technical advisor to Bob Wells, who wrote the EC12 publications, which are now sold through the AMYA store.
Work step by step. 1.Make paper stencil for each sail and check it's dimensions on your model. 2.With soft pencil transfer all lines in to fabric - add stripe 5-7 mm around. sail edges. 3.Make all necessary lines on fabric using sewing machine and thin thread with light brown or beige color.
When e-mailing Carr Sails, put "Model Yacht Sails" in your subject line to avoid getting caught in our spam filters. CARR SAILS, 3011 - 177th Ave. NE, Redmond, WA 98052 (425) 881-2846 rodcarr @ carrsails.com. HOME CATALOG & PRICE LIST SAIL LOCKER HOW TO ORDER GALLERY FAQ ...
the history of the future. At the age of fifteen David Potter started sailing model boats at the world famous Birkenhead Model Yacht Club. In 2012 he decided to turn his passionate hobby into a business and launched Potter Solutions. As a qualified engineer, with a good eye for detail, he produces a range of equipment for the majority of radio ...
Larry Robinson - Making Model Yacht Sails - how to build in their shape, a master class in sail making for modern rc model yachts. Around 700 copies sold by mid 2015 and still going strong. If you want to know how to make well shaped rc model yacht sails, and make them efficiently and consistently, this contains all you need to know. ...
2023 CATALOG AND PRICE LIST. 1) Select color for corner reinforcements: (red, yellow, blue, green, day-glo orange, day-glo pink, black or white.) 2) Select mainsail to mast attachment: Mast loops, jackwire, bolt-rope. 4) If Class Insignia and racing numbers required, select color: (red, blue, green or black), (add $15.)
A method of making Soft sails for a Footy Model yacht using 3mm carbon tube & plastic bags
Measure up one-third way along luff, and lay off 3/32 in from straight line. Measure out one-third way along foot and lay off 1/16 in from chord. Divide leech chord into halves and measure out 2 in for roach. Sweep a fair curve from clew to head, giving slightly more curve at top half of leech.
Hobby Model Yacht Sails And Supplies. Sail Making RC Mylar Sails. Sail Makers Block Wing. Mylar Film Insignia Tape Kikusui Tapes Eyelets. Supplier of Hunter Mylar Polyester Sail Film. Inspect our site for your sail making needs. Hunter Mylar. 36 - 50 - 75 Micron in 400mm and 600mm wide ...
Catsails are specialist manufacturers of sails and accessories for performance radio controlled model yachts. Proprietor Nigel Brown has been sailmaking since 1980 and has worked in some of the top sail lofts across the World including building sails for 4 America's Cup programmes. Years of sailmaking experience at the highest level combined ...
We make it easy to get new sails custom designed for your sailboat or sailing yacht, at the best prices online. Replacement sails for Catalina, Hunter, Beneteau, Pearson, C&C, and 15,000 more! Get a free quote within 24 hours or less. Headsails, Mainsails, Spinnakers, and Turtle Bags too!
Batten Material - Medium. $8.38. Sail Reinforcement and Deck Patch Material 685 mm x 375 mm "White". $7.75. Sail Reinforcement and Deck Patch Material 685 mm x 375 mm "Red". $7.75. Sail Reinforcement and Deck Patch Material 685 mm x 375 mm "Blue". $7.75. Sail Reinforcement and Deck Patch Material 685 mm x 375 mm "Black".